How do you use perspective guides in Procreate?
Short answer
Perspective guides in Procreate are digital overlays that help artists maintain accurate spatial relationships in their drawings. By enabling these guides in the Actions menu, you can snap your brush strokes to vanishing points. This tool simplifies complex architectural drawing and environmental design by automating the alignment of lines along defined axes.
On this page
How to enable perspective guides in Procreate
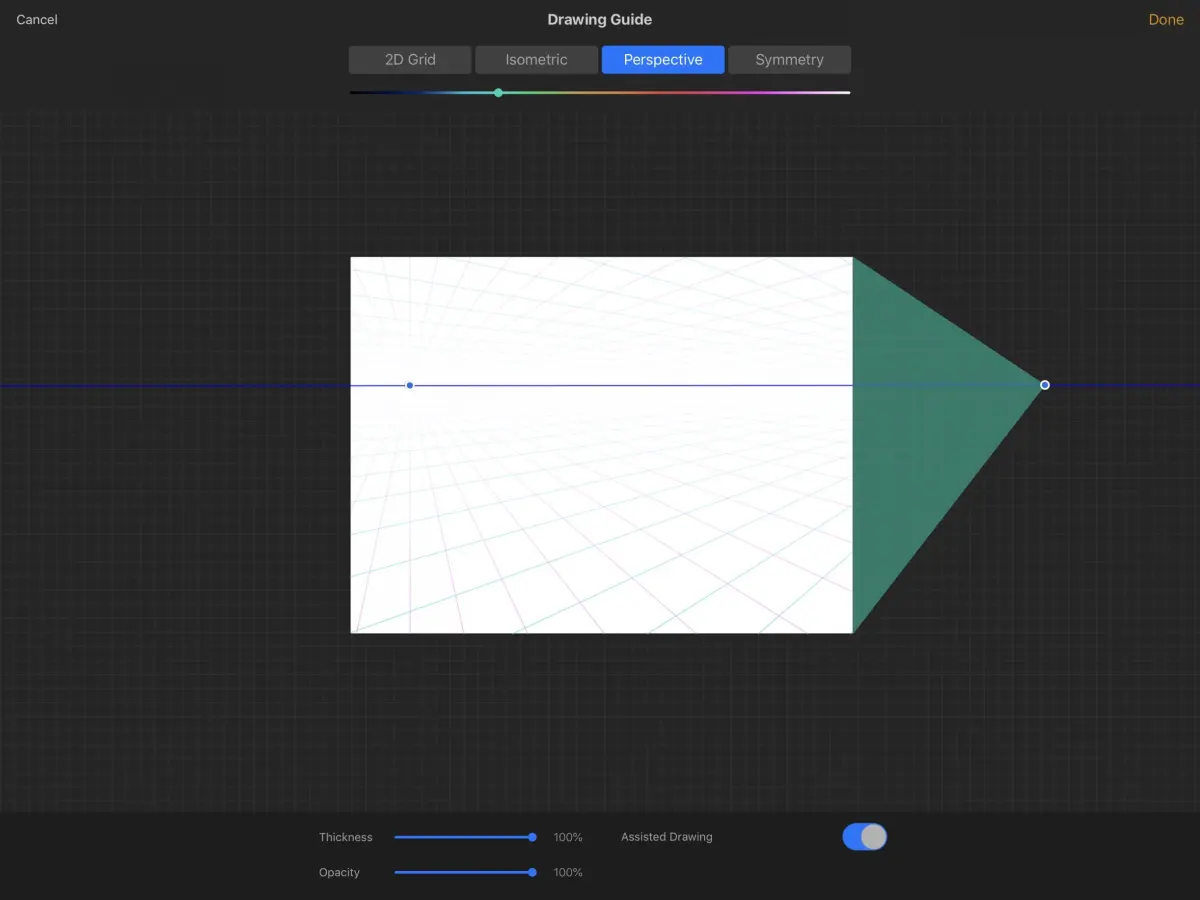
To begin using perspective guides, open your canvas and tap the wrench icon in the top-left corner to access the Actions menu. Select the Canvas tab and toggle the switch for Drawing Guide. Once the guide is active, tap the Edit Drawing Guide button located directly beneath the toggle to enter the configuration interface.
At the bottom of the screen, you will see four icons representing different grid types: 2D Grid, Isometric, Perspective, and Symmetry. Select the Perspective icon to activate the tool. You can then tap anywhere on your canvas to place a vanishing point. Procreate allows you to add up to four distinct vanishing points on a single canvas, which you can move by dragging the blue dots to align with your composition’s horizon line.
How to use drawing assist for precision
Once your vanishing points are set, you must enable Drawing Assist to force your strokes to snap to the guides. You can activate this feature by tapping the layer thumbnail in your Layers panel and selecting Drawing Assist from the pop-up menu. When this is active, any brush stroke you make will automatically align with the nearest perspective axis.
If you find that the snapping is too restrictive for organic shapes, you can easily toggle the feature off by tapping the layer thumbnail again. It is helpful to keep your perspective guides on a separate layer or use the guide overlay as a reference while drawing on a different layer. This workflow ensures that your structural lines remain perfect while your decorative details remain fluid and expressive.
Best perspective techniques for beginners
Beginners should start with a one-point perspective setup to understand how lines converge toward a single center. As you gain confidence, move to two-point perspective, which is the industry standard for drawing buildings and interior spaces. To master these layouts, follow these steps:
- Create a new canvas and enable the Perspective guide.
- Place a single vanishing point in the center of your horizon line.
- Enable Drawing Assist on your active layer.
- Draw a series of rectangles and lines to see how they snap to the central point.
- Experiment with moving the vanishing point off-canvas to change the viewer's distance from the subject.
Practicing with these basic shapes helps you internalize how depth is represented on a flat digital surface. By keeping the grid settings simple initially, you avoid the visual clutter that often overwhelms new users when working with multiple complex vanishing points.
Why perspective lines disappear or fail
A common issue users face is the disappearance of the grid lines. This usually occurs because the opacity slider in the Edit Drawing Guide menu is set too low, or the color of the guide matches the background color of your canvas. Always ensure the opacity and thickness sliders are adjusted to a visible level before you begin your work.
Another reason for failure is the failure to enable Drawing Assist on the specific layer you are currently using. If you draw on a layer where the assist is not turned on, your lines will not snap to the perspective guides. Always check the layer name in the Layers panel; if Drawing Assist is active, the word "Assisted" will appear directly under the layer name. If you do not see this label, your strokes will behave like standard freehand marks regardless of the visible grid.
Common mistakes when using perspective guides
One frequent error is placing vanishing points too close together, which causes extreme distortion that makes objects look unnatural or "stretched." To prevent this, place your vanishing points far apart, even outside the borders of your canvas. Another mistake is ignoring the horizon line, which should always be placed at the viewer's eye level to maintain consistency across the entire scene.
Avoid these pitfalls by following these best practices:
- Do not rely solely on the grid; use it as a foundation and sketch over it to add character.
- Avoid using too many vanishing points in one scene, as this makes the perspective difficult to manage.
- Remember to lock your guide settings once you are satisfied with the placement to prevent accidental movement.
- Use different colors for your guide lines if you are working with multiple vanishing points to keep your workflow organized.
By maintaining a clean and logical setup, you ensure that your perspective remains accurate throughout the entire duration of your creative process.
Key facts
- Procreate’s Drawing Guide tool allows you to toggle between 2D Grid, Isometric, Perspective, and Symmetry modes.
- The Perspective guide creates a vanishing point on the canvas that automatically snaps your brush strokes to a specific depth.
- You can add up to three vanishing points on a single canvas to create complex architectural or atmospheric scenes.
- Tapping the "Edit Drawing Guide" button lets you reposition vanishing points and change the guide color or opacity.
- Activating "Drawing Assist" on a specific layer ensures that every stroke made on that layer adheres strictly to the active perspective guide.
- You can toggle the guide visibility on and off at any time without affecting the actual artwork drawn on your layers.
The bottom line
Perspective guides in Procreate are essential tools for maintaining structural accuracy in digital illustrations. By utilizing the Drawing Assist feature, artists can ensure their lines converge perfectly toward vanishing points, facilitating realistic depth and scale. Mastering the placement of these points and toggling layer assistance allows for efficient, professional-grade composition. Practice adjusting guide opacity to keep your canvas clear while building complex, three-dimensional environments with ease.
People also ask
Can I use multiple perspective guides in one Procreate project?
You can only have one type of drawing guide active per canvas at a time. However, you can switch between different guide types as you work by editing the settings in the Canvas menu.
Why are my lines not snapping to the perspective guide?
Ensure that "Drawing Assist" is enabled for the specific layer you are using. You can verify this by checking if the layer thumbnail says "Assisted" underneath its name.
How do I change the color of the perspective lines?
When you are in the "Edit Drawing Guide" screen, look at the color bar at the top of the interface. You can drag the slider to select any hue to make the guide lines more visible against your artwork.
Is it possible to move a vanishing point once it is set?
Yes, simply tap the "Edit Drawing Guide" option in the Actions menu. You can then drag the vanishing point nodes to any new location on or off the canvas.
Does the perspective guide work with all brush types?
The guide works with almost every brush in Procreate, including pencils, ink pens, and airbrushes. It will force the stroke to align with the vanishing point regardless of the brush shape or texture.
Can I save custom perspective guide settings?
Procreate does not currently support saving multiple custom guide presets for a single canvas. You must manually adjust the vanishing point positions whenever you need to change your perspective setup.
This answer was created with the help of AI research tools and reference sources. Spotted an error? Let us know — we correct mistakes quickly. See our editorial policy.