How do you use clipping masks in Procreate?
Short answer
A clipping mask in Procreate allows you to apply textures, colors, or effects to a specific layer without altering the underlying shape. By nesting a layer above another, the top layer’s visibility is restricted to the boundaries of the bottom layer, enabling non-destructive editing and precise control over complex digital illustrations.
![How to Use a Clipping Mask in Procreate: What Does It Do and How Does It Work? [VIDEO]](/img/b3/how-do-you-use-clipping-masks-in-procreate-1.webp)
On this page
How to create a clipping mask in Procreate
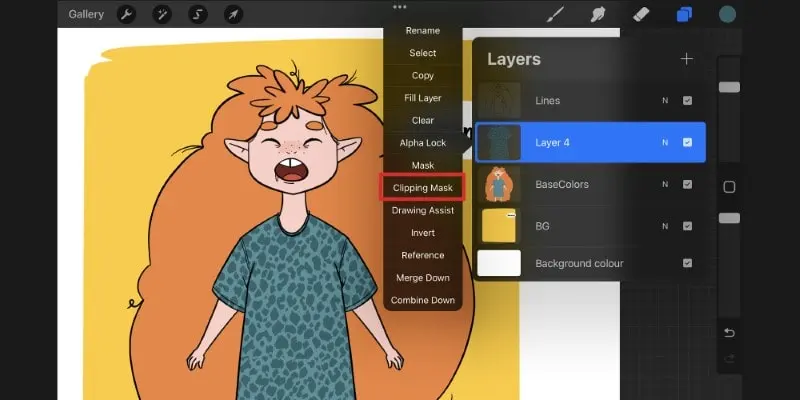
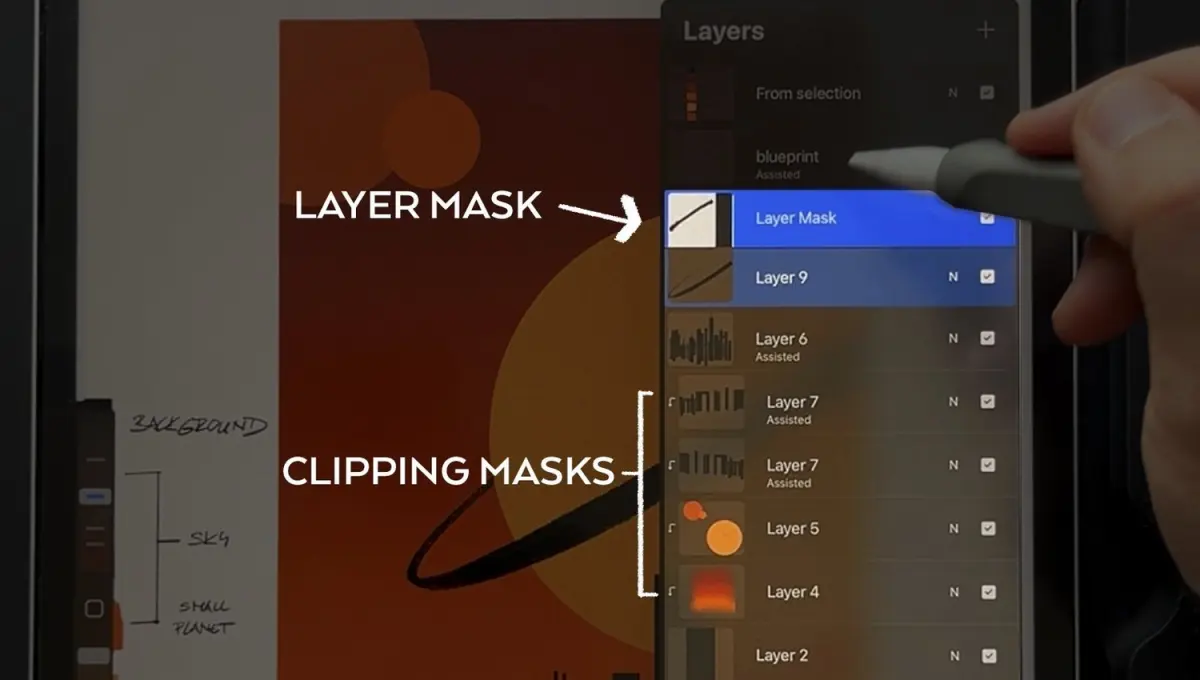
Creating a clipping mask is a fundamental skill for digital artists working in Procreate. To begin, ensure you have at least two layers in your Layers panel. The bottom layer acts as the "mask" or the container, while the top layer contains the content you wish to restrict. Select the top layer by tapping on it once, then tap it again to open the Layer Options menu. From this list, select "Clipping Mask." You will notice a small downward-pointing arrow appear next to the layer thumbnail, indicating that it is now clipped to the layer directly beneath it.
Alternatively, you can use a gesture-based shortcut to speed up your workflow. Simply tap the layer you want to clip and drag it slightly to the right, or use the "Select" tool to highlight multiple layers and group them before clipping. Once active, any brush strokes or adjustments made on the clipped layer will only appear within the opaque pixels of the base layer. This allows you to experiment with colors or shading without worrying about painting outside your desired boundaries.
Why use clipping masks for digital art
Clipping masks are essential for maintaining a clean, non-destructive workflow. Because the clipped content exists on a separate layer, you can modify, erase, or change the opacity of your additions without affecting the base shape. This is particularly useful when adding highlights, shadows, or textures to a character or object. If you decide the shading is too dark, you can simply adjust the blend mode or the opacity slider on the clipped layer, leaving the original line art or base color completely untouched.
Beyond simple shading, clipping masks allow for complex layering techniques that would otherwise be impossible. You can stack multiple clipping masks on top of one another, all constrained to the same base layer. This enables you to separate different elements of your work, such as texture, highlights, and color variations, into distinct layers while keeping them perfectly aligned with the underlying form. This modular approach provides maximum flexibility during the refinement stage of your creative process.
How to manage multiple clipping masks
Managing complex projects often requires using several layers clipped to a single base. Procreate allows you to stack as many layers as you need, provided they are placed directly above the base layer. Each clipped layer will inherit the transparency of the layer below it, creating a hierarchy that keeps your workspace organized. If you move a clipped layer away from the stack or delete the base layer, the clipping mask effect will automatically deactivate, though the content on the layer remains intact.
To organize your layers effectively, consider these steps:
- Create your base shape on the bottom layer.
- Add a new layer above it and enable the Clipping Mask option.
- Add subsequent layers above the first clipped layer to build up details.
- Use layer groups to keep your clipping stacks tidy if your project involves dozens of individual parts.
By keeping your layers labeled and grouped, you can navigate complex illustrations without losing track of which effects are applied to which specific elements.
Common mistakes when using clipping masks
One of the most frequent errors beginners make is placing the clipping mask layer below the base layer. If your layer is at the bottom of the stack, it has no shape to reference, so the clipping mask function will appear to do nothing. Always ensure the layer you want to clip is positioned directly above the layer that defines the boundaries. Another common issue is accidentally clipping a layer to an empty layer. If your base layer is transparent, the clipped layer will also appear invisible because it is restricted to the empty space of the layer below.
Watch out for these common pitfalls:
- Forgetting to check the layer order, which prevents the mask from functioning.
- Clipping a layer to a layer that contains only a few pixels, causing your work to disappear.
- Confusing clipping masks with Alpha Lock, which functions similarly but permanently affects the pixels on the same layer.
- Neglecting to rename layers, which makes it difficult to identify which mask belongs to which object in large files.
If your mask is not working, verify that the small arrow is visible on the layer thumbnail.
Best practices for professional results
To achieve professional-grade results, combine clipping masks with blending modes. For instance, set a clipped layer to "Multiply" to create soft shadows or "Add" or "Screen" to create glowing highlights. This combination allows you to adjust the lighting of your scene dynamically. Furthermore, use clipping masks in conjunction with adjustment layers. By applying a Hue/Saturation or Curves adjustment as a clipping mask, you can change the color of a specific object without altering the rest of your image. This level of control is what separates amateur digital paintings from polished, professional illustrations.
Finally, always remember that clipping masks are temporary. You can toggle them on and off by tapping the Clipping Mask option in the layer menu. If you are satisfied with your work and need to save memory, you can merge your clipped layers into the base layer, though this is a permanent change. Practice these techniques regularly to build muscle memory, as mastering the layer stack is the most effective way to improve your efficiency and creative output in Procreate.
Key facts
- A clipping mask forces the contents of one layer to stay within the boundaries of the layer directly beneath it.
- To create one, tap your chosen layer in the Layers panel and select "Clipping Mask" from the menu.
- The base layer remains unchanged, while the clipped layer acts as a non-destructive overlay.
- You can stack multiple clipping masks on top of each other to build complex textures or shading.
- If you move or erase the base layer, the clipped content will automatically adjust to the new shape.
- Clipping masks are ideal for adding highlights, shadows, or patterns without affecting the original line art.
The bottom line
Clipping masks are essential tools for non-destructive editing in Procreate. By tethering your work to a base shape, you can experiment with colors, textures, and lighting effects without risking your original artwork. Mastering this feature allows for a more efficient workflow, enabling you to make precise adjustments while keeping your layers organized. It is the gold standard for professional digital illustration and clean, layered compositions.
People also ask
Can I use a clipping mask on a layer group?
Yes, you can apply a clipping mask to an entire group in Procreate. This allows you to restrict multiple layers of artwork to the shape of a single mask layer simultaneously.
Why is the "Clipping Mask" option greyed out?
This happens if you try to apply a clipping mask to the very bottom layer of your canvas. A clipping mask must always have a parent layer beneath it to function.
How do I remove a clipping mask?
Simply tap the clipped layer in the Layers menu and uncheck the "Clipping Mask" option. The layer will revert to a standard layer, showing all content previously hidden by the mask.
Does a clipping mask affect the file size?
Clipping masks add to the total layer count, which can increase the file size and impact the maximum number of layers allowed on your specific iPad model. Monitor your layer limit if you are working on a large, complex canvas.
Can I use blending modes with clipping masks?
Absolutely, blending modes work perfectly with clipping masks. They are frequently used together to create professional lighting effects like "Multiply" for shadows or "Add" for glowing highlights.
What is the difference between a clipping mask and an alpha lock?
Alpha lock restricts painting to the existing pixels on a single layer, making it permanent. Clipping masks keep the paint on a separate layer, allowing for more flexibility and easier edits later.
This answer was created with the help of AI research tools and reference sources. Spotted an error? Let us know — we correct mistakes quickly. See our editorial policy.