How do you use the symmetry tool in Procreate?
Short answer
The Symmetry tool in Procreate is accessed through the Canvas menu under the Drawing Guide settings. By enabling Assisted Drawing, you can create perfectly mirrored illustrations across vertical, horizontal, quadrant, or radial axes. This feature automates complex patterns and character designs, ensuring precision while you draw on a single side.
On this page
How to activate the symmetry tool in Procreate
To begin using symmetry, open your canvas and tap the Actions icon, represented by a wrench symbol in the top-left corner. Select the Canvas tab and toggle the Drawing Guide switch to the "On" position. Once enabled, tap "Edit Drawing Guide" to reveal the configuration panel at the bottom of the screen.
Within this interface, you will see several options, including 2D Grid, Isometric, Perspective, and Symmetry. Select the Symmetry option to activate the default vertical mirroring line. You can adjust the guide’s color using the spectrum bar at the top or change its opacity and thickness using the sliders. Once you are satisfied with the guide's appearance, tap "Done" in the top-right corner to return to your canvas.
How to customize symmetry guide settings
Procreate offers four distinct symmetry modes to suit different artistic needs. After selecting "Edit Drawing Guide," look for the "Options" button located in the bottom-right corner of the screen. This menu allows you to toggle between vertical, horizontal, quadrant, and radial symmetry.
- Vertical: Mirrors your strokes across a central upright axis.
- Horizontal: Reflects your work across a horizontal line.
- Quadrant: Divides the canvas into four sections, mirroring strokes across both axes.
- Radial: Creates a circular, snowflake-like pattern that repeats around a central point.
Additionally, you can toggle "Rotational Symmetry." When enabled, this feature flips your strokes rather than just mirroring them, which is essential for creating complex, balanced designs. You can also drag the blue node on the guide to reposition the axis anywhere on your canvas, providing complete control over your composition's focal point.
Why drawing assist is necessary for symmetry
Simply enabling the guide is not enough to make your strokes mirror automatically. You must ensure that "Drawing Assist" is active on the specific layer you are currently working on. When Drawing Assist is enabled, the word "Assisted" will appear beneath the layer name in your Layers panel.
If you find that your strokes are not mirroring, check the following steps to troubleshoot your settings:
- Open the Layers panel and tap the thumbnail of your active layer.
- Ensure the "Drawing Assist" option is checked in the pop-up menu.
- Verify that you are drawing on a layer that supports the assist; sometimes, locked or hidden layers can cause confusion during the process.
When Drawing Assist is turned on, every mark you make will be instantly replicated according to your chosen symmetry settings. This allows you to focus on the details of one side while the software handles the structural balance.
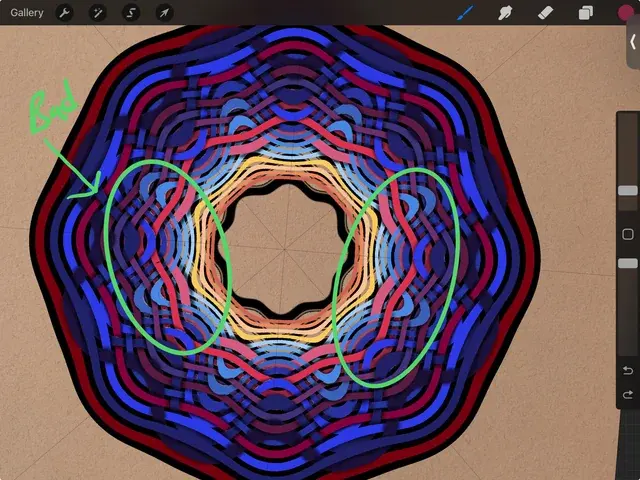
Common mistakes when using symmetry tools
Many beginners struggle because they attempt to draw on a layer that does not have Drawing Assist enabled. It is a common error to assume that the guide automatically applies to every layer in the stack. You must manually toggle the assist for each layer you want to be symmetrical, which is actually a benefit, as it allows you to keep non-symmetrical elements on separate, unassisted layers.
Another frequent mistake involves moving the symmetry guide after you have already started drawing. If you shift the axis line mid-process, your existing strokes will not move with the guide, leading to a disjointed composition. Always finalize your guide placement before you begin your primary line work. If you need to transform your drawing later, use the Selection or Transform tools to move your art and the guide simultaneously to maintain alignment.
Best practices for complex symmetrical designs
For intricate illustrations, such as mandalas or architectural sketches, start by utilizing the Radial symmetry setting. This mode is the most efficient way to generate complex, repeating patterns without having to duplicate and rotate individual elements manually. To keep your file organized, maintain a clean layer structure where your symmetry guide is on a dedicated layer or kept as a global guide for the entire document.
If you are creating a character, use the Vertical symmetry mode to ensure facial features remain perfectly aligned. You can always turn off Drawing Assist temporarily if you need to add asymmetrical details, such as a stray lock of hair or a unique accessory. By mastering the balance between assisted and manual strokes, you can produce professional-grade digital art that maintains structural integrity while retaining a natural, hand-drawn quality. Remember to save your work frequently, as complex radial patterns can occasionally demand more processing power from your device.
Key facts
- The Symmetry tool is located within the Actions menu under the Canvas tab.
- You can choose from four symmetry types: Vertical, Horizontal, Quadrant, and Radial.
- Enabling "Rotational Symmetry" allows your strokes to mirror across the center point in a circular fashion.
- Drawing Assist must be toggled on for the layer you intend to draw on for the effect to activate.
- You can adjust the symmetry guide's position and angle by tapping "Edit Drawing Guide" after activation.
- Symmetry works best with the Brush tool, though it also functions with the Smudge and Erase tools.
The bottom line
The Procreate Symmetry tool is a powerful feature that streamlines the creation of balanced, complex designs by automatically mirroring your brushstrokes. By accessing the Canvas menu and enabling Drawing Assist, you can experiment with various geometric layouts. Mastering the placement of the guide nodes allows for precise control, making this tool essential for artists creating intricate patterns, character designs, or perfectly symmetrical logos and illustrations.
People also ask
Can I use symmetry on multiple layers at once?
Drawing Assist is applied on a per-layer basis. You must enable it for each individual layer you wish to use with the symmetry guide.
Why are my strokes not mirroring?
Ensure that "Drawing Assist" is turned on for your active layer. You can verify this by checking the layer thumbnail, which should display the word "Assisted."
How do I move the symmetry line?
Tap "Edit Drawing Guide" in the Canvas menu. You can then drag the blue nodes to reposition the line or the green node to rotate it.
Does the symmetry tool work with imported images?
Yes, but it only applies to new strokes you make on an assisted layer. It does not automatically mirror existing image data already placed on the canvas.
Can I change the color of the symmetry guide lines?
Yes, the color bar at the top of the Edit Drawing Guide screen allows you to customize the guide's appearance for better visibility against your artwork.
Is there a way to turn off symmetry quickly?
You can toggle Drawing Assist off by tapping the layer thumbnail and selecting the option from the menu, or by disabling it in the Canvas settings.
This answer was created with the help of AI research tools and reference sources. Spotted an error? Let us know — we correct mistakes quickly. See our editorial policy.