How do you draw a face in profile?
Short answer
Drawing a profile requires mapping the skull as a series of geometric shapes rather than individual features. By establishing the brow, nose, and chin alignment, you create a structural foundation. Focus on the relationship between the ear and the jawline to ensure the head maintains proper anatomical proportion and balance.
On this page
How to structure a face in profile
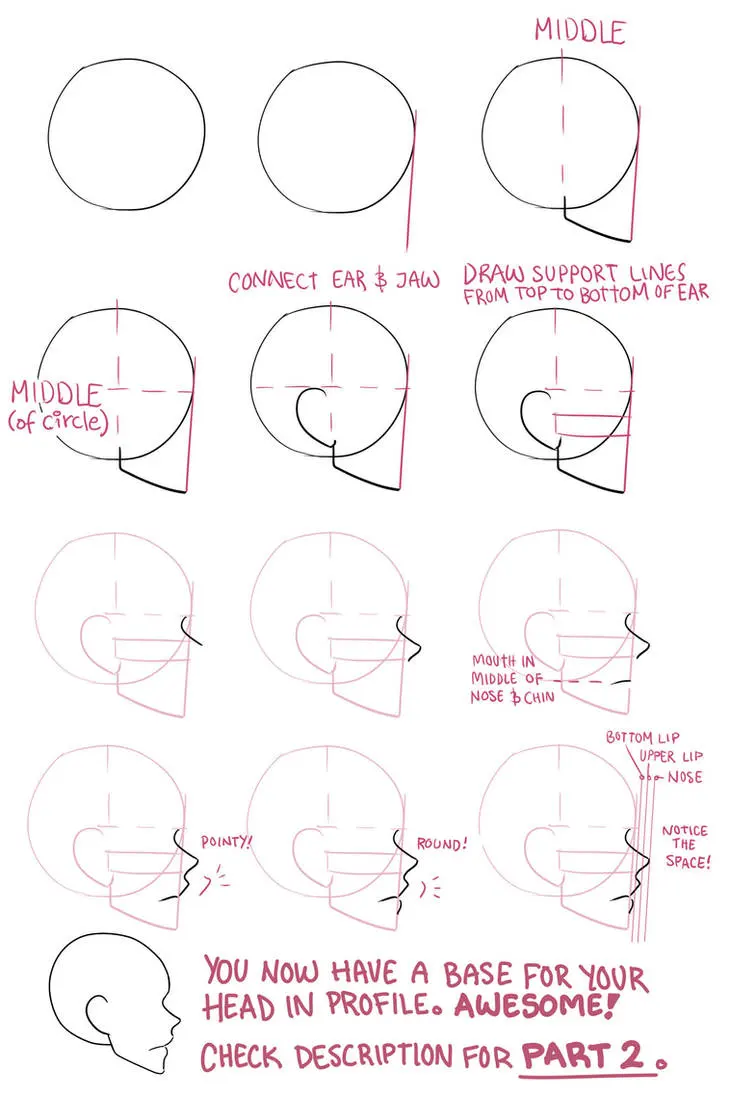
The human head is essentially a sphere with a box-like structure attached for the jaw. To begin, draw a circle to represent the cranium and a smaller square or rectangle overlapping the lower front quadrant for the jaw. The vertical axis of the face is not straight; it follows a slight curve from the forehead to the chin. By visualizing the skull as these basic forms, you avoid the common error of making the head look flat or distorted.
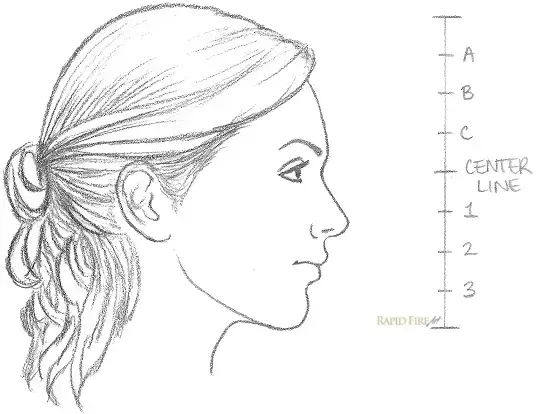
Once the basic shapes are set, establish the center line of the face. In a profile view, this line runs from the hairline down to the chin, passing through the bridge of the nose. Keep in mind that the ear is typically positioned in the middle of the head, aligned between the brow line and the base of the nose. Maintaining these spatial relationships is essential for achieving a realistic sense of depth and volume.
Steps for drawing facial features
Using your structural guide, you can begin placing the features with precision. Accuracy in a profile depends on the relative projection of the nose and lips compared to the forehead. Follow these steps to map the features correctly:
- Mark the brow line, the bottom of the nose, and the bottom of the chin as three equal segments.
- Draw the nose as a triangular wedge extending from the brow line.
- Place the eye as a flattened triangle, since only one side is visible.
- Position the lips so they sit slightly behind the vertical line of the nose.
- Connect the jawline from the chin back toward the ear, keeping the angle sharp.
By following this sequence, you ensure that no single feature is disproportionately large. The eye should be placed deep within the socket, while the lips should follow the natural curve of the teeth and gums.
How to measure proportions accurately
Proportions in a profile view are governed by the "rule of thirds." The distance from the hairline to the brow, the brow to the base of the nose, and the nose to the chin should be roughly equal. If you find your drawings look "off," it is usually because one of these segments is too long or too short. Use your pencil to measure these distances against each other before committing to permanent lines.
Another critical measurement is the depth of the jaw. The jawbone should hinge just below the ear canal and travel forward to the chin. If the jaw is too shallow, the head will appear to lack a neck or support. If it is too deep, the profile will look overly aggressive or masculine. Always compare the width of the cranium to the width of the jaw to maintain a balanced silhouette.
Common mistakes when drawing profiles
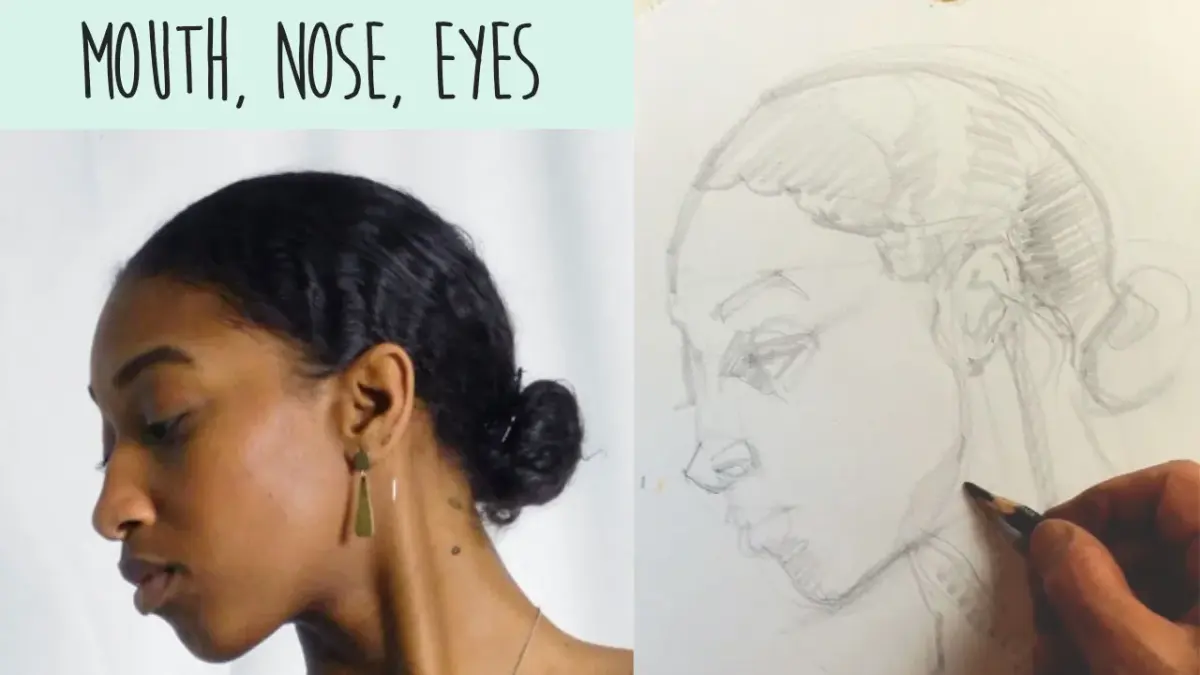
One of the most frequent errors is drawing the eye as a full almond shape. In profile, the eye is foreshortened and appears as a wedge or a triangle, with the iris appearing as an oval. Another mistake is forgetting the slope of the forehead. Many beginners draw the forehead as a vertical line, but in reality, it recedes slightly as it moves toward the hairline.
- Avoid drawing the lips as two distinct circles, which creates a "duck-like" appearance.
- Do not make the nose too long; it should generally occupy the middle third of the face.
- Ensure the neck is drawn from the back of the skull and the throat, not just the center of the head.
- Watch the alignment of the chin; it should not be tucked too far into the neck or pushed too far forward.
Correcting these alignment issues early in the sketching phase prevents the need for extensive erasing later.
Best tools for beginners to use
For those just starting, a standard HB or 2B graphite pencil is ideal because it allows for light, buildable strokes. Using a hard lead, such as a 2H, is excellent for the initial structural shapes because the lines remain faint and easy to clean up. Pair these with a kneaded eraser, which can be molded to lift small amounts of graphite without damaging the paper surface. This allows you to refine the contours of the nose and lips without losing your underlying guide marks.
Choosing the right paper is also important for developing your technique. A smooth, medium-weight drawing paper prevents the graphite from catching on texture, allowing for cleaner lines. As you progress, you may want to experiment with charcoal or carbon pencils for deeper shadows, but keep your initial practice focused on line quality and proportion. Mastering the profile is a foundational skill that will significantly improve your ability to draw the human head from any angle, provided you remain patient with the structural process.
Key facts
- The human head in profile is roughly shaped like a circle with a square jaw attached to the lower front.
- Align the ear vertically with the center of the skull, typically positioned between the eyebrow line and the base of the nose.
- The eye in profile is not a full almond shape; it appears as a triangle or a wedge pointing toward the ear.
- The bridge of the nose typically aligns with the brow ridge, while the tip of the nose extends outward from the circle.
- The mouth should be set back slightly from the nose, with the upper lip often protruding further than the lower lip.
- Use the "Loomis Method" as a foundational guide to establish correct proportions for the skull before adding facial features.
The bottom line
Drawing a face in profile requires mastering basic geometric proportions rather than focusing on individual details. By visualizing the skull as a circle and the jaw as a square, you create a sturdy foundation for facial features. Always prioritize the alignment of the brow, nose, and chin to ensure structural accuracy. With consistent practice of these anatomical landmarks, you will achieve a natural and convincing side-view portrait.
People also ask
How do I determine the correct placement of the ear?
In a side view, the ear sits behind the jawline. It should span the vertical distance between the horizontal line of the brow and the horizontal line of the bottom of the nose.
Why does my profile drawing look flat or distorted?
This often happens when the jaw is drawn too small or the back of the skull is not rounded enough. Ensure the cranium has sufficient volume behind the ear to balance the facial features.
Should the eye be drawn as a full oval?
No, an eye in profile should be drawn as a triangular shape. The point of the triangle faces the temple, and the wider base sits against the bridge of the nose.
How far should the chin extend from the face?
The chin should align roughly with the vertical plane of the forehead. Avoid drawing the chin too far forward, which can make the face appear unnatural or exaggerated.
What is the best way to handle the neck connection?
The neck does not attach to the center of the head but rather to the back of the skull. Start the back of the neck from the base of the cranium and the front from underneath the jaw.
How do I draw the lips in profile?
Draw the lips as a series of curves, ensuring the upper lip overlaps the lower lip slightly. The mouth should follow the natural curve of the jaw rather than sitting flat against the face.
This answer was created with the help of AI research tools and reference sources. Spotted an error? Let us know — we correct mistakes quickly. See our editorial policy.