How do you draw a carrot for beginners?
Short answer
Drawing a carrot involves sketching a tapered, elongated triangle with a rounded bottom and adding textured, leafy greens at the top. By focusing on basic geometric shapes, layering organic lines for the root, and incorporating simple jagged patterns for the foliage, beginners can easily create a recognizable and realistic vegetable illustration.
On this page
How to draw a basic carrot shape
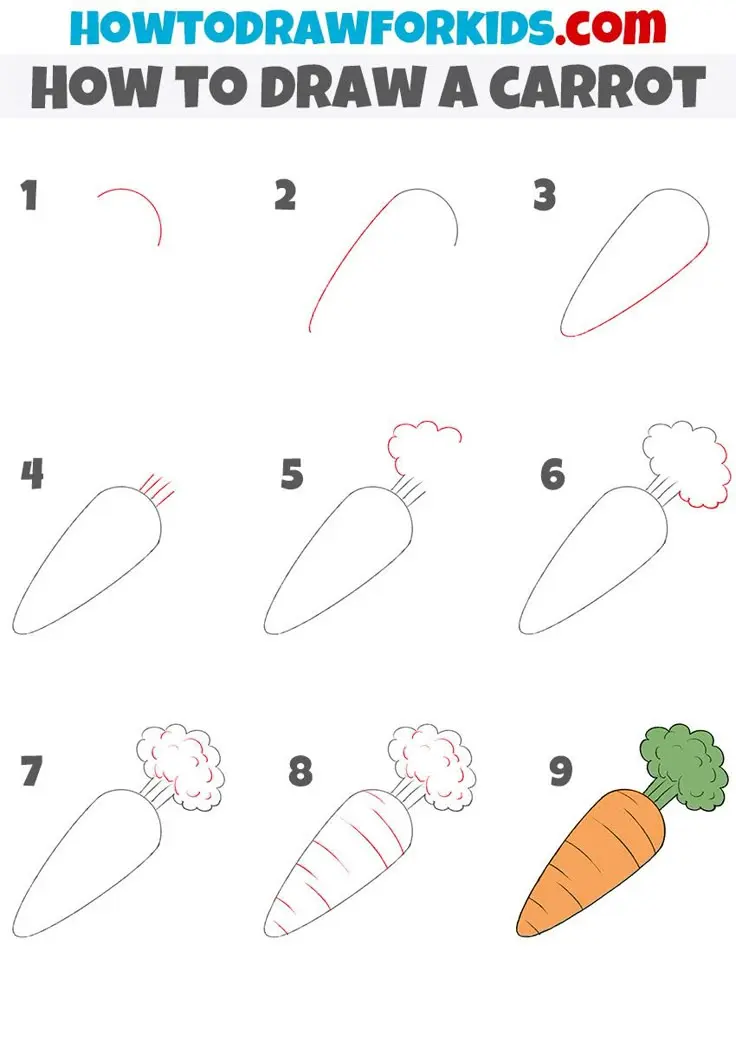
To begin, visualize the carrot as a long, slightly curved cone. Start by drawing a light, vertical guideline to establish the length and the gentle arc of the root. At the top, draw a wide, flat oval or a slight curve to represent the broad shoulder where the greens attach. From the edges of this top curve, draw two lines that taper inward, meeting at a rounded point at the bottom.
Keep your initial pencil strokes very faint so you can easily adjust the shape. Carrots are rarely perfectly symmetrical, so do not worry if one side is slightly bumpier than the other. Natural vegetables have character, and slight irregularities will actually make your drawing look more authentic. Once you are satisfied with the basic outline, you can go over the lines with a firmer hand to finalize the primary structure.
Best drawing tools for beginners
For those just starting, a standard HB graphite pencil is the most versatile tool. It allows for both light sketching and darker detailing without requiring multiple specialized pencils. Use a white vinyl eraser to clean up your guidelines, as these are less likely to smudge your paper than the pink erasers found on the ends of pencils.
When you are ready to add color, colored pencils or wax crayons are excellent choices for beginners. They provide good control and allow you to layer shades to create depth. If you prefer a more painterly look, watercolor pencils are also effective. Regardless of the medium, keep your tools sharp to ensure your lines remain crisp and your color application stays within the boundaries of your sketch.
- Use a sharp HB pencil for the initial outline.
- Keep a soft eraser handy to lift out mistakes.
- Choose a vibrant orange for the root and a deep green for the foliage.
- Use a white pencil or gel pen to add highlights for a glossy look.
How to add texture and detail
A smooth, featureless carrot often looks like a cartoon. To make your drawing more realistic, add small, horizontal dash marks along the sides of the root. These represent the tiny root hairs and natural ridges found on real carrots. Keep these marks short and irregular, placing them at varying intervals to mimic the organic growth patterns of the vegetable.
You should also consider the lighting of your drawing. If your light source is coming from the left, add a slightly darker shade of orange to the right side of the carrot. This subtle shading creates a three-dimensional effect, making the carrot look round rather than flat. You can also leave a thin, vertical strip of lighter color or white on the side facing the light to simulate a highlight.
How to draw carrot greens
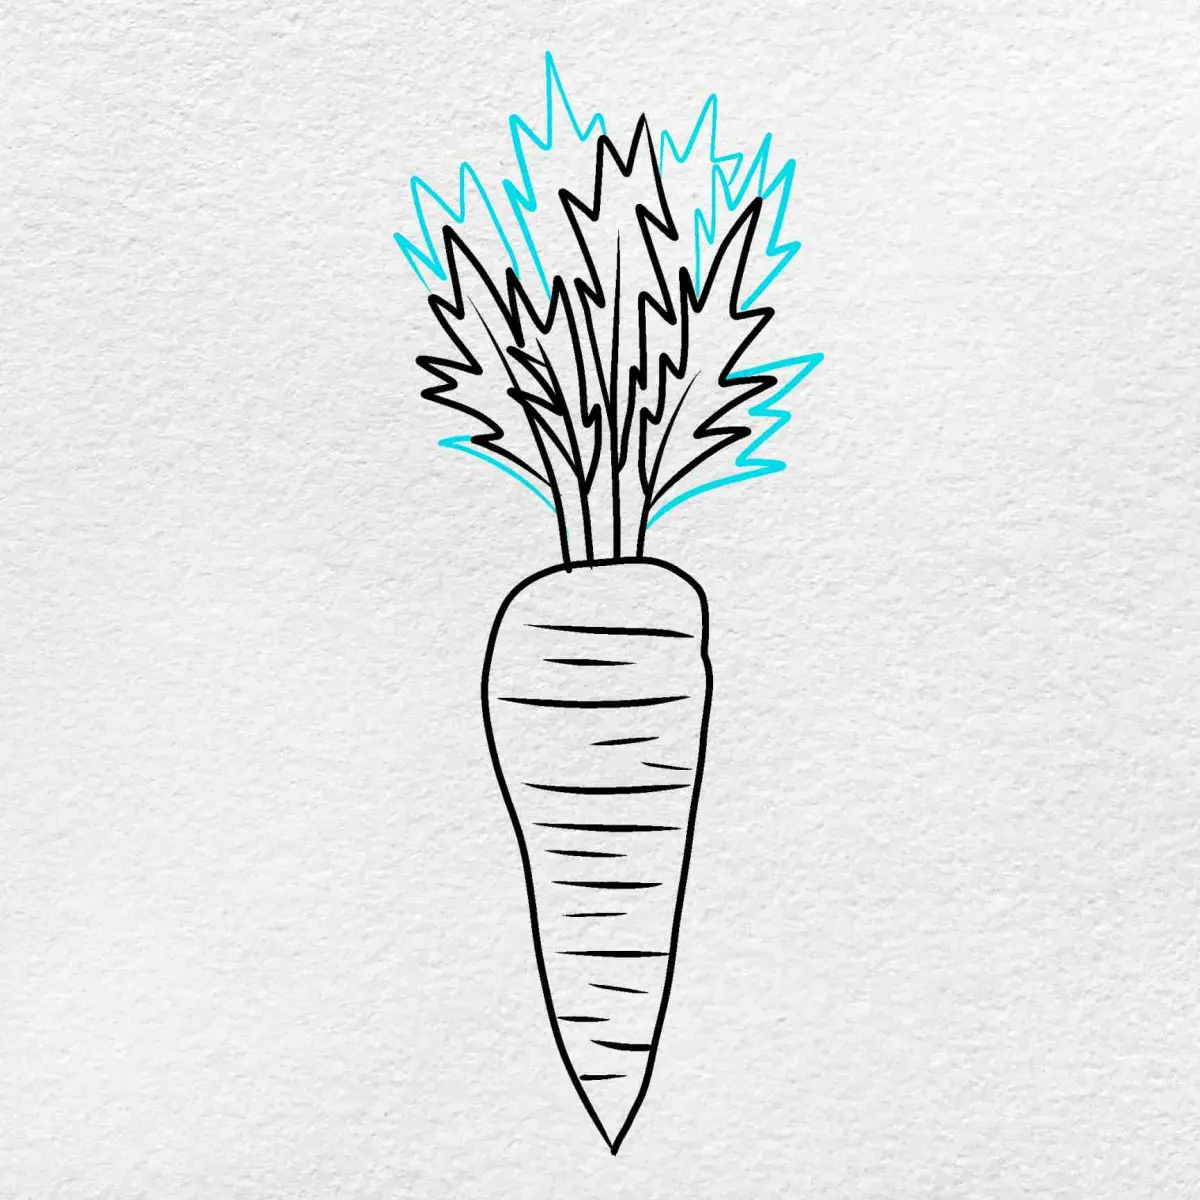
The leafy top, or "carrot tops," adds essential contrast to the orange root. Start by drawing thin, vertical stems extending upward from the top of the carrot. From these stems, draw small, jagged, or fern-like leaves branching outward. You do not need to draw every single leaf; instead, focus on creating a bushy, clustered silhouette that suggests a dense collection of foliage.
Use varying shades of green to add depth to the leaves. A darker green at the base of the stems can suggest shadow, while a lighter, brighter green on the tips can represent sunlight hitting the foliage. Keep the lines for the leaves quick and sketchy rather than stiff. This loose approach helps capture the wispy, light nature of carrot greens, which are much more delicate than the heavy root.
- Draw 3 to 5 main stems emerging from the top.
- Use a "zig-zag" motion to create the appearance of serrated leaves.
- Overlap the leaves to create a sense of volume and density.
- Keep the stems thin to contrast with the thickness of the carrot.
Common mistakes when drawing carrots
One of the most frequent errors is drawing the carrot perfectly straight and symmetrical. Real carrots grow in soil and are often twisted, bent, or tapered unevenly. If your drawing looks too rigid, try adding a slight bend in the middle or making the bottom point lean to one side. This simple change instantly makes the vegetable look more natural.
Another common mistake is neglecting the connection point between the root and the greens. Beginners often draw the greens floating above the carrot or attach them too neatly. Ensure the stems are firmly rooted in the top of the carrot, perhaps by adding a few small, overlapping lines where the green meets the orange. Finally, avoid using a single flat color for the entire carrot. Even a simple drawing benefits from a gradient or a few darker spots to show texture and form. By avoiding these pitfalls, you will achieve a much more professional result.
Key facts
- Carrots are members of the Apiaceae family, which includes parsley and fennel.
- The iconic orange color is caused by high concentrations of beta-carotene.
- A classic carrot shape is essentially an elongated, tapering triangle.
- Adding horizontal "dashes" along the sides creates the appearance of fibrous roots.
- The leafy top, or "greens," is best drawn as a series of jagged, cloud-like shapes.
- Varying line thickness adds depth, making the vegetable look three-dimensional rather than flat.
The bottom line
Drawing a carrot is an excellent exercise in mastering organic shapes and basic shading. By starting with a simple, tapering triangle and adding texture through small horizontal marks, you can create a recognizable form. Remember that nature is rarely perfectly symmetrical; embrace slight curves and irregular lines to give your drawing character. With practice, these foundational techniques will help you illustrate a wide variety of garden vegetables.
People also ask
What is the best pencil to use for sketching vegetables?
An HB or 2B pencil is ideal for beginners because they offer a good balance between darkness and erasability. These grades allow you to sketch light guidelines that can be easily cleaned up later.
Should I use a ruler to draw the carrot shape?
No, avoid using a ruler because organic shapes like vegetables look better with natural, slightly imperfect curves. A freehand approach captures the unique, rustic character of a garden-grown carrot.
How do I make the carrot look realistic?
Focus on shading the edges more heavily than the center to create a rounded effect. Adding small, irregular dots or lines across the surface mimics the texture of real carrot skin.
What is the most common mistake when drawing the greens?
Beginners often draw the leaves too stiff or symmetrical. Instead, use loose, erratic strokes to mimic the wild, feathery growth pattern of actual carrot tops.
How do I draw the connection between the root and the leaves?
Draw a slightly indented, flat top at the base of the carrot where the stems emerge. This small detail prevents the greens from appearing like they are floating above the vegetable.
Can I use colored pencils for this drawing?
Yes, layering different shades of orange and yellow creates a vibrant, realistic look. Use a darker orange or brown for the shadows to give the drawing significant weight and volume.
This answer was created with the help of AI research tools and reference sources. Spotted an error? Let us know — we correct mistakes quickly. See our editorial policy.