How do you draw animal eyes?
Short answer
Drawing animal eyes requires capturing the unique shape of the pupil, the reflective quality of the iris, and the surrounding fur texture. By focusing on the interplay of light and shadow, you can create a realistic gaze. Start with basic geometric shapes, then layer details to build depth and lifelike character.
On this page
How to draw realistic animal eyes
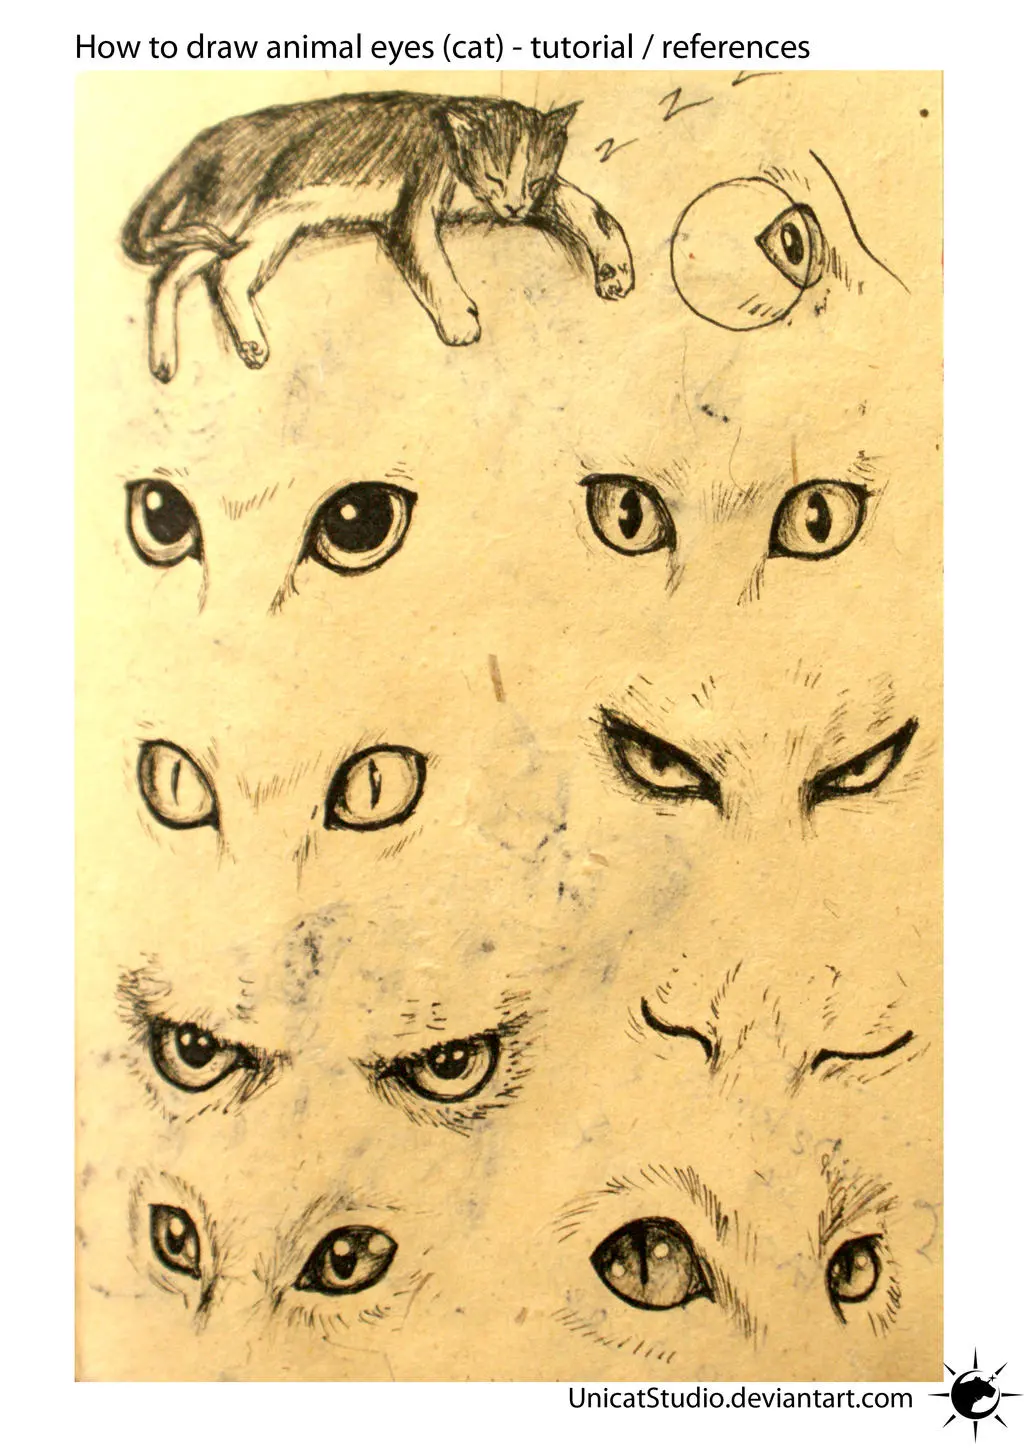
To begin drawing an animal eye, you must first observe the specific shape of the eyelid, which often differs significantly from human anatomy. Most mammals have a distinct almond or oval shape, but predators like cats have vertical pupils, while prey animals like goats have horizontal, rectangular pupils. Start by sketching a light outline of the eye socket and the eyelid margins. Use a hard pencil, such as an H or HB, to keep your lines faint so they can be easily blended or erased later.
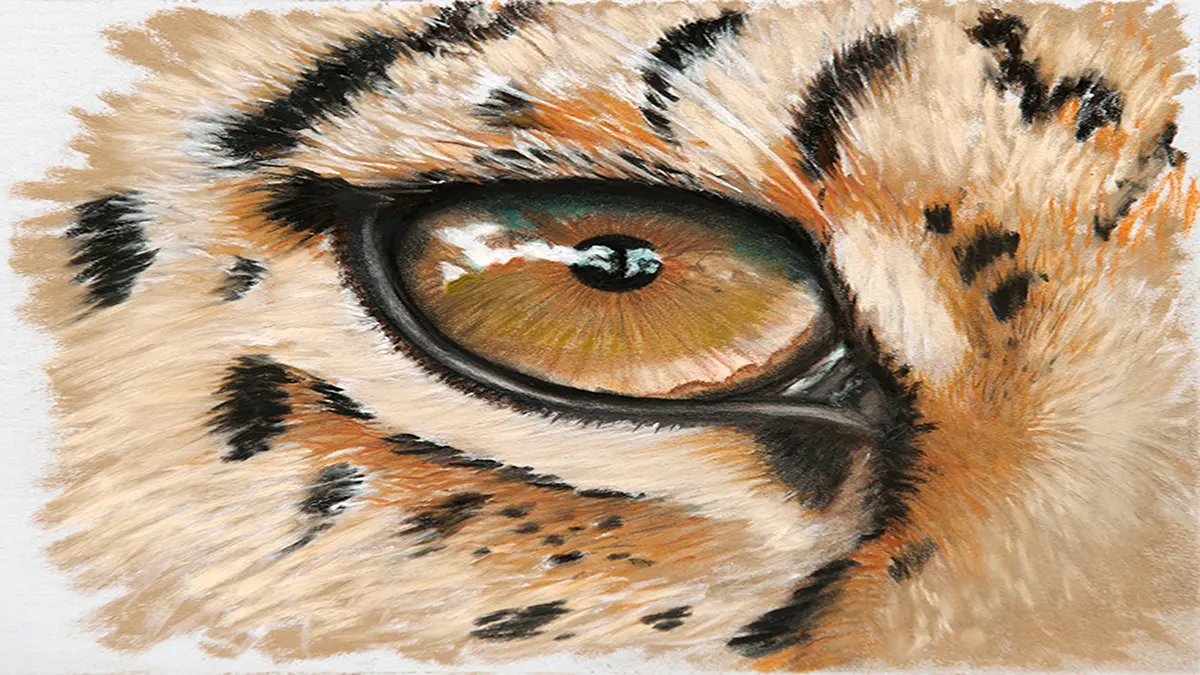
Once the basic shape is established, focus on the placement of the pupil. The pupil is the darkest part of the eye and serves as the anchor for your drawing. Ensure the pupil is centered correctly within the iris to avoid a cross-eyed appearance. After placing the pupil, define the iris by adding subtle radial lines that extend from the center toward the outer edge. These lines should vary in length and thickness to mimic the natural, organic patterns found in biological eyes.
Which tools are best for beginners
For those starting out, a set of graphite pencils ranging from 2H to 6B is essential. The harder 2H pencils are perfect for initial sketches and fine details, while the softer B-range pencils allow for deep, rich blacks in the pupil and surrounding fur. You will also need a kneaded eraser, which can be molded into a point to lift graphite from the paper, creating the necessary highlights that give an eye its "wet" look.
In addition to pencils, consider using a blending stump or a piece of chamois to smooth out textures. High-quality smooth-surface paper, such as Bristol board, is recommended because it prevents the graphite from catching on paper grain, allowing for cleaner transitions. To achieve professional results, follow these steps:
- Sketch the eye shape and pupil using a light 2H pencil.
- Fill in the pupil with a 6B pencil, leaving a small white space for the main highlight.
- Layer the iris with radial strokes, keeping the outer edges slightly darker.
- Use a kneaded eraser to lift out small, secondary highlights for added dimension.
Why eyes look flat in drawings
A common reason for a drawing to look flat is the lack of proper shading around the eyelid. The eye is a sphere set within a bony socket, meaning the surrounding skin must have shadows to show depth. If you draw the eye as a flat shape on a flat surface, it will lack volume. Always shade the upper eyelid slightly, as it usually casts a shadow over the top portion of the eyeball.
Another factor is the absence of reflections. Animal eyes are covered by a moist film that creates complex light patterns. If you only use one highlight, the eye will look like a marble rather than a living organ. Add a primary highlight where the light source hits the eye, but also include a secondary, softer reflection on the opposite side. This "fill light" mimics the way light bounces off the environment and hits the curved surface of the cornea.
Common mistakes when drawing fur
Many beginners struggle because they draw fur as individual, uniform lines that look like a comb. Instead, observe how fur grows in clumps or "tufts" that follow the contours of the animal's face. When drawing the hair surrounding the eye, use long, sweeping strokes that originate from the inner corner and move outward. Vary the pressure of your pencil to make the fur look dense near the socket and thinner toward the edges.
Avoid these common errors to improve your technique:
- Drawing every single hair, which makes the animal look stiff or cartoonish.
- Using a consistent, heavy outline, which flattens the form.
- Ignoring the direction of growth, which makes the fur appear messy.
- Forgetting to leave white space for highlights in the fur, which creates a muddy look.
Focus on the shadows between the fur clumps rather than the hairs themselves to create a more realistic, soft texture.
How to add life to the gaze
The final step in bringing an animal eye to life is the subtle application of contrast. The transition from the pupil to the iris should be sharp, but the transition from the iris to the white of the eye—or the sclera—should be soft. Use a blending stump to smudge the edges of the iris slightly, which mimics the natural blur of the eye's curvature. Adding a tiny bit of detail to the tear duct can also ground the eye in the face.
Finally, consider the "glint" or the sparkle. A sharp, crisp highlight is the most important element for creating a sense of consciousness. If the highlight is too large, the eye looks glassy; if it is too small, it looks dull. Experiment with the placement of this highlight to change the direction in which the animal is looking. By adjusting the angle of the reflection, you can make the animal appear alert, curious, or calm, effectively capturing its personality through the gaze.
Key facts
- Mammal pupils vary significantly: cats have vertical slits for depth perception, while goats have horizontal rectangles for wide-angle views.
- The sclera, or white of the eye, is rarely visible in most animals, unlike in humans where it is a prominent feature.
- Always include a sharp white highlight to represent the reflection of light, which provides the illusion of moisture and life.
- Use a dark, rich pigment for the pupil to create depth, ensuring it remains the darkest value in the entire drawing.
- Observe the nictitating membrane, a translucent third eyelid found in many birds and reptiles, which can add realistic detail.
- Fur direction typically radiates away from the eye socket, so draw individual hairs following the contours of the skull.
The bottom line
Drawing realistic animal eyes requires careful observation of the specific species' anatomy rather than applying human features. Focus on the distinct pupil shape, the placement of light reflections to create moisture, and the way surrounding fur follows the skull's structure. By prioritizing these structural details and maintaining high contrast between the dark pupil and the iris, you can capture the unique character and intensity of any animal.
People also ask
Why do animal eyes look like they are glowing in photos?
This effect is caused by the tapetum lucidum, a reflective layer of tissue located behind the retina. It reflects light back through the eye to improve night vision, causing the eyes to shine when hit by a camera flash.
How do I make an animal eye look wet?
Focus on placing a crisp, bright white highlight on the surface of the cornea. Adding a subtle, lighter-colored reflection on the opposite side of the pupil also helps simulate the curvature and moisture of the eyeball.
Should I draw the eyelashes on an animal?
Most animals do not have human-like eyelashes, though some mammals like horses and camels possess long, stiff hairs around the lids. Avoid drawing fine, individual lashes unless you are specifically depicting a species known for them.
What is the best way to shade the eyeball?
Treat the eye as a sphere by applying a gradient of shadows. Keep the side of the eye facing the light source brighter and use a soft shadow near the upper eyelid to suggest the lid's weight.
How do I draw the pupil shape correctly?
Look closely at the species, as pupils change shape based on light levels. A circular pupil is common in dogs and humans, while vertical slits are characteristic of nocturnal predators like foxes and domestic cats.
Is it necessary to draw the tear duct?
Including the caruncle, or the small pinkish corner of the eye, adds a high level of anatomical realism. Keep it subtle and slightly darker than the surrounding skin to avoid making the eye look unnatural or distorted.
This answer was created with the help of AI research tools and reference sources. Spotted an error? Let us know — we correct mistakes quickly. See our editorial policy.
![How To Draw Eyes In 7 Easy Steps [Video + ]](/img/8e/how-do-you-draw-eyes-1.webp)