How do you draw a realistic eye?
Short answer
Drawing a realistic eye requires capturing the anatomical curvature of the eyeball, the interplay of light on the moist surfaces, and the layered texture of the iris. By focusing on structural proportions, subtle shading gradients, and the placement of highlights, artists can transform simple shapes into a convincing, lifelike representation of human vision.

On this page
How to structure the eye anatomy
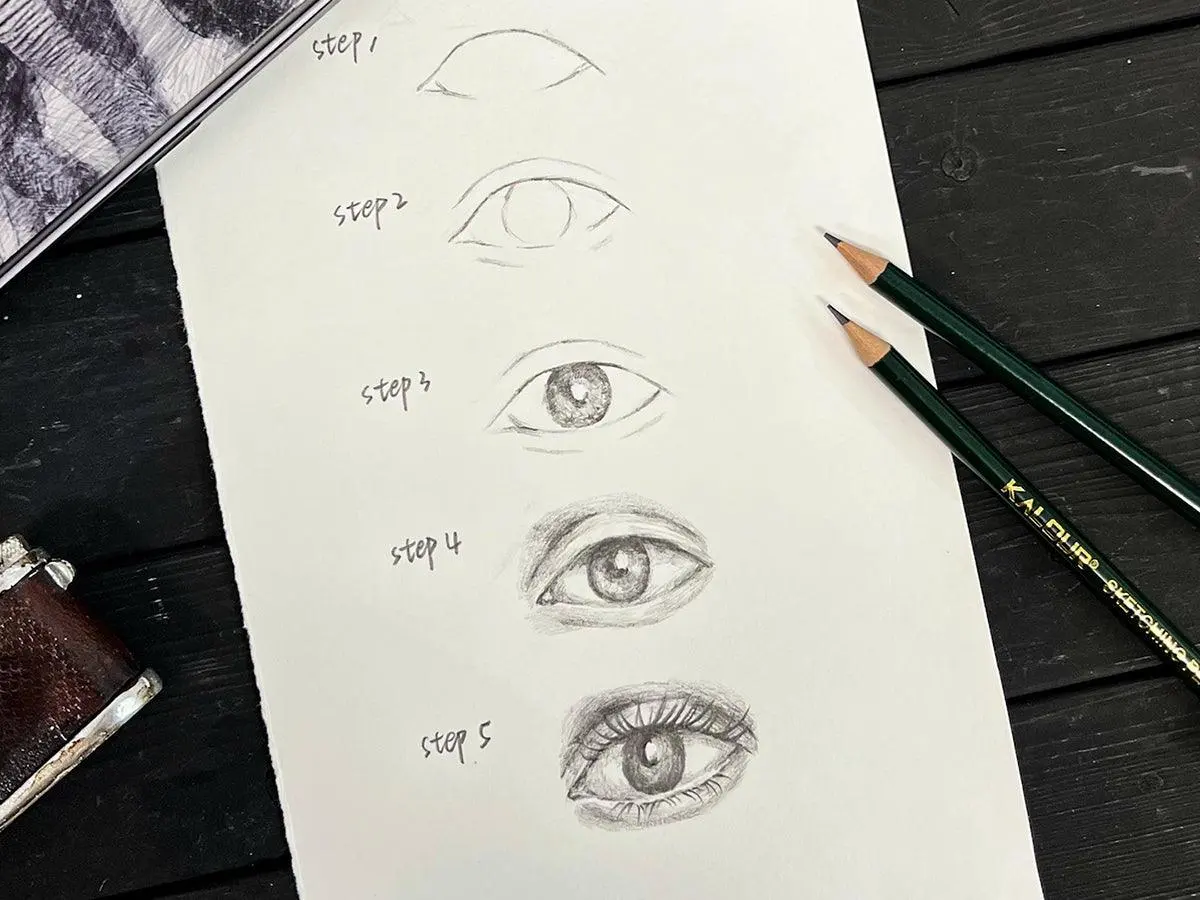
The eye is not a flat shape but a sphere set into a bony socket. Start by drawing a horizontal guideline and placing a circle to represent the eyeball. The upper eyelid typically covers the top portion of the iris, while the lower lid rests gently against the bottom edge. Avoid drawing a perfect almond shape, as this often results in a cartoonish appearance. Instead, focus on the slight tilt of the eye, where the inner corner (the caruncle) sits lower than the outer corner.
When mapping out the features, remember that the iris is a perfect circle, even if the eyelids obscure part of it. The pupil should be placed directly in the center of the iris. Use these steps to establish your foundation:
- Lightly sketch the sphere of the eyeball to ensure proper volume.
- Draw the upper eyelid as a soft curve that follows the contour of the sphere.
- Mark the tear duct as a small, triangular shape at the inner corner.
- Ensure the lower eyelid is slightly flatter than the upper lid to reflect gravity.
Best shading techniques for realism
Realism is achieved through the transition of values rather than harsh outlines. Start by identifying your primary light source, which dictates where the highlights will appear. The eyeball is a wet, reflective surface, so it requires a bright white highlight, often positioned at the edge of the pupil or iris. Use a range of graphite pencils, such as 2H for light sketching and 4B or 6B for the deep shadows of the pupil and lash line.
Gradual blending is essential for a natural look. Use a blending stump or a soft tissue to smooth out the transition between the dark pupil and the lighter iris fibers. Focus on these areas to build depth:
- The sclera (white of the eye) should be shaded with light gray tones, especially near the corners, to suggest roundness.
- The iris requires radial lines drawn from the pupil outward to mimic its natural texture.
- The upper eyelid casts a subtle shadow onto the top of the iris and the sclera, which adds significant depth.
How to draw realistic eyelashes
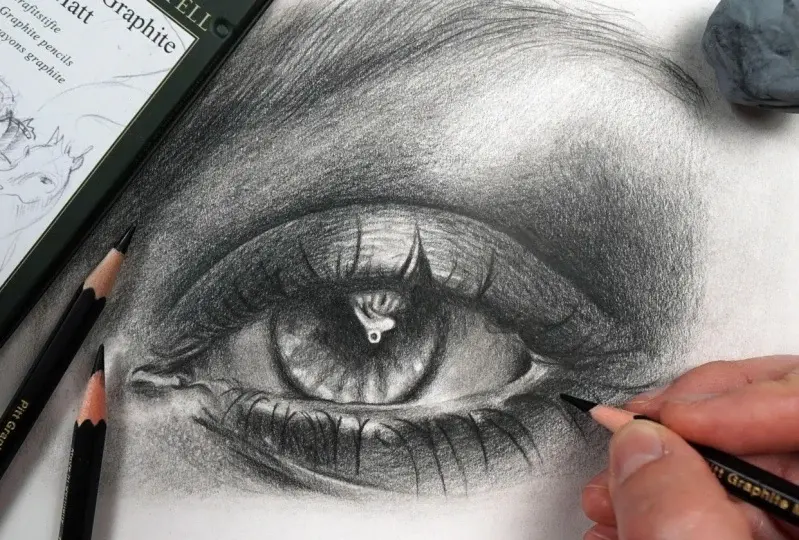
Eyelashes are one of the most common areas where beginners struggle by drawing uniform, spike-like lines. In reality, lashes grow in clusters and vary in thickness, length, and direction. They emerge from the edge of the eyelid, not the skin above it. When drawing them, use quick, flicking motions with your pencil, starting at the root and lifting the pressure as you move outward to create a tapered tip.
To achieve a natural appearance, avoid drawing lashes that are perfectly straight or evenly spaced. Instead, overlap them slightly and allow them to curve naturally following the shape of the eye. Consider these tips for better lash placement:
- Draw the lashes on the upper lid longer and more curved than those on the lower lid.
- Group the lashes in small bundles of two or three to create a more organic, messy look.
- Vary the direction of the lashes, as they naturally fan out toward the outer corner of the eye.
Why eyes look flat in drawings
A drawing often looks flat because the artist fails to account for the surrounding skin and the depth of the eye socket. The eye does not exist in isolation; it is surrounded by the brow bone, the bridge of the nose, and the cheekbone. Shading the area around the eye—specifically the crease of the eyelid and the shadow cast by the brow—provides the necessary context to make the eyeball look like it is recessed into the skull.
Another reason for flatness is the lack of contrast within the iris. The iris is a complex structure with depth, meaning the side furthest from the light source should be slightly darker than the side facing the light. If the iris appears as a flat, solid color, the eye will lose its vitality. Always ensure the pupil is the darkest point of the drawing, as this creates a focal point that draws the viewer into the eye.
Common mistakes when drawing eyes
One frequent error is failing to draw the thickness of the eyelid itself. The skin of the eyelid has mass, and the lower lid has a visible edge that catches light. If you draw the lower lashes emerging directly from the eyeball, the eye will look unnatural. Always leave a small gap between the eyeball and the lower eyelid to represent the thickness of the lid tissue.
Another mistake is placing the highlight in an anatomically impossible position. The highlight should reflect the light source; if you have multiple highlights, they should all align with the same light direction. Furthermore, avoid using pure black for the entire iris, as this hides the intricate details of the radial fibers. By keeping your lines soft and focusing on the transition between light and shadow, you will successfully create a realistic eye that possesses depth, texture, and a convincing sense of anatomical structure.
Key facts
- The human eye is not a perfect circle; it is an almond shape with a slight dip near the tear duct.
- The pupil should always be placed in the center of the iris, not the center of the entire eye shape.
- Highlights on the cornea are essential for realism, as they indicate the light source and add a wet, glassy appearance.
- Eyelashes grow from the outer rim of the eyelid, not the waterline, and should curve outward in clusters.
- The iris is never a solid color; it contains complex radial patterns, fibers, and small dark spots.
- Shading the sclera—the white of the eye—is crucial, as it is a sphere and must have shadows to look three-dimensional.
The bottom line
Drawing a realistic eye requires observing the anatomical structure rather than relying on symbols. By focusing on the spherical nature of the eyeball, the complex patterns within the iris, and the way light interacts with moist surfaces, you can create depth. Remember to prioritize subtle shading over harsh outlines, as this creates a lifelike quality that transforms a simple sketch into a convincing, professional-looking portrait.
People also ask
Why does my drawing look flat?
You likely missed the subtle shadows on the white of the eye and the eyelid. Treat the eyeball as a sphere and the eyelid as a curved surface that casts a shadow onto the eye.
How do I make the iris look realistic?
Use a variety of line weights and textures radiating from the pupil toward the outer edge. Add small, dark flecks and ensure the outer rim of the iris is darker than the center.
Should I draw every single eyelash?
No, drawing every lash often makes the eye look artificial. Focus on drawing clusters of lashes, varying their length and thickness to create a natural, organic look.
Where should the highlight go?
The highlight should be placed on the upper portion of the pupil or iris, reflecting the primary light source. Keep this area pure white to maintain the appearance of a moist surface.
How do I draw the tear duct correctly?
The tear duct is a small, pinkish, triangular shape located at the inner corner of the eye. Keep it subtle and avoid making it too sharp or dark, as it is a soft, fleshy tissue.
What is the most common mistake when drawing eyes?
Beginners often forget that the upper eyelid covers a portion of the iris. If the entire iris is visible, the eye will appear surprised or unnatural rather than relaxed.
This answer was created with the help of AI research tools and reference sources. Spotted an error? Let us know — we correct mistakes quickly. See our editorial policy.



