How do you draw hands easily?
Short answer
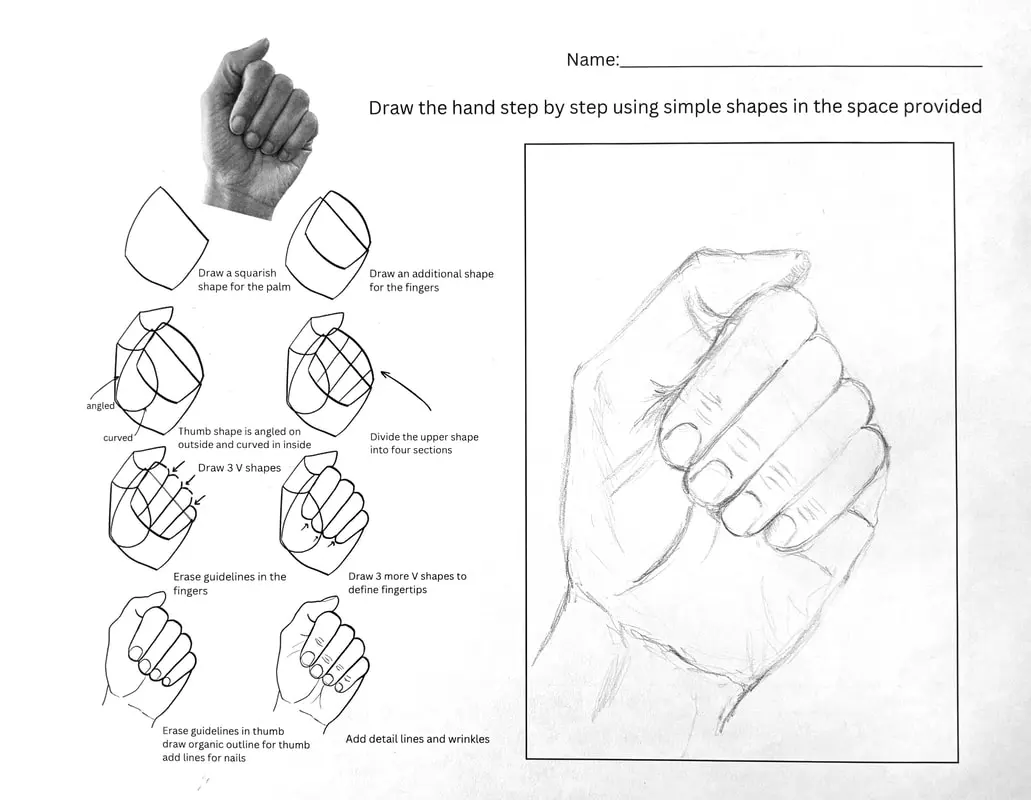
Drawing hands easily requires breaking them down into simple geometric shapes rather than focusing on complex details. By visualizing the palm as a square and the fingers as cylinders, you can establish correct proportions. Practice by mapping the skeletal structure first, then adding volume, which simplifies the process for any skill level.

On this page
How to simplify hand anatomy for beginners
The human hand is a complex structure of 27 bones, but you can simplify it by viewing it as two primary parts: a trapezoidal palm and five cylindrical fingers. Start by drawing a flat, slightly curved square or trapezoid to represent the palm. This base shape serves as the anchor for all five digits. Once the palm is established, mark the positions where the fingers will emerge, keeping in mind that the middle finger is typically the longest.
When sketching, focus on the relationship between the knuckles and the fingertips. The fingers are not just straight lines; they consist of three distinct segments, or phalanges, separated by joints. By drawing these segments as small boxes or cylinders, you create a three-dimensional framework that prevents the hand from looking flat. This structural approach allows you to manipulate the hand into various gestures without losing anatomical accuracy.
How to measure hand proportions correctly
Achieving realistic proportions is the most common hurdle for artists. A helpful rule of thumb is that the length of the middle finger is roughly equal to the length of the palm. When the hand is held flat, the distance from the wrist to the base of the fingers is approximately the same as the distance from the base of the fingers to the tip of the middle finger.
To ensure your drawing remains balanced, follow these specific measurement guidelines:
- The thumb typically reaches up to the first knuckle of the index finger.
- The width of the palm is usually about the same as the length of the four fingers combined.
- The palm itself is slightly wider than it is tall, providing a solid foundation for the digits.
- Use the length of the index finger as a unit of measurement to verify the scale of the other fingers.
How to draw hands in different positions
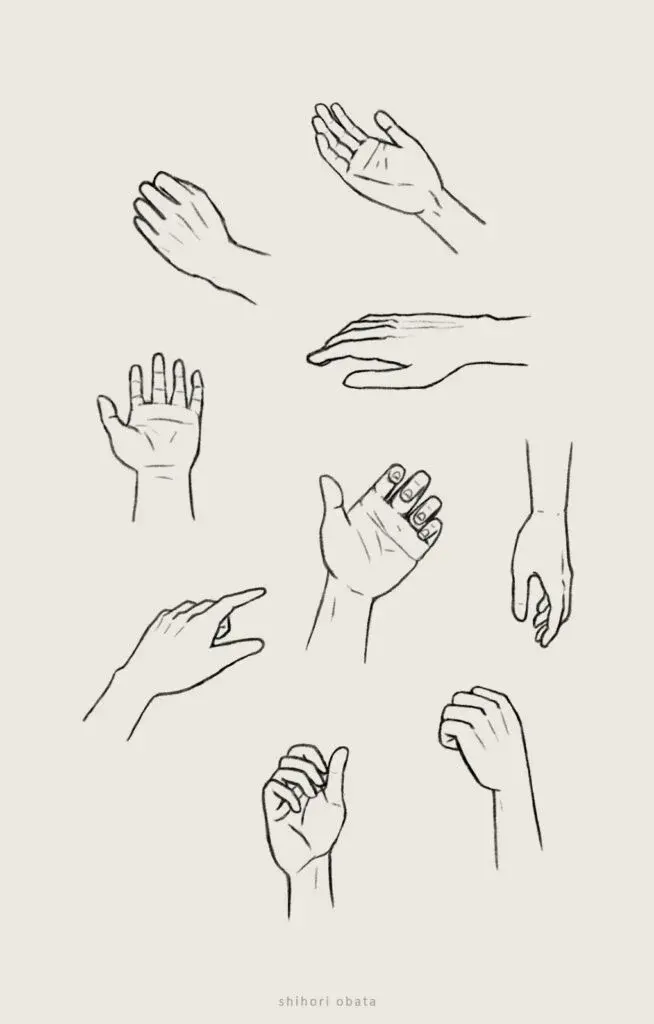
Hands are rarely static, so learning to draw them in motion is essential. To capture dynamic poses, start by sketching the "action line" of the hand, which follows the curve of the palm and the direction of the fingers. This line dictates the flow of the hand before you add any volume or skin details. If the hand is clenching into a fist, the fingers will overlap, creating hidden areas that you must account for in your initial sketch.
When practicing gestures, consider these steps to maintain structural integrity:
- Identify the primary gesture or motion of the wrist and palm.
- Sketch the palm as a simplified block to establish the perspective.
- Draw the fingers as simple tubes, noting which ones overlap or are foreshortened.
- Refine the outlines by connecting the cylinders into a cohesive, organic shape.
- Add details like fingernails and skin folds only after the underlying structure is confirmed.
Common mistakes when drawing hands
Many beginners fail because they rush to draw individual fingers before establishing the palm. This often leads to "sausage fingers" that appear detached or disconnected from the hand. Another frequent error is ignoring perspective, which causes the fingers to look like they are all on the same plane even when the hand is angled toward or away from the viewer. Always draw the entire hand as a single unit rather than five separate parts.
Additionally, artists often make the fingers too thin or too short, which makes the hand look unnatural. To avoid this, constantly compare your drawing against a reference or your own hand. If you struggle with perspective, try drawing the hand inside a box. This technique forces you to consider the depth of the palm and the way fingers recede into space, preventing the common mistake of drawing hands that look like flat, two-dimensional cutouts.
Best tools and exercises for practice
To improve your hand-drawing skills, consistent practice is more important than expensive materials. Start with a simple graphite pencil and a sketchbook, as these allow for easy erasing and refinement. Many artists find that using a soft lead, such as a 2B, helps in creating light, structural sketches that can be darkened later. You do not need complex equipment to master the anatomy of the hand; simple tools are often the most effective for learning.
Incorporate these daily exercises into your routine to see rapid improvement:
- Spend ten minutes sketching your own hand from different angles while holding various objects.
- Use a mirror to observe how your tendons and knuckles shift when you move your fingers.
- Practice drawing hands from photographs, focusing specifically on the silhouette and the negative space between the fingers.
- Challenge yourself to draw a hand without looking at the paper, which helps develop hand-eye coordination and a better understanding of spatial relationships.
By dedicating time to these exercises, you will eventually internalize the structure of the hand, making the drawing process feel intuitive and effortless.
Key facts
- The human hand is roughly the same length as the face, measured from the chin to the hairline.
- Simplify the palm into a square or trapezoid shape before adding the fingers.
- Fingers are not straight cylinders; they have three distinct segments (phalanges) that allow for complex bending.
- The middle finger is the longest digit, serving as the primary anchor point for measuring hand proportions.
- The thumb attaches at a lower angle than the other four fingers and possesses a unique range of motion.
- Use a "gesture" line to establish the flow and direction of the hand before committing to detailed outlines.
The bottom line
Drawing hands effectively requires breaking complex anatomy down into simple geometric shapes like squares and cylinders. By focusing on the arc of the knuckles, the specific length ratios of the fingers, and the unique positioning of the thumb, you can overcome common pitfalls. Consistent practice using your own hand as a reference is the most reliable way to master these proportions and achieve natural results.
People also ask
Why do hands often look like "mittens" when first sketched?
This happens because artists often draw the fingers as a single block rather than individual units. To avoid this, define the gaps between fingers early in the process to establish clear separation.
How do I measure the length of the fingers?
A common rule of thumb is that the middle finger is roughly equal in length to the palm. Use this ratio to ensure your fingers do not look too short or overly elongated.
Should I draw the knuckles as straight lines?
No, knuckles form a gentle arc across the back of the hand rather than a flat, horizontal line. Aligning them in a curve adds necessary depth and realism to the hand.
How can I make the hand look less stiff?
Avoid drawing fingers perfectly parallel to one another. Varying the angles and slight bends in each finger creates a more natural, dynamic appearance.
What is the best way to practice drawing hands?
Use your own non-drawing hand as a reference model throughout the day. Sketching from life is significantly more effective than relying solely on imagination or static images.
Why is the thumb so difficult to draw?
The thumb is often misplaced because it originates from the side of the palm rather than the base of the fingers. Always draw the thumb's base as a separate, fleshy mound to show its distinct structure.
This answer was created with the help of AI research tools and reference sources. Spotted an error? Let us know — we correct mistakes quickly. See our editorial policy.