What is the easiest way to draw a yurt?
Short answer
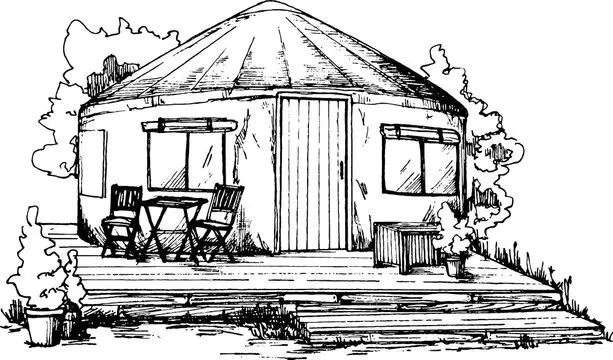
The easiest way to draw a yurt is to construct it using basic geometric shapes: a cylinder for the vertical walls and a flattened cone for the roof. By sketching these two forms first, you can easily add details like the circular smoke hole and lattice wall patterns to achieve a realistic look.
On this page
How to draw a yurt step by step
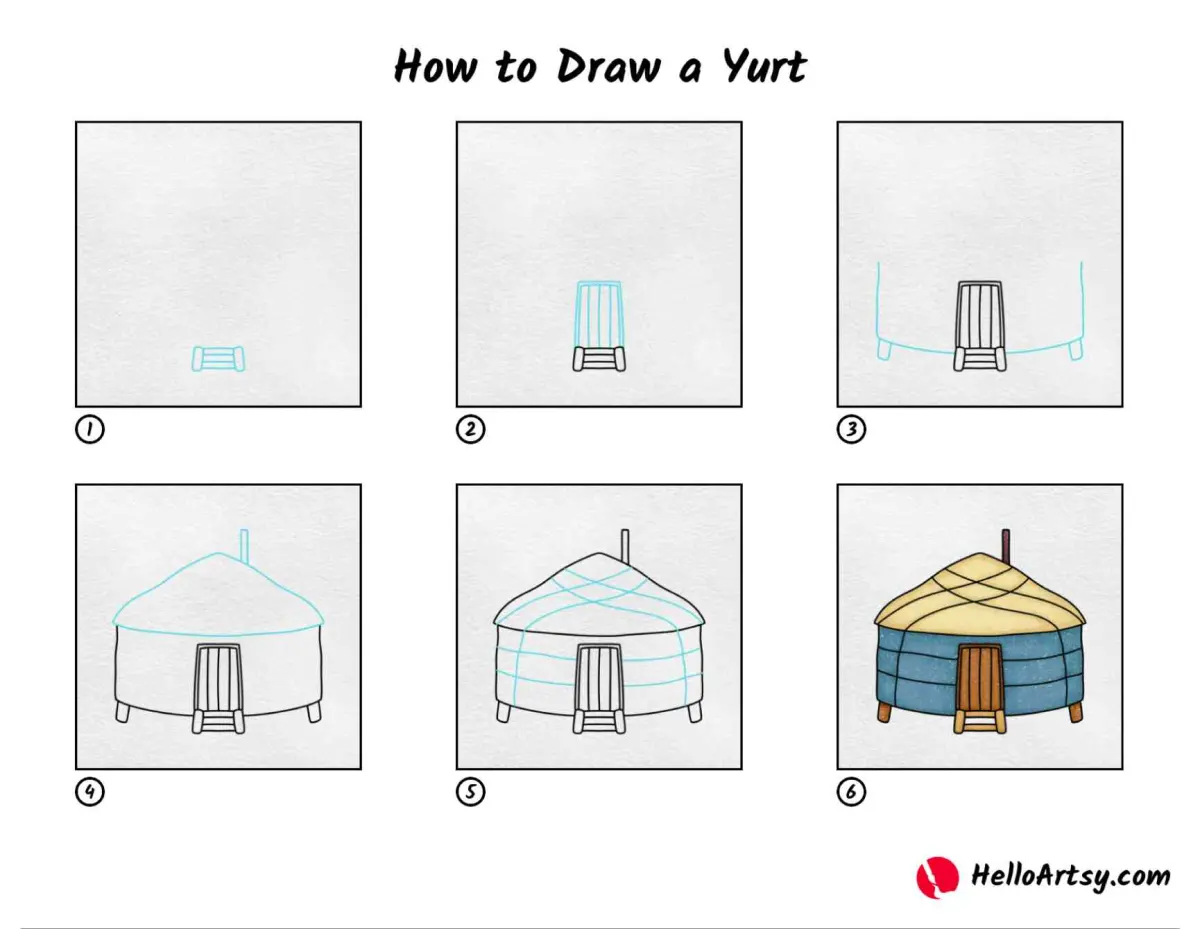
Drawing a yurt begins with establishing the fundamental silhouette of the structure. Start by sketching a wide, short cylinder to represent the vertical lattice walls. Once the cylinder is defined, draw a shallow cone resting on top of the walls to form the roof. The key to a proper yurt shape is keeping the roof angle low, as traditional yurts are designed to be aerodynamic and stable in high winds.
After the basic forms are set, you can refine the sketch by adding the distinct features of the structure. Use these steps to complete your drawing:
- Draw a small circle at the very peak of the roof to represent the crown or smoke hole.
- Add a series of lines radiating from the crown to the edge of the roof to depict the roof poles.
- Sketch a small rectangle on the side of the cylinder to indicate the door frame.
- Add a cross-hatch pattern across the cylinder to suggest the wooden lattice wall construction.
Best drawing tools for beginners
For those new to architectural sketching, starting with a graphite pencil is highly recommended. A 2B pencil offers enough softness to create light guidelines that can be easily erased, while still allowing for darker, final outlines. Using a ruler is optional but helpful for ensuring the vertical walls remain parallel and the roof edges stay symmetrical during the initial layout phase.
When you are ready to add depth, consider using fine-liner pens or markers. These tools are excellent for emphasizing the lattice pattern of the walls, which is a signature visual element of a yurt. If you prefer a softer look, charcoal or soft pastels can be used to blend the shadows under the roof eaves, giving the drawing a more three-dimensional appearance. Always keep a kneaded eraser nearby to lift away graphite smudges without damaging the paper surface.
Why yurt proportions matter
The visual appeal of a yurt drawing relies heavily on the ratio between the wall height and the roof pitch. A common error is drawing the roof too steep, which makes the structure look like a standard house rather than a nomadic dwelling. In reality, a yurt’s roof is typically pitched at an angle between 20 and 30 degrees. Maintaining this low profile is essential for capturing the authentic, grounded aesthetic of the traditional Central Asian design.
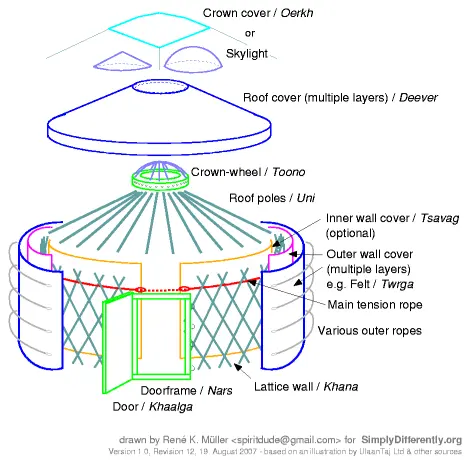
Another factor to consider is the size of the crown relative to the overall diameter. The crown, or toono, is the central hub that supports the roof poles and allows light and smoke to pass through. If the crown is drawn too small, the yurt will look cramped and unrealistic. Aim for a crown diameter that is roughly one-fifth to one-sixth of the total diameter of the yurt to ensure the proportions look balanced and structurally sound on paper.
Common mistakes when drawing yurts
One frequent mistake is neglecting the thickness of the materials. Because yurts are covered in heavy felt or canvas, the edges of the roof and the door frame should have a subtle sense of weight rather than appearing as razor-thin lines. Adding a slight overlap where the roof meets the wall helps convey the presence of the fabric covering. This small detail prevents the drawing from looking like a flat, transparent geometric shape.
Perspective is another area where artists often struggle. Since a yurt is a circular building, the base and the roof crown should be drawn as ellipses rather than perfect circles unless you are viewing the structure from directly above. Failing to adjust these ellipses based on your eye level will make the yurt appear distorted or tipped over. Always ensure that the curvature of the base ellipse matches the curvature of the roof crown to maintain a consistent perspective throughout the entire sketch.
How to add texture and detail
Adding texture is what transforms a simple line drawing into a convincing illustration of a yurt. You can represent the fabric cover by using light, parallel shading lines that follow the curve of the roof. To emphasize the lattice walls, use a consistent crisscross pattern. This pattern should be slightly obscured if you want to show the heavy felt layer often draped over the wood, or left visible if you are depicting the frame during construction.
To finalize your drawing, focus on the lighting and shadows. Since a yurt is a rounded object, one side should be slightly darker than the other to show the direction of the light source. A cast shadow on the ground extending away from the structure will also help anchor the yurt to the landscape. By carefully placing these shadows, you create a sense of scale and presence that makes the building feel like it truly occupies space in your composition.
Key facts
- A yurt is essentially a cylinder topped with a low-pitched cone, so start by drawing these two basic geometric shapes.
- Use a light pencil to draw a wide oval for the base and a smaller oval above it to serve as the roof's crown.
- Connect the edges of the two ovals with straight vertical lines to define the cylindrical wall.
- Draw a small circle in the center of the top oval to represent the toono, the traditional smoke hole or skylight.
- Add a rectangular shape at the base of the cylinder to indicate the door, which is traditionally oriented toward the south.
- Keep your lines loose and sketchy at first to ensure the proportions look balanced before committing to dark outlines.
The bottom line
Drawing a yurt is a straightforward process of stacking a cylinder and a cone. By focusing on the central smoke hole and the circular lattice walls, you can quickly capture the essence of this iconic dwelling. Avoid making the walls too tall or the roof too sharp, as yurts are designed to be low and stable. With these simple geometric steps, you can easily illustrate this architectural marvel.
People also ask
Why do yurts have a circular shape?
The circular design is aerodynamically efficient, allowing wind to flow around the structure rather than hitting a flat surface. This shape also provides maximum interior space while using the minimum amount of building materials.
What is the purpose of the hole at the top of a yurt?
The central opening, known as the toono, serves as a chimney for the central hearth and a source of natural light. It is often covered with a flap of felt or canvas to regulate temperature and ventilation.
How many walls does a traditional yurt have?
Traditional Mongolian yurts, or gers, use a collapsible lattice wall made of wooden poles. The number of wall sections depends on the size of the yurt, but they are always arranged in a circle.
Should I use a ruler when drawing a yurt?
While a ruler can help with the door frame, freehand drawing is often better for a yurt. The structure's organic, rounded nature looks more natural when the lines have a slight, human-made variation.
What is the best way to shade a yurt drawing?
Focus your light source on one side of the cylinder and shade the opposite side to create depth. Use soft, curved strokes to follow the roundness of the walls rather than flat, vertical shading.
Are there different styles of yurts to draw?
Yes, you can draw a traditional Mongolian ger with a steeper roof or a modern Western-style yurt. Western yurts often feature more windows and steeper, more permanent roof structures than their nomadic counterparts.
This answer was created with the help of AI research tools and reference sources. Spotted an error? Let us know — we correct mistakes quickly. See our editorial policy.