Why do my drawings look flat?
Short answer
Drawings look flat primarily due to a lack of value contrast, missing atmospheric perspective, and improper use of linear perspective. When objects lack a defined light source, they appear two-dimensional. By mastering shading techniques, overlapping shapes, and size variation, you can create the illusion of three-dimensional depth on a flat surface.
On this page
Why drawings look flat
The primary reason drawings appear flat is the absence of a consistent light source. Without a clear direction for light, objects lack the highlights and shadows necessary to define their volume. When you draw an object using only outlines, you are essentially creating a symbol rather than a representation of physical form. Shadows provide the visual cues that our brains use to interpret depth, curvature, and solidity.
Another common issue is the lack of value contrast. Beginners often use a narrow range of grays, which makes the image look washed out. To create depth, you must push your darkest darks and lightest lights to their extremes. This technique, known as chiaroscuro, was popularized by Renaissance masters like Leonardo da Vinci and Caravaggio. By increasing the range between your deepest shadows and brightest highlights, you force the eye to perceive a three-dimensional space rather than a flat sheet of paper.
How to use linear perspective
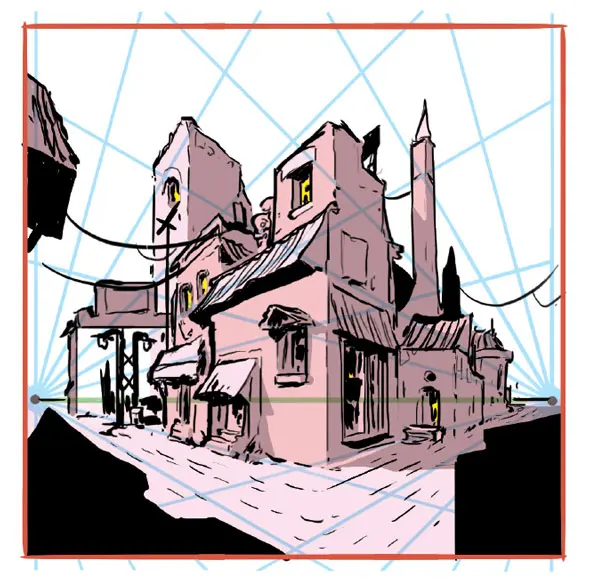
Linear perspective is a mathematical system used to create the illusion of space on a flat plane. It relies on horizon lines and vanishing points to determine how objects shrink as they move further away. If your drawings lack a clear vanishing point, your objects will appear to float or sit on the same plane, destroying the sense of distance.
To implement linear perspective effectively, follow these steps:
- Draw a horizontal line across your page to represent the horizon or eye level.
- Place one or more dots on this line to serve as your vanishing points.
- Connect the corners of your objects to these points using light guidelines.
- Ensure that all parallel lines receding into the distance converge at these points.
By following these rules, you create a structured environment where objects occupy specific positions in a believable, deep space.
Best shading techniques for beginners
Shading is the process of darkening areas of a drawing to suggest form. Many beginners make the mistake of using only one type of pencil pressure, resulting in a uniform gray tone. Instead, you should observe how light wraps around an object. A sphere, for example, has a highlight, a mid-tone, a core shadow, a reflected light, and a cast shadow.
To improve your shading, practice these techniques:
- Hatching: Drawing closely spaced parallel lines to build up density.
- Cross-hatching: Layering perpendicular sets of lines to create darker values.
- Blending: Using a stump or tissue to soften transitions between light and shadow.
- Stippling: Creating value through the accumulation of small dots.
Avoid "smudging" with your fingers, as the oils from your skin can damage the paper and create muddy, uneven textures that flatten your work.
Common mistakes when drawing depth
One frequent error is failing to use overlapping. When one object partially covers another, the brain immediately recognizes that the former is closer to the viewer. If you draw all objects side-by-side without any overlap, you create a "paper doll" effect where everything feels like it exists on a single, shallow plane.
Another mistake is ignoring atmospheric perspective. In nature, objects that are further away appear lighter, less detailed, and cooler in color temperature. If you draw distant mountains with the same heavy, dark lines as a foreground tree, the image will collapse into flatness. Always reduce the contrast and detail of background elements to push them back into the distance. Finally, ensure that your cast shadows are anchored to the base of your objects, as floating shadows create the illusion that objects are hovering rather than sitting on a surface.
How to practice drawing three-dimensionally
Developing a sense of depth requires consistent practice and careful observation of the real world. Start by drawing simple geometric forms like cubes, spheres, and cylinders. These shapes are the building blocks of all complex objects. By mastering how light behaves on a basic cylinder, you gain the skills to draw more complex subjects like human limbs or tree trunks.
Dedicate time to "still life" studies where you control the lighting. Use a single desk lamp positioned to one side of your subject to create dramatic, clear shadows. This setup makes it easier to identify the core shadow and reflected light. As you draw, constantly compare the values of your subject to the values on your paper. If your drawing looks flat, identify which area lacks a dark shadow or a bright highlight and adjust accordingly. Through deliberate practice and critical observation, you will eventually train your eyes to see and translate three-dimensional space onto your paper with confidence and accuracy.
Key facts
- Use a light source to determine where shadows fall, as consistent lighting creates the illusion of depth.
- Overlap objects to establish a clear foreground, middle ground, and background in your composition.
- Apply atmospheric perspective by making distant objects lighter, cooler in color, and less detailed.
- Vary your line weight; thicker lines suggest proximity, while thinner lines imply distance.
- Utilize linear perspective by connecting lines to a vanishing point on the horizon line.
- Avoid "coloring book" style outlines, as soft edges and gradients better represent three-dimensional form.
The bottom line
Drawings often appear flat because they lack the structural cues our eyes use to perceive depth in the real world. By mastering light, shadow, and perspective, you can transform simple shapes into convincing three-dimensional forms. Focus on overlapping elements, varying your line quality, and applying atmospheric perspective to guide the viewer’s eye through space. Consistent practice of these fundamental principles will effectively eliminate flatness in your art.
People also ask
What is the difference between shape and form?
A shape is two-dimensional, defined only by height and width, such as a circle. A form is three-dimensional, possessing height, width, and depth, like a sphere.
How can I make my shading look smoother?
Use the side of your pencil rather than the tip to cover more surface area. Layer your graphite gradually, starting with light pressure and building up darkness to avoid harsh, uneven streaks.
Why does my drawing look distorted when I use perspective?
Distortion often occurs when your vanishing points are placed too close together. Spacing them further apart or moving them off the page creates a more natural, realistic field of view.
What is the rule of thirds in drawing?
The rule of thirds involves dividing your canvas into a grid of nine equal rectangles. Placing key focal points along these lines or at their intersections adds dynamic balance and depth to your work.
Should I use black to create shadows?
Avoid using pure black for shadows, as it can make a drawing look muddy or flat. Instead, mix complementary colors or use a darker shade of the object's base color to create richer, more realistic depth.
How do I draw something that is far away?
Reduce the contrast between the object and its background. Distant items should have less texture, fewer visible details, and colors that lean toward blue or gray.
This answer was created with the help of AI research tools and reference sources. Spotted an error? Let us know — we correct mistakes quickly. See our editorial policy.