How do you draw fingers step by step?
Short answer
Drawing fingers requires breaking complex anatomy into simple geometric shapes like cylinders and boxes. By establishing the palm as a foundational trapezoid and mapping finger lengths relative to the middle finger, you create accurate proportions. Consistent practice using skeletal landmarks and realistic gesture lines ensures your hand drawings appear natural and structurally sound.
On this page
How to structure the hand for drawing
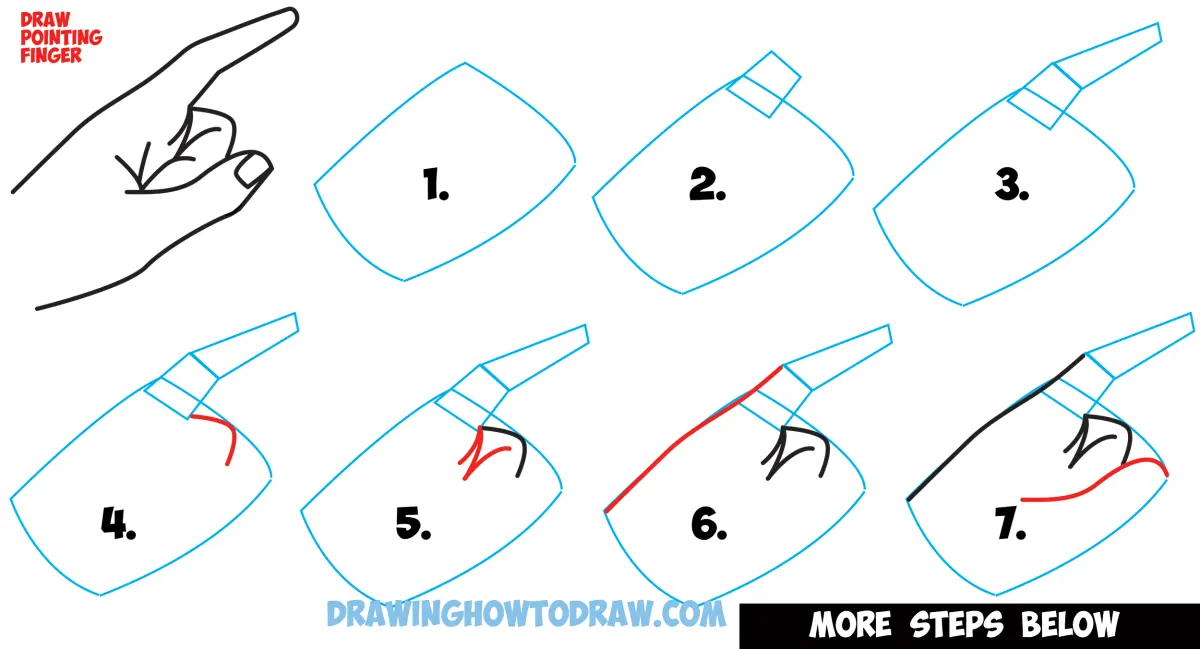
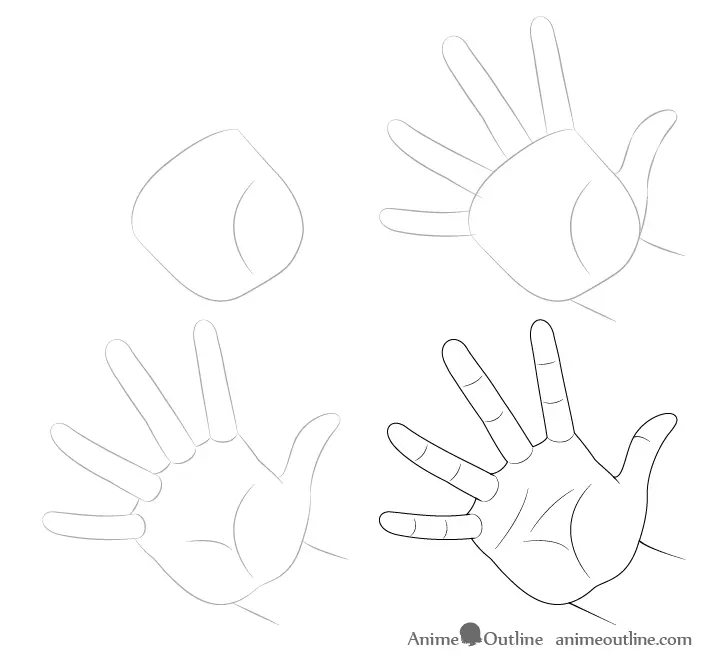
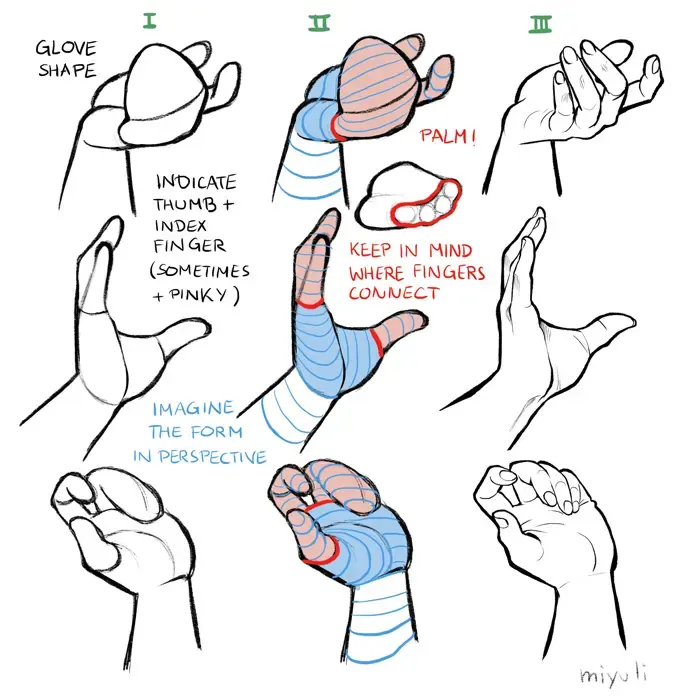
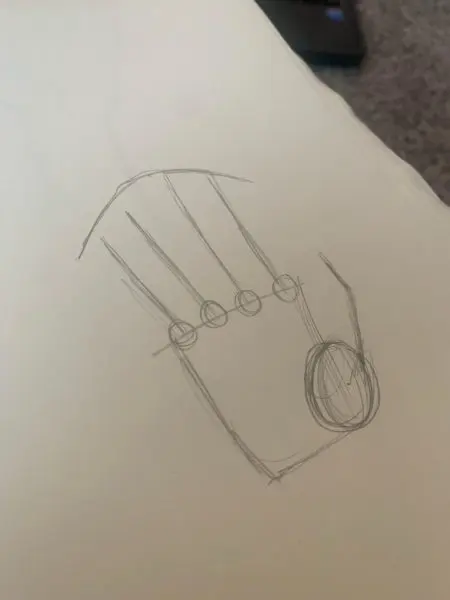
The human hand is a complex arrangement of bones, but you can simplify it by viewing the palm as a flat, wedge-shaped block. Before drawing individual fingers, sketch a trapezoid to represent the palm, which serves as the anchor for the digits. The thumb connects to the side of this base, while the four fingers emerge from the top edge.
When mapping the fingers, remember that they are not straight lines; they are segmented cylinders. Each finger consists of three phalanges, or bones, separated by two knuckles. To maintain correct proportions, use the following guide for your initial sketch:
- Draw the palm as a flattened square or trapezoid.
- Mark the base of the fingers with a gentle arc, as the middle finger is typically the longest.
- Use simple cylinders to represent the three segments of each finger.
- Ensure the joints are slightly wider than the shafts of the fingers to suggest bone structure.
How to measure finger proportions accurately
Proportion is the most common hurdle for artists, as fingers vary significantly in length and thickness. A helpful rule is that the middle finger is generally the longest, followed by the ring finger and index finger, which are often similar in length. The pinky finger is the shortest, usually ending near the top joint of the ring finger.
To achieve realism, compare the length of the fingers to the length of the palm. In a standard adult hand, the longest finger is roughly equal to the height of the palm itself. You can verify your work by checking these relationships:
- The index finger usually reaches the base of the fingernail on the middle finger.
- The ring finger is often slightly shorter than the middle finger but longer than the index finger.
- The thumb is shorter and thicker, typically reaching the first joint of the index finger when held against the side of the hand.
Why fingers look stiff in drawings
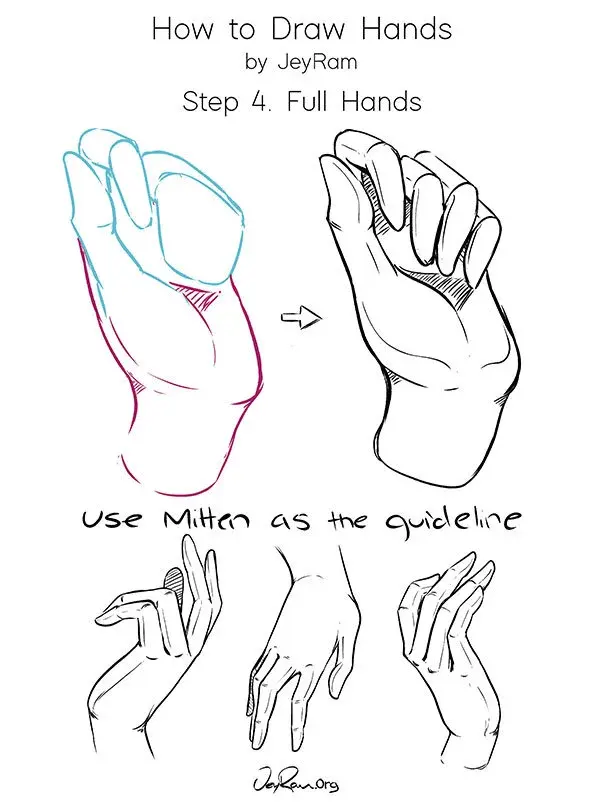
Stiffness often occurs when artists draw fingers as perfectly straight, rigid tubes. In reality, fingers possess a natural curvature, even when the hand is at rest. This "resting pose" is essential for making a drawing look organic rather than mechanical. Always incorporate a slight inward curve toward the palm to simulate the natural tension of the tendons.
Another reason for a stiff appearance is the lack of variation in the finger joints. Each knuckle creates a slight bulge and a change in direction for the finger's surface. To avoid a robotic look, try these techniques:
- Vary the thickness of the finger segments; the base is usually the thickest part, tapering toward the fingertip.
- Add subtle overlapping lines where the finger segments meet to create depth.
- Avoid drawing fingers as parallel lines; allow them to fan out slightly from the palm to create a dynamic, realistic silhouette.
Common mistakes when drawing fingers
Many beginners struggle with "sausage fingers," where the digits appear puffy and lack bony structure. This usually happens because the artist focuses on the fleshy outline rather than the underlying skeletal framework. To correct this, emphasize the knuckles as hard, angular points rather than soft, rounded curves. This adds a sense of weight and structural integrity to the hand.
Another frequent error is neglecting the webbing between the fingers. The skin does not start at the very base of the finger bones; it sits slightly higher, creating a V-shaped gap between each digit. Failing to include this webbing makes the fingers look like they are floating separately from the hand. Keep these points in mind to improve your accuracy:
- Do not make all fingers the same thickness; the middle finger should be the most substantial.
- Avoid perfectly symmetrical curves on both sides of a finger, as muscles and tendons create unique contours.
- Ensure the fingernails are drawn with a slight curve that follows the cylindrical shape of the fingertip.
Best practice tips for beginners
The most effective way to improve your hand-drawing skills is to observe your own hand from various angles. Use a mirror to study how your fingers bend and how the skin bunches up at the joints during movement. Sketching from life provides immediate feedback on how light and shadow define the volume of the fingers, which is difficult to replicate from memory alone.
Consistency comes from repeating the basic construction process until it becomes muscle memory. Start by drawing hands in simple, static positions before attempting complex gestures like gripping an object or making a fist. By focusing on the underlying geometry, you will eventually be able to draw hands from any perspective with confidence. Remember these final tips for your practice sessions:
- Start with light, sketchy lines so you can easily adjust proportions before finalizing the details.
- Practice drawing the hand in different lighting conditions to see how shadows define the cylindrical segments.
- Keep your drawings small at first to focus on the overall shape rather than getting lost in the tiny details of the skin or fingernails.
Key facts
- The human finger consists of three phalanges, except for the thumb, which has two.
- Fingers are not straight cylinders; they taper slightly and have distinct knuckles that bulge when bent.
- The middle finger is typically the longest, followed by the ring finger and the index finger.
- To maintain correct proportions, the length of the middle finger is roughly equal to the length of the palm.
- Fingernails are not flat; they follow the cylindrical curve of the fingertip.
- Sketching fingers as simple geometric shapes like boxes or cylinders helps establish correct perspective before adding detail.
The bottom line
Drawing realistic fingers requires moving beyond simple shapes to understand the underlying skeletal structure and natural proportions of the hand. By treating fingers as articulated, tapered cylinders and observing the arc of the knuckles, you can create depth and movement. Focus on the relationship between finger length and palm size, and always prioritize the natural curvature of the digits to avoid a stiff, unnatural appearance in your work.
People also ask
Why do my drawn fingers look like sausages?
This usually happens because the joints are ignored. Ensure you mark the knuckles and add slight indentations where the finger segments meet to create a more realistic, articulated appearance.
Should all fingers be the same length?
No, fingers follow a natural arc. The middle finger is the longest, while the pinky is significantly shorter and usually ends near the top joint of the ring finger.
How do I draw fingers that are bent?
Use overlapping shapes to show depth. When a finger bends, the skin on the inside bunches up, while the skin on the outside stretches, which should be reflected in your line work.
What is the most common mistake when drawing hands?
The most frequent error is making the fingers too short relative to the palm. Always measure the finger length against the palm to ensure the hand does not look stunted.
How do I draw fingernails accurately?
Do not draw a full oval; instead, draw a shape that follows the curve of the fingertip. Leave a small gap between the nail and the skin to suggest the nail bed.
Are hands harder to draw than faces?
Many artists find hands more difficult because of their complex, shifting geometry and lack of fixed symmetry. Practice by observing your own hand in various positions to understand the underlying structure.
This answer was created with the help of AI research tools and reference sources. Spotted an error? Let us know — we correct mistakes quickly. See our editorial policy.