How do you draw a realistic hand?
Short answer
Drawing a realistic hand requires breaking down complex anatomy into simple geometric shapes like boxes and cylinders. By establishing the palm’s structure first, you create a foundation for the fingers and thumb. Consistent practice with observation, focusing on proportions and skeletal landmarks, allows you to capture the natural gesture and volume of hands.
On this page
How to simplify hand anatomy for drawing
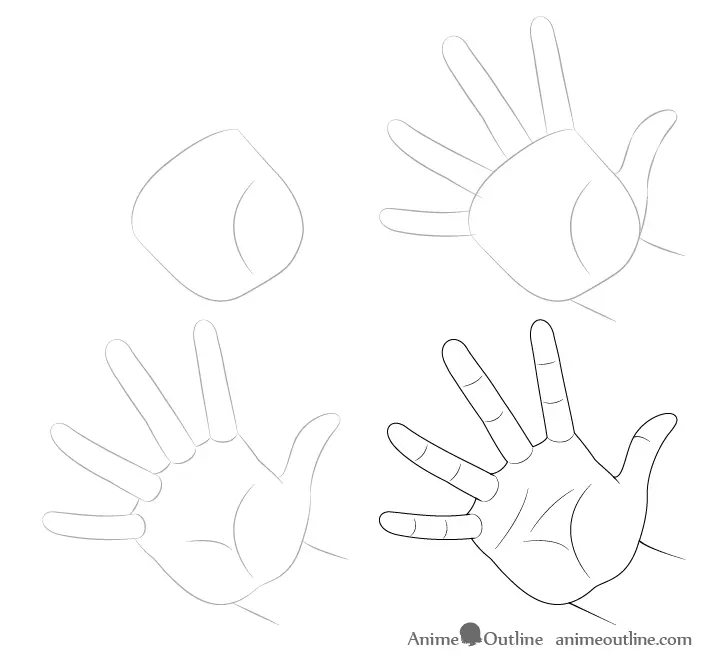
The human hand is a complex structure consisting of 27 bones, but artists simplify this by viewing the palm as a flat, slightly trapezoidal block. The fingers are then treated as cylinders attached to this base. By visualizing the palm as a rigid box, you can establish the perspective of the hand before adding the more fluid elements. This structural approach prevents the common error of drawing fingers that appear disconnected or strangely proportioned relative to the rest of the limb.
To begin your sketch, follow these foundational steps:
- Draw a square or trapezoid to represent the palm, noting the slight arch across the knuckles.
- Mark the position of the thumb base, which sits lower than the other fingers and is connected by a thick pad of muscle.
- Use light lines to map out the length of each finger, remembering that the middle finger is typically the longest.
- Connect these shapes with fluid lines to define the skin and tissue, ensuring the joints are slightly rounded rather than sharp.
How to measure hand proportions correctly
Proportions are the most critical factor in achieving realism. A common rule of thumb is that the length of the middle finger is roughly equal to the length of the palm. The thumb, when fully extended, usually reaches about halfway up the index finger. If your proportions are off by even a small margin, the hand will immediately look uncanny or distorted to the viewer. Always use your own hand as a reference, comparing the length of the digits to the width of the palm.
When refining your proportions, keep these anatomical facts in mind:
- The knuckles do not form a straight line; they create a gentle, cascading curve.
- The distance between the wrist and the base of the fingers is roughly the same as the length of the middle finger.
- Fingers are not uniform cylinders; they taper slightly toward the tips and have distinct pads at the joints.
- The skin on the back of the hand is thin and reveals the underlying tendons, while the palm side is fleshy and padded.
How to draw fingers and joints accurately
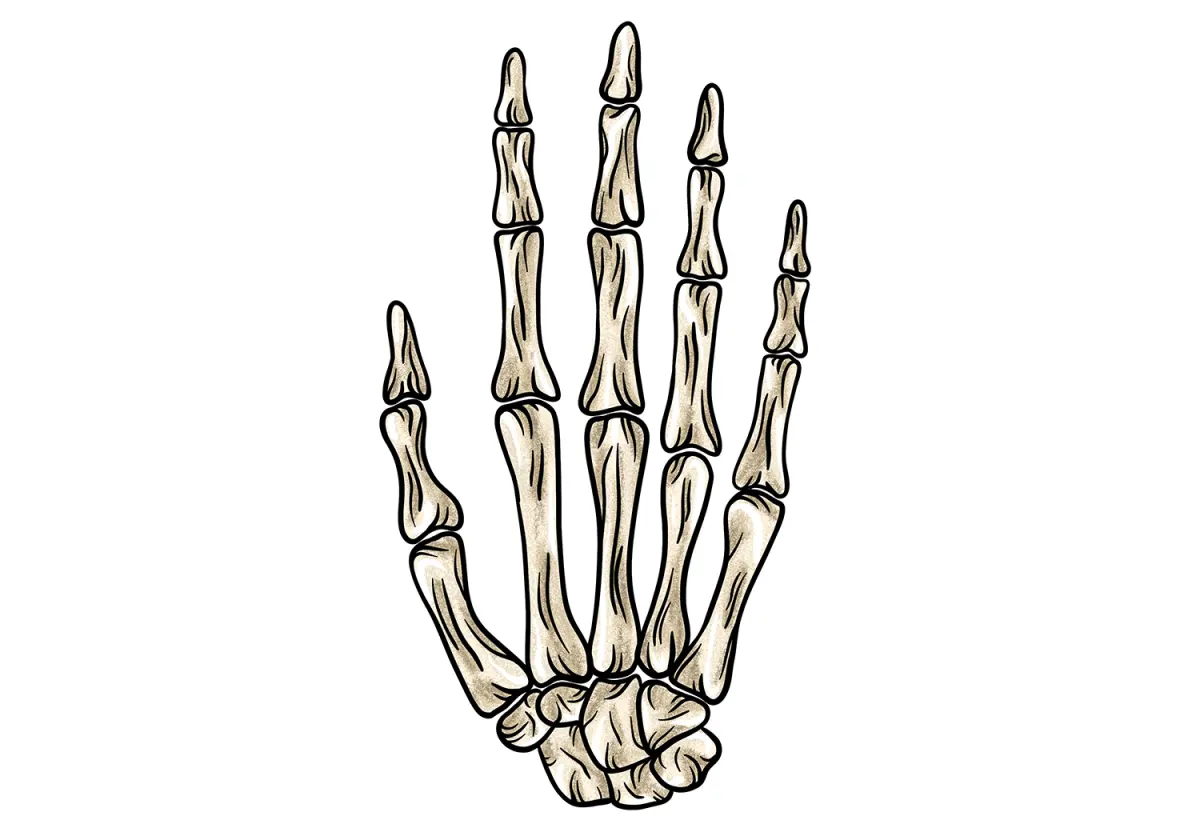
Fingers are composed of three phalanges, except for the thumb, which has two. When drawing them, it is essential to show the articulation of the joints. Avoid drawing fingers as straight, rigid sticks; they possess a natural, slight curve even when relaxed. Each joint acts as a hinge, and the skin folds significantly on the inside of these joints when the finger bends. Observing how the skin bunches up at the knuckles provides the necessary detail to make a drawing feel three-dimensional and alive.
Focus on these details to enhance your work:
- Draw the knuckles as subtle bumps on the back of the hand rather than perfect circles.
- Ensure the fingernails are drawn as part of the finger's surface, curving around the cylinder of the fingertip.
- Pay attention to the webbing between the fingers, which starts lower than the actual knuckle joints.
- Study how the thumb moves on a different plane compared to the fingers, allowing it to rotate and grasp objects.
Common mistakes when drawing hands
The most frequent error beginners make is drawing the fingers too short or creating "sausage-like" shapes that lack structural integrity. Another common pitfall is ignoring the wrist, which connects the hand to the arm with a complex set of tendons and bones. Beginners often draw the hand as if it is floating, failing to account for the way the wrist bone protrudes or how the forearm muscles taper into the hand. Always integrate the wrist into your initial sketch to ensure the hand looks like a natural extension of the arm.
To avoid these common pitfalls, practice the following:
- Avoid "flat" hands by adding shading to indicate the volume of the palm and the depth of the fingers.
- Do not forget the shadow cast by the thumb, which often creates a deep pocket of darkness in the palm.
- Refrain from drawing every single wrinkle; focus on the major joints and the overall gesture of the hand.
- Check your work in a mirror to spot errors in perspective that your eyes might have glossed over during the drawing process.
Best practice techniques for improvement
Consistent observation is the best tool for improvement. Spend time sketching your own hand from various angles, such as clenching a fist, holding a pen, or resting flat on a table. Using a mirror allows you to observe your hand while drawing simultaneously, which is an invaluable exercise for understanding foreshortening. Foreshortening occurs when a finger points toward the viewer, making it appear shorter than it actually is; mastering this effect is the hallmark of an advanced artist.
To maintain steady progress, incorporate these habits into your routine:
- Dedicate ten minutes daily to "gesture drawing" hands, focusing on the flow and energy rather than perfect detail.
- Use a soft graphite pencil to build up layers, starting with light geometric shapes before adding darker, definitive outlines.
- Study the hands of famous portrait painters like Leonardo da Vinci or John Singer Sargent to see how they handled complex hand positions.
- Remember that a realistic hand is not just about anatomy; it is about capturing the specific tension or relaxation present in the pose you are drawing.
Key facts
- The human hand is composed of 27 individual bones, including 8 carpals in the wrist, 5 metacarpals in the palm, and 14 phalanges in the fingers.
- Always simplify the palm into a basic pentagon or square shape to establish the correct perspective and angle before adding fingers.
- Use the length of the middle finger as a measuring tool; it is typically equal to the length of the entire palm from the wrist crease.
- The thumb is unique because it rotates on a different plane than the other four fingers, originating from the side of the wrist rather than the palm base.
- Fingers are not perfectly straight cylinders; they taper slightly and feature distinct knuckles that create a rhythmic, segmented appearance.
- Avoid drawing fingers as "sausages" by ensuring the joints are slightly wider than the shafts and adding subtle skin folds at the crease points.
The bottom line
Drawing a realistic hand requires moving beyond symbolic representations to observe the underlying skeletal structure. By breaking the anatomy into simple geometric forms—a pentagonal palm and cylindrical fingers—you can establish accurate proportions before refining the details. Practice observing the unique range of motion in the thumb and the rhythmic variations in finger length. Consistent study of these structural fundamentals will eventually lead to natural, fluid results.
People also ask
How do I draw hands in different positions?
Focus on the negative space between the fingers and the overall silhouette of the hand. By blocking out the gesture with simple geometric shapes first, you can maintain accurate proportions regardless of the pose.
Why do my drawn hands always look stiff?
Stiff hands usually result from drawing fingers as parallel, rigid lines. Introduce a slight curve to the knuckles and ensure the fingers fan out naturally rather than remaining perfectly vertical.
How do I determine the correct finger length?
The middle finger is the longest, followed by the ring and index fingers, which are often similar in length. The pinky finger typically ends near the top joint of the ring finger.
Should I draw the fingernails first?
No, always draw the fingernails last as surface details. If you draw them too early, they often dictate the shape of the fingertip incorrectly and disrupt the hand's structural integrity.
How do I make the palm look three-dimensional?
Use shading to distinguish the "thenar eminence," the fleshy mound at the base of the thumb. Adding a slight shadow here provides the necessary volume to make the hand look realistic.
Is it better to draw from life or photos?
Drawing from your own hand is the best practice because you can observe it from multiple angles in real-time. Use a mirror to capture complex foreshortened views that are difficult to visualize otherwise.
This answer was created with the help of AI research tools and reference sources. Spotted an error? Let us know — we correct mistakes quickly. See our editorial policy.