What is the easiest way to draw a donut?
Short answer
The easiest way to draw a donut is by using two concentric circles as a foundation. Start by sketching a larger outer circle and a smaller inner circle, then connect them with curved lines to create volume. Add shading to give it a three-dimensional appearance and finish with simple shapes for sprinkles.

On this page
How to draw a basic donut shape
The most efficient method for drawing a donut begins with geometric construction. By viewing the donut as a torus, you can simplify its complex form into two circles. Start by drawing a light circle to represent the outer edge, then place a smaller circle in the center to define the hole. This approach ensures symmetry and prevents the shape from looking lopsided or distorted.
Once you have your circles, you can refine the outline to make it look like a pastry rather than a mathematical diagram. Soften the edges of your circles so they appear slightly uneven, as real donuts are rarely perfect. You can also add a wavy line around the top edge to represent the dripping icing. This simple technique provides a solid framework that allows you to build detail without losing the overall structural integrity of the drawing.
Best tools for drawing a donut for beginners
For those just starting, using a graphite pencil with a medium hardness, such as an HB or 2B, is ideal. These pencils allow you to sketch lightly, making it easy to erase mistakes or adjust the size of the circles before committing to darker lines. You should also keep a kneaded eraser nearby, as it is gentle on paper and perfect for lifting away graphite without damaging the surface texture.
When you are ready to add color or definition, consider using the following tools:
- Fineliner pens: Use these to create crisp, permanent outlines once your sketch is finished.
- Colored pencils: These are excellent for layering, allowing you to build up the golden-brown crust color.
- White gel pens: Use these to add highlights on the icing, which makes the glaze look wet and realistic.
- Blending stumps: These help smooth out your shading, creating a soft transition between the light and shadow areas of the pastry.
Why the donut looks flat
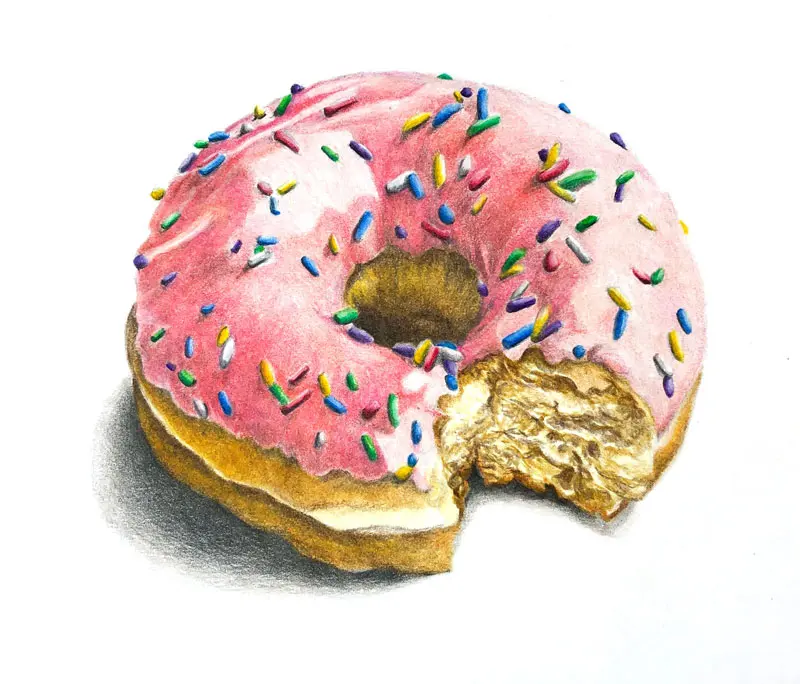
A common issue for beginners is that the donut appears like a flat ring on the page rather than a solid object. This happens because the drawing lacks depth and perspective. To fix this, you must consider the light source. If your light is coming from the top left, the bottom right side of the donut should be significantly darker. Adding a cast shadow underneath the donut on the surface it rests upon also anchors the object and provides a sense of weight.
Furthermore, you should avoid drawing the inner and outer circles as perfectly concentric lines if you want to show volume. Instead, slightly shift the inner circle toward the light source. This creates a thicker edge on the side opposite the light, mimicking the way a real torus catches light and shadow. By focusing on these subtle shifts in tone and placement, you transform a two-dimensional shape into a convincing, three-dimensional representation of a donut.
Common mistakes when drawing a donut
Many people struggle with the proportions of the central hole. If the hole is too large, the donut looks like a thin, brittle ring; if it is too small, the pastry appears dense and heavy. Aim for a hole that occupies roughly one-third of the total width of the donut. You should also be careful with the placement of sprinkles, as scattering them too evenly can make the drawing look mechanical and artificial.
Follow these steps to avoid common pitfalls:
- Don't press too hard with your pencil during the initial sketching phase, as deep indentations are difficult to erase.
- Avoid using perfectly straight lines for the icing, as this makes the glaze look stiff rather than liquid.
- Do not neglect the thickness of the donut; ensure the side profile is visible to give the object height.
- Refrain from using black for shadows; instead, use a deep brown or purple to keep the colors vibrant and organic.
How to add realistic details to your drawing
Once the base form is established, adding texture is what truly brings the drawing to life. Focus on the contrast between the smooth, shiny surface of the icing and the porous, bread-like texture of the donut's side. You can indicate the bread texture by using small, stippled dots or short, light dashes along the bottom edge. This suggests the airy, leavened nature of the dough, providing a tactile quality that contrasts well with the glossy glaze.
Finally, place your sprinkles strategically to enhance the composition. Rather than drawing them as simple dots, try varying their shapes into small cylinders or ovals to suggest depth. Some sprinkles should overlap the edges of the icing to create a sense of movement. By adding a few bright white highlights on the curved surfaces of the icing, you simulate the reflection of light, which is the final touch needed to make your donut look delicious and complete.
Key facts
- Start by drawing two concentric circles, one inside the other, to establish the basic donut shape.
- Use an oval shape instead of a perfect circle to create a more realistic three-dimensional perspective.
- Draw a wavy, irregular line along the top half of the donut to represent the dripping icing.
- Add small, rounded rectangles or dashes on top of the icing to serve as sprinkles.
- Use a light gray or beige color for the dough and a brighter, solid color for the glaze.
- Apply a small white highlight on the curved side of the donut to suggest a glossy, fresh texture.
The bottom line
Drawing a convincing donut relies on mastering basic geometry and adding subtle details like irregular icing edges and highlights. By starting with simple ovals and building up layers of texture, you can transform a basic shape into a delicious-looking illustration. Remember to focus on lighting and shadow to provide depth, ensuring your final drawing looks like a three-dimensional object rather than a flat, two-dimensional circle.
People also ask
How do I make the donut look three-dimensional?
You can achieve depth by drawing a small curved line at the bottom inner edge to represent the thickness of the dough. Adding a soft shadow beneath the donut on the surface it rests on also helps ground the object.
What is the best tool for drawing smooth circles?
A compass is the most accurate tool for creating perfect circular shapes. If you are drawing freehand, practice drawing circles in the air with your arm before touching the paper to build muscle memory.
Should I use ink or pencil for the final outline?
Using a fine-liner or ink pen after sketching with a pencil allows you to create clean, permanent edges. Always wait for the ink to dry completely before erasing your initial pencil guidelines to avoid smearing.
How can I make the icing look realistic?
Vary the thickness of the icing line so it appears thicker in some areas and thinner in others. Adding a few small bubbles or uneven bumps along the edge of the glaze mimics the natural look of poured frosting.
What is the most common mistake when drawing donuts?
Many beginners draw the center hole perfectly centered, which makes the donut look flat. Offsetting the hole slightly toward the top or bottom creates a more natural, organic appearance.
Can I add texture to the donut dough?
Yes, you can stipple the bottom side of the donut with tiny dots to represent the porous, airy texture of fried dough. Keeping these dots concentrated in the shaded areas adds significant visual interest.
This answer was created with the help of AI research tools and reference sources. Spotted an error? Let us know — we correct mistakes quickly. See our editorial policy.