How do you teach perspective to kids?
Short answer
Teaching perspective involves helping children understand how objects change size and position relative to a viewer. By introducing the horizon line, vanishing points, and overlapping shapes, you provide the tools to create depth on a flat surface. Consistent practice with observation and simple geometric drawing exercises builds these essential spatial skills.
On this page
How to explain perspective to a child
Perspective is the artistic technique used to create the illusion of three-dimensional depth on a two-dimensional surface. To explain this to a child, start by observing the real world together. Point out how cars look smaller as they drive down a long road or how trees appear to shrink as they get farther away. Use the term "scale" to describe how size changes based on distance.
You can demonstrate this concept using simple physical objects. Place a toy block close to the child and another identical block several feet away. Ask them to compare the sizes. Once they see that the distant object appears smaller, explain that artists use this visual rule to make drawings look realistic. Keep the initial conversation focused on observation rather than complex geometry to avoid overwhelming them.
What are the basic rules of perspective
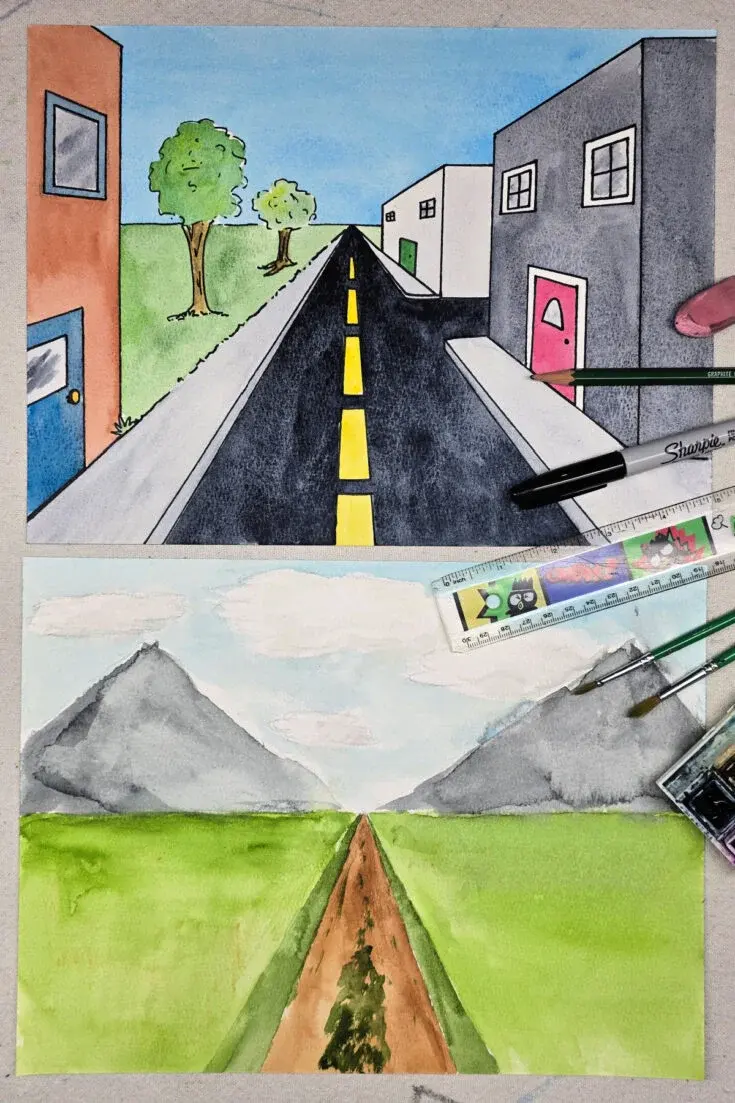
The fundamental components of perspective are the horizon line and the vanishing point. The horizon line represents the eye level of the viewer, while the vanishing point is the specific spot where parallel lines appear to converge in the distance. Understanding these two concepts allows children to anchor their drawings in a logical space.
- Draw a horizontal line across the middle of the paper to represent the horizon.
- Place a small dot anywhere on that line to serve as the vanishing point.
- Draw shapes like squares or rectangles, then connect their corners to the dot.
- Add vertical and horizontal lines to "close" the shapes, creating 3D boxes.
Encouraging children to use a ruler during these early exercises ensures that their lines remain clean. This practice helps them visualize how lines travel toward a single point, which is the cornerstone of one-point perspective drawing.
How to use overlapping to show depth
Overlapping is the easiest way for young children to create a sense of distance without needing complex math. When one object partially covers another, the brain automatically perceives the covered object as being further away. This technique is highly effective for beginners because it relies on visual intuition rather than rigid grid systems.
To practice this, have the child draw several circles or shapes of varying sizes on a page. Instruct them to draw some shapes so that they seem to "hide" behind others. You can use these steps to guide the process:
- Draw the largest shapes first near the bottom of the page to represent the foreground.
- Draw medium-sized shapes in the middle ground, slightly overlapping the bottom ones.
- Draw the smallest shapes near the horizon line to represent the background.
- Use color or shading to distinguish between the layers, making the foreground darker and the background lighter.
Why perspective drawings look wrong
Common mistakes often stem from a lack of consistency in where lines are directed. A frequent error is drawing lines that go toward different spots on the paper rather than a single vanishing point. This creates a distorted image where the objects seem to tilt or break apart. Remind the child that all lines representing depth must meet at the same point.
Another issue is the "floating" object, where items are drawn without a clear relationship to the ground plane. If a building or tree is drawn too high above the horizon line without a base, it loses its sense of scale. Always ensure that the bottom of an object sits firmly on the surface plane. If a drawing looks "off," ask the child to trace their lines back to the vanishing point to see if they deviate from the intended path.
Best exercises for practicing perspective
Consistent practice is the most effective way to master these spatial concepts. Start with simple shapes before moving on to complex structures like houses or city streets. Encourage the child to draw from life, such as looking down a hallway or standing at the end of a sidewalk, to see how the lines actually converge in their own environment.
- The "Roadway" drawing: Draw a road that starts wide at the bottom and tapers to a point on the horizon.
- The "Alphabet" exercise: Draw block letters that recede toward a vanishing point to create 3D text.
- The "Forest" study: Draw trees of different sizes, placing larger ones lower on the page and smaller ones higher up.
- The "Room" view: Draw the four corners of a room meeting at a central point to create a realistic interior space.
By rotating through these exercises, children gain confidence in their ability to manipulate space. Always celebrate the effort of creating depth, as it is a significant cognitive milestone in a young artist's development.
Key facts
- Linear perspective uses a horizon line and a vanishing point to create the illusion of three-dimensional depth on a flat surface.
- The Renaissance architect Filippo Brunelleschi is credited with formalizing the mathematical rules of linear perspective around 1415.
- Objects appear smaller as they approach the vanishing point, while lines that are parallel in reality appear to converge at that point.
- Atmospheric perspective involves using lighter colors and less detail for objects in the background to simulate the effect of distance.
- Overlapping shapes, where one object partially obscures another, is the simplest way for children to indicate spatial depth in drawings.
- Foreshortening is a technique where an object appears compressed when viewed at an angle, making it look shorter than its actual length.
The bottom line
Teaching perspective is fundamentally about training the eye to observe how space interacts with the viewer. By starting with simple overlapping techniques and moving toward the mathematical precision of vanishing points, children learn to translate the three-dimensional world onto paper. Consistency, the use of a horizon line, and regular practice are the most effective tools for turning flat sketches into immersive, realistic representations of depth.
People also ask
At what age can children typically understand perspective
Most children begin to grasp basic overlapping and size variation around age seven or eight. Formal instruction in linear perspective is usually most effective when introduced between the ages of ten and twelve.
What is the difference between one-point and two-point perspective?
One-point perspective uses a single vanishing point, usually centered, and is best for drawing roads or hallways. Two-point perspective uses two vanishing points on the horizon, which is ideal for drawing the corners of buildings or boxes.
Should I teach children to use a ruler for perspective drawings?
Using a ruler is essential for beginners to understand how parallel lines converge toward a specific point. Once the concept is mastered, students can transition to freehand sketching to add a more organic feel.
What is the most common mistake beginners make?
The most frequent error is drawing all objects the same size regardless of their distance from the viewer. Beginners also often struggle with placing the horizon line too high or too low, which distorts the scene's scale.
How can I teach perspective without formal art tools?
You can use a window and a dry-erase marker to trace the outline of buildings or trees outside. This physical demonstration helps children visualize how 3D objects map onto a 2D plane.
Why do my child's drawings look "flat"?
Drawings appear flat when they lack a defined horizon line or consistent vanishing points. Encouraging the child to add foreground, middle ground, and background elements will naturally create a sense of depth.
This answer was created with the help of AI research tools and reference sources. Spotted an error? Let us know — we correct mistakes quickly. See our editorial policy.