How do you draw a scorpion step by step?
Short answer
Drawing a scorpion requires breaking its anatomy into manageable geometric shapes, starting with the cephalothorax, abdomen, and tail. By sketching a curved line for the body and adding symmetrical pincers and a segmented stinger, you can accurately capture its form. Consistent proportions and attention to joint articulation are essential for realism.
On this page
How to draw a scorpion step by step
To begin your drawing, start with a light pencil sketch to establish the basic posture. Scorpions have a distinct, elongated body that curves upward. Draw a small oval for the head area, a larger oval for the main body, and a series of smaller, narrowing segments for the tail. This framework ensures your proportions remain accurate before you add complex details.
Once the skeleton is set, follow these steps to build the anatomy:
- Sketch the cephalothorax, which is the front section holding the eyes and legs.
- Outline the abdomen, keeping it wide and segmented.
- Draw the tail, known as the metasoma, curving it over the back.
- Add the pedipalps, which are the large pincers, extending from the front.
- Attach four pairs of legs to the underside of the cephalothorax.
Refine these shapes by adding curves and thickness to the segments. Remember that the tail should taper significantly as it reaches the stinger.
Best drawing tools for beginners
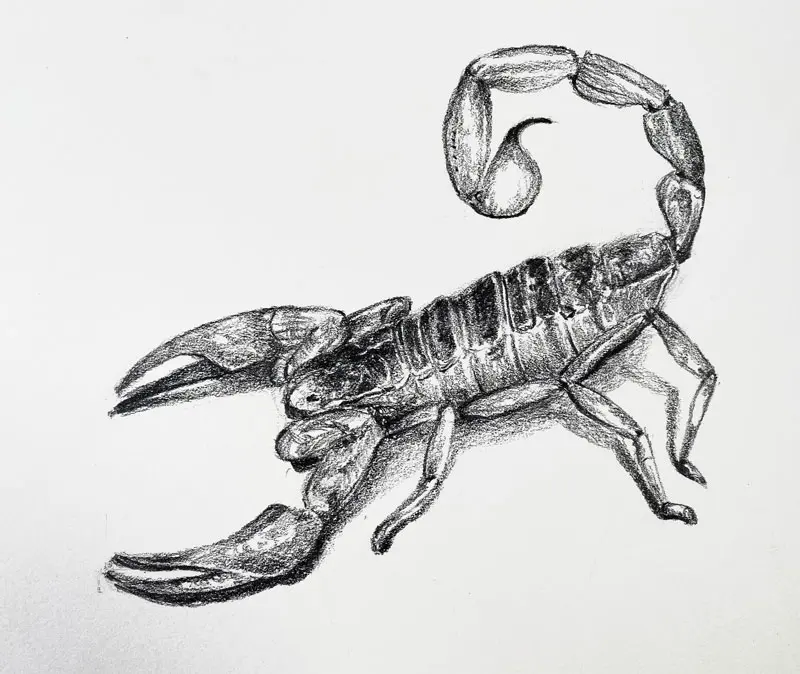
For those new to biological illustration, using a graphite pencil set ranging from HB to 4B is ideal. HB pencils are perfect for the initial light framework, while softer 4B pencils allow you to add deep shadows and texture to the exoskeleton. A high-quality kneaded eraser is also essential for lifting graphite to create highlights on the shiny, chitinous surface of the scorpion.
When choosing paper, select a smooth, acid-free sketchbook with a weight of at least 80 pounds. Smooth paper allows for finer detail work, which is necessary when drawing the small, serrated edges of the pincers or the tiny sensory hairs called trichobothria. Avoid overly textured paper, as it can make precise lines appear jagged. Using a fine-liner pen for the final outline can also help define the silhouette once your pencil work is complete.
How to capture scorpion anatomy accurately
Accuracy in drawing a scorpion depends on understanding its unique segment structure. The body is divided into the prosoma and the opisthosoma, with the latter further split into the mesosoma and the metasoma. When drawing the segments, ensure they overlap slightly like armor plating. This layering is what gives the scorpion its rigid, defensive appearance and allows for its characteristic flexibility.
Pay close attention to the pincers, or chelae. These are not merely circles; they have a palm-like structure called the manus and a movable finger. The joint where the pincer meets the arm is a critical area for detail. Observe how the legs attach to the body, as they are often tucked underneath, which can be a common point of confusion for beginners. By focusing on these anatomical junctions, your drawing will look biologically plausible rather than like a generic insect.
Common mistakes when drawing scorpions
A frequent error is making the tail segments uniform in size. In nature, the segments of the metasoma increase in length as they approach the telson, or the stinger. If you draw them all the same size, the scorpion will look unnatural and stiff. Additionally, many artists fail to account for the thickness of the pincers. They should be substantial and powerful, often appearing larger than the legs.
Another common mistake is ignoring the perspective of the legs. Because scorpions are low to the ground, the legs are often splayed out to the sides. Avoid drawing them straight down like a table. Instead, give them a slight bend at the joints to suggest movement and weight. Finally, avoid over-detailing the eyes; scorpions have a pair of median eyes and several lateral eyes, but they are often small and subtle. Focusing too much on them can distract from the overall form.
How to add texture and shading
The final stage of your drawing involves adding texture to represent the scorpion's exoskeleton. Use short, cross-hatched strokes to create the appearance of a hard, reflective shell. Focus your shading on the undersides of the body segments and the inner curves of the pincers to create a sense of three-dimensional volume. Leave small, white gaps on the top of the tail and the back to indicate light reflecting off the smooth surface.
To enhance the realism, consider these shading techniques:
- Use smooth gradients on the rounded segments to simulate a glossy finish.
- Apply darker values in the crevices between the body segments to add depth.
- Use a stippling technique—small dots—to add a rougher, granular texture to the pincers if you are drawing a species known for a bumpy carapace.
- Ensure the cast shadow beneath the scorpion is dark and sharp, which anchors the creature firmly to the ground plane.
By carefully layering your shadows, you will bring the scorpion to life on the page.
Key facts
- Scorpions possess eight legs, two pedipalps (claws), and a segmented tail ending in a telson (stinger).
- When drawing, start with a central curved line to establish the flow of the segmented tail.
- The body consists of two main parts: the cephalothorax (head and torso) and the abdomen.
- Use ovals to map out the large pincers before adding detail to avoid disproportionate limbs.
- Scorpions have a low center of gravity; keep the legs tucked close to the body for realism.
- Focus on the exoskeleton's hard edges by using sharp, angular lines rather than soft curves.
The bottom line
To draw a realistic scorpion, prioritize the silhouette by sketching the segmented tail and bulky pincers first. Use geometric shapes to build the body structure before refining the edges with angular, chitinous textures. Avoid drawing the legs too long, as scorpions keep them close to their frames. By focusing on the creature’s distinct low-profile posture and segmented anatomy, you can create a scientifically accurate and visually striking illustration.
People also ask
Are all scorpions dangerous to humans?
While all scorpions are venomous, only about 25 of the 2,500 known species possess venom potent enough to be lethal to humans. Most stings result in localized pain and swelling similar to a bee sting.
How many segments are in a scorpion's tail?
The scorpion's tail, technically called the metasoma, consists of five distinct segments. The final segment is the telson, which houses the venom glands and the sharp stinger.
Do scorpions have eyes?
Yes, scorpions typically have a pair of median eyes in the center of the head and several lateral eyes along the front corners. When drawing, these are usually represented as small, simple dots.
What is the best medium for drawing insects?
Graphite pencils are ideal for beginners because they allow for easy erasing and shading of the exoskeleton. Fine-liner pens are better for adding the sharp, chitinous textures seen on the legs and pincers.
Why do scorpions glow under UV light?
Scorpions contain fluorescent chemicals in their cuticle, specifically beta-carboline, which reacts to ultraviolet light. This causes them to glow a bright blue-green color in the dark.
Should I draw the scorpion from a side or top view?
A side profile is generally easier for beginners as it clearly displays the tail structure and the curve of the body. A top-down view is better for showcasing the full span of the pincers and leg placement.
This answer was created with the help of AI research tools and reference sources. Spotted an error? Let us know — we correct mistakes quickly. See our editorial policy.