How do you draw a ponytail?
Short answer
Drawing a ponytail requires capturing the hair's volume at the base and its natural drape as it falls. Begin by defining the anchor point on the skull, then use sweeping, curved lines to establish the overall shape. Add texture through grouped strokes that follow the hair's flow, rather than drawing every individual strand.
On this page
How to structure the base of a ponytail
The foundation of a realistic ponytail lies in how the hair gathers at the scalp. Before drawing the tail itself, identify the anchor point on the head, which is usually located at the crown or the nape of the neck. When hair is pulled back, it creates tension lines that radiate from the hairline toward the elastic band. You should draw these guide lines lightly to show the direction of the pull, as this provides a sense of weight and realism to the hairstyle.
To create a convincing base, follow these steps:
- Determine the height of the ponytail and mark it with a small circle or oval.
- Draw soft, curved lines from the hairline leading toward that central point.
- Leave a small gap between the head and the hair mass to suggest volume and thickness.
- Add a slight overlap where the hair meets the hair tie to indicate the tightness of the gather.
How to sketch the volume and flow
Once the base is established, focus on the silhouette of the ponytail. A common mistake is drawing the ponytail as a single, uniform shape; instead, think of it as a collection of flowing ribbons or a solid mass with varying thickness. The hair should taper naturally as it moves away from the head, becoming thinner toward the ends. Use long, fluid strokes that mimic the gravitational pull on the hair, ensuring the lines curve in a way that suggests movement rather than stiffness.
When sketching the volume, keep the outer edges smooth but add subtle variations in the line weight to imply depth. If the ponytail is meant to be wavy or curly, the silhouette should be more jagged and uneven, reflecting the bounce of the hair. Avoid making the ponytail perfectly symmetrical, as real hair rarely behaves in a uniform fashion. By varying the length and curvature of your strokes, you create the illusion of a full, healthy head of hair that reacts to the character's movement.
How to add texture and detail
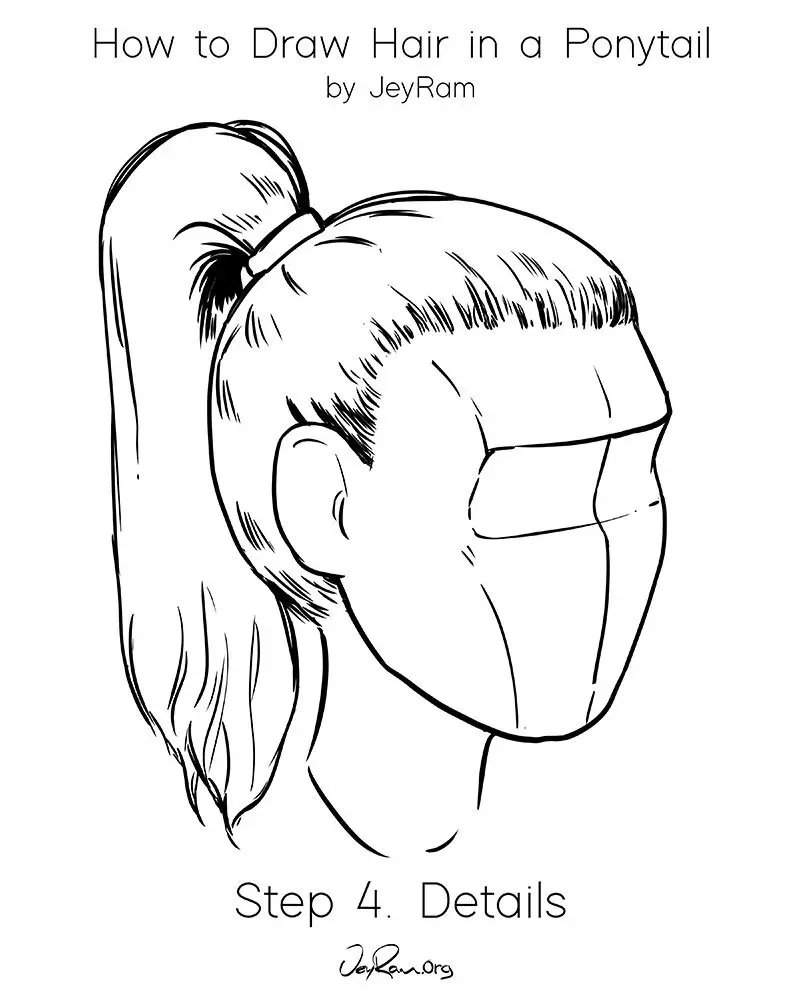
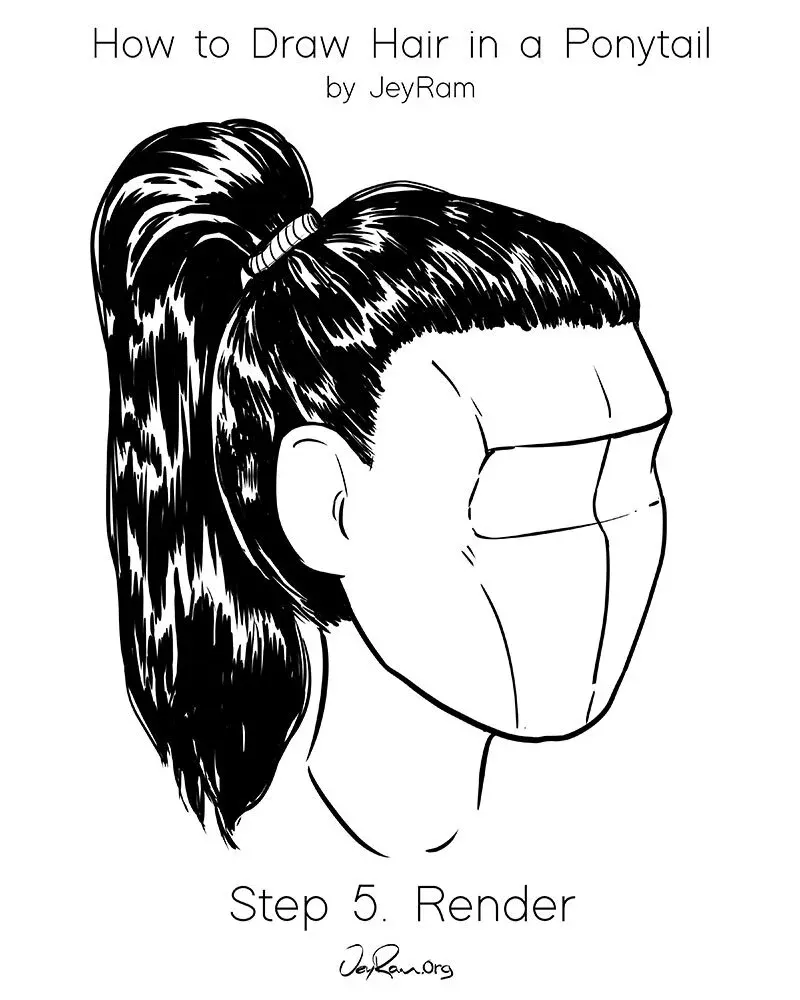
Texture is what separates a basic shape from a realistic drawing. Instead of drawing hundreds of individual hairs, group them into larger strands or "clumps." These clumps should originate from the hair tie and follow the general flow of the ponytail. Use darker, more defined lines near the base where the hair is most compressed, and use lighter, thinner strokes toward the ends where the hair naturally separates. This technique mimics the way light hits hair, creating highlights and shadows that define the form.
Consider these tips for effective texturing:
- Use cross-contour lines to wrap around the shape of the ponytail, emphasizing its three-dimensional volume.
- Leave white spaces between your line groups to serve as highlights, which helps define the hair's sheen.
- Vary the thickness of your strokes to create a sense of organic randomness.
- Add a few loose, stray hairs around the edges to make the ponytail look more natural and less like a rigid object.
Common mistakes when drawing ponytails
One of the most frequent errors is placing the ponytail too close to the skull, which makes the hair look flat or glued down. Another common issue is ignoring the physics of the hair tie; if the hair looks like it is floating away from the head, the connection point lacks the necessary tension. Additionally, many beginners draw hair using straight, stiff lines. Hair is soft and pliable, so your lines must be curved to reflect the weight and flexibility of the strands.
Another mistake is failing to account for the hair's thickness at the base. If the ponytail is too thin, it looks unrealistic; if it is too thick, it loses its grace. Always ensure the volume at the base is proportional to the overall size of the head. Finally, avoid over-detailing the entire length of the ponytail. If you draw every single hair, the drawing will look cluttered and lose its sense of light and shadow. Focus on the major shapes first and only add fine details where they are absolutely necessary.
Best techniques for beginners
If you are new to drawing hair, start by practicing with simple shapes like cylinders or cones to understand how hair wraps around a form. You can also study photographs of different hair textures to see how light interacts with the strands. Practice drawing the ponytail in various positions, such as hanging straight down, swinging to the side, or tied high on the head. By observing how hair behaves in different scenarios, you will develop a better intuition for drawing it accurately without needing to rely on overly complex techniques.
Consistency is key when learning to draw hair. Try drawing a simple ponytail from different angles daily to build your muscle memory. As you gain confidence, experiment with different hair types, such as straight, wavy, or braided styles. Remember that drawing is a process of simplifying complex reality into readable shapes. By mastering the fundamental flow and volume of a ponytail, you can apply these same principles to any other hairstyle, eventually creating characters with hair that looks both natural and full of life.
Key facts
- Start by drawing the scalp line above the forehead to establish where the hair originates.
- Identify the anchor point on the back of the skull where the ponytail will be secured.
- Use long, sweeping strokes to define the outer silhouette of the ponytail rather than drawing individual strands.
- Add volume by drawing the hair slightly away from the skull before it converges at the tie.
- Incorporate gravity by tapering the shape as it moves downward to suggest weight and movement.
- Use curved lines within the shape to indicate the natural flow and direction of the hair fibers.
The bottom line
Drawing a ponytail effectively relies on capturing the silhouette and volume rather than focusing on individual strands. By establishing a clear anchor point and using long, sweeping lines that follow the pull of gravity, you create a natural look. Remember to vary the thickness of the hair mass to suggest texture, ensuring the final shape reflects the tension and movement inherent in a tied hairstyle.
People also ask
How do you make a ponytail look realistic?
Focus on the volume at the crown and the way hair bundles together. Adding subtle highlights and varying the thickness of your lines helps simulate the texture of real hair.
Should I draw every single hair strand?
No, drawing individual hairs often makes the style look stiff or messy. Instead, focus on the overall shape and use a few strategic lines to suggest texture.
How do I draw a high ponytail versus a low one?
A high ponytail requires drawing the hair pulling upward toward the top of the head, creating tension. A low ponytail sits at the nape, requiring a more relaxed, downward curve.
What is the best way to draw the hair tie?
Draw a small, thick oval or a series of tight loops around the base of the ponytail. Ensure it looks like it is cinching the hair tightly to maintain the structure.
How do I show movement in a ponytail?
Use curved, flowing lines to indicate the ponytail swinging to one side. A slight arch in the tail suggests the hair is reacting to the person's motion.
What are common mistakes when drawing ponytails?
A frequent error is making the hair look like a flat, solid block. Avoid this by adding gaps or slight variations in the outline to show that hair is made of separate strands.
This answer was created with the help of AI research tools and reference sources. Spotted an error? Let us know — we correct mistakes quickly. See our editorial policy.