How do you draw a nose for beginners?
Short answer
Drawing a nose is best approached by breaking the complex structure into simple geometric shapes. Start with a central circle for the tip and two smaller ovals for the nostrils. By focusing on light, shadow, and the bridge’s connection to the brow, you can create a realistic, three-dimensional form with minimal effort.
![For beginners] This is actually a crucial part! Review the techniques for drawing noses!](/img/e4/how-do-you-draw-a-nose-for-beginners-1.webp)
On this page
How to simplify nose shapes for beginners
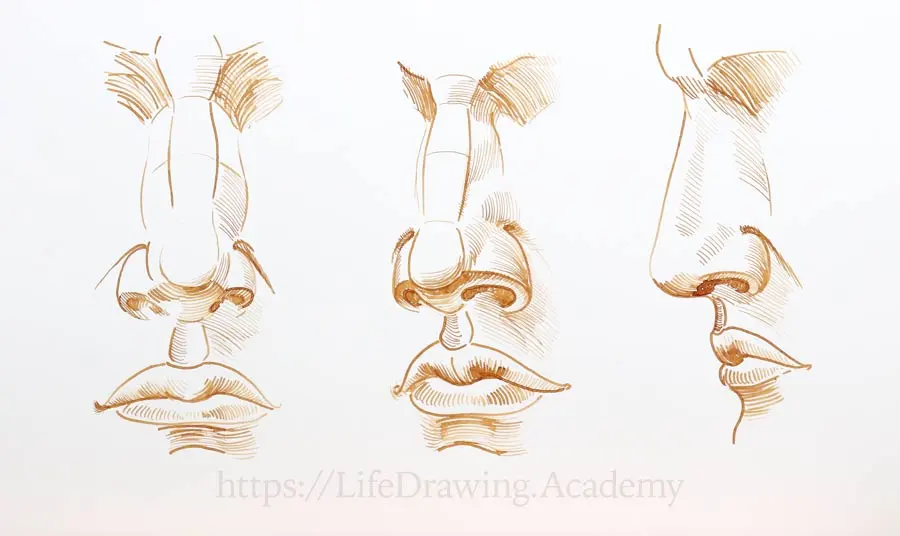
The human nose is essentially a wedge or a pyramid protruding from the face. To draw it accurately, visualize the nose as three primary shapes: a large central sphere for the tip and two smaller, flattened ovals on either side for the nostrils. By sketching these basic forms lightly with a hard pencil, such as a 2H, you establish the correct proportions before adding detail. This geometric foundation ensures that the nose remains symmetrical and properly aligned with the rest of the facial features.
When building this structure, pay close attention to the angle of the head. If the subject is looking up, the circles will appear higher and the nostrils more visible. If the subject is looking down, the tip of the nose will overlap the nostrils. Master these simple steps to build your framework:
- Draw a vertical line to mark the center of the face.
- Place a circle where the tip of the nose will sit.
- Add two smaller ovals touching the bottom of the circle for the nostrils.
- Connect the top of the circle to the eyebrows with two light, parallel lines to form the bridge.
How to shade a nose for realism
Shading is the most critical element in making a drawing look three-dimensional rather than flat. Instead of drawing harsh outlines for the nostrils and bridge, use soft shadows to define the edges. Focus your darkest values on the underside of the nose and the deepest parts of the nostrils. As you move toward the bridge, the shading should become significantly lighter to suggest the rounded surface of the skin.
Use a blending stump or a soft tissue to smooth out your graphite, creating a seamless transition between light and dark areas. Remember that light usually hits the bridge and the tip of the nose first, so keep these areas the lightest on your page. Follow these techniques to enhance your shading:
- Use cross-hatching for areas that require deeper, richer shadows.
- Leave a small, unshaded white spot on the tip of the nose to represent a highlight.
- Apply pressure gradually, starting with light strokes and building up to darker tones.
- Avoid using black ink; instead, layer multiple shades of gray to create depth.
Common mistakes when drawing noses
One of the most frequent errors beginners make is drawing the nose using only hard, dark lines. This often results in a cartoonish appearance that lacks volume and realism. Another common mistake is neglecting the connection between the nose and the brow. The bridge of the nose does not simply end; it flows directly into the brow bone, creating a subtle shadow that helps anchor the nose to the face.
Proportions are also a frequent stumbling block. Many artists draw the nose too wide or place it too far down on the face. Remember that the bottom of the nose typically aligns with the bottom of the ears. If your nose looks disconnected or floating, check your reference to ensure the bridge correlates correctly with the inner corners of the eyes. By avoiding these pitfalls, you can significantly improve the anatomical accuracy of your portraits.
Best tools for drawing noses
Choosing the right equipment can make the learning process much more manageable. For beginners, a standard set of drawing pencils ranging from 2H to 6B is sufficient. The harder 2H pencils are perfect for initial light sketches and guidelines, while the softer 4B or 6B pencils allow you to create the deep, velvety blacks needed for the nostrils and shadows. A high-quality kneaded eraser is also essential because it allows you to lift graphite gently to create highlights.
Paper quality matters as well. A medium-tooth drawing paper provides enough texture to hold the graphite, allowing for better blending and layering. If you are just starting, consider these tools:
- A set of graphite pencils (HB, 2B, 4B, 6B).
- A kneaded eraser for lifting highlights and correcting mistakes.
- A blending stump for smoothing transitions.
- A sketchbook with at least 80lb weight paper to prevent tearing during heavy shading.
How to practice drawing noses effectively
Consistency is the key to mastering facial anatomy. Rather than trying to draw a perfect portrait immediately, dedicate time to drawing noses from different angles. Look at photographs of various people and analyze how the light hits their features. Practice drawing the nose in isolation before attempting to integrate it into a full facial composition. This focused practice helps you understand the underlying structure without the distraction of eyes or mouths.
Keep a dedicated sketchbook for these exercises and date your work to track your progress over time. You might find it helpful to draw the same nose from three different perspectives: front view, profile, and three-quarter view. This repetition reinforces your spatial understanding of how the nose occupies space on the head. As you gain confidence, try to draw from life using a mirror or a real-life model. By observing the subtle nuances of light and shadow in real-time, you will develop a much sharper eye for detail and proportion.
Key facts
- A nose is essentially a wedge-shaped prism that projects from the face.
- Use a circle to represent the tip and two smaller ovals for the nostrils.
- Avoid drawing hard outlines for the bridge; use light shading instead.
- The base of the nose generally aligns with the bottom of the ears.
- Light source direction determines where to place shadows on the nasal wings.
- Simplify the complex cartilage structure into three basic geometric shapes.
The bottom line
Drawing a realistic nose requires moving away from outlines and focusing on three-dimensional forms. By breaking the structure into a central sphere and two side wings, you create a solid foundation. Use soft shading to define the planes and light sources, which adds depth and volume. With practice, you will learn to observe the subtle curves that define unique nasal shapes without relying on rigid, flat lines.
People also ask
Why does my nose drawing look flat?
You are likely using harsh outlines instead of soft shading. Focus on defining the planes of the nose with light and shadow rather than drawing the edges.
How do I draw nostrils without making them look like dark holes?
Nostrils are rarely perfect circles; they are typically almond-shaped or teardrop-shaped. Keep them narrow and focus on the shadow cast by the nostril wing.
Where should the nose sit in relation to the eyes?
The bridge of the nose typically begins at the level of the brow line. The width of the nose often aligns with the inner corners of the eyes.
How do I draw a nose from a side profile?
Start by drawing a triangle that extends from the face. Use the tip of the nose as the furthest point and connect it back to the brow and the upper lip.
What is the best pencil grade for shading a nose?
Use an HB pencil for initial light sketches and a 2B or 4B pencil for adding depth to the shadows. Softer leads allow for smoother transitions in skin tones.
Should I draw the bridge of the nose as a solid line?
Never draw a solid line down the entire bridge, as it makes the nose look cartoonish. Only suggest the bridge with subtle shading or highlights on the top plane.
This answer was created with the help of AI research tools and reference sources. Spotted an error? Let us know — we correct mistakes quickly. See our editorial policy.