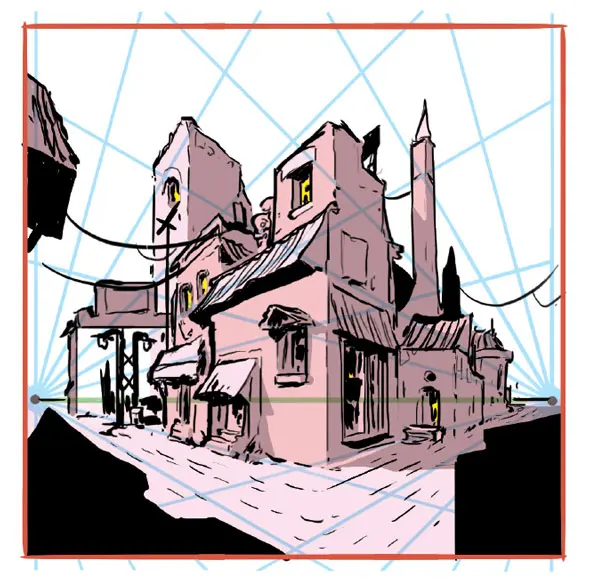
What is three-point perspective?
Short answer
Three-point perspective is a drawing technique that uses three vanishing points to create the illusion of depth and height on a two-dimensional surface. It simulates how the human eye perceives objects when looking sharply upward or downward, causing vertical lines to converge toward a point high above or far below the viewer.
On this page
What is three-point perspective used for?
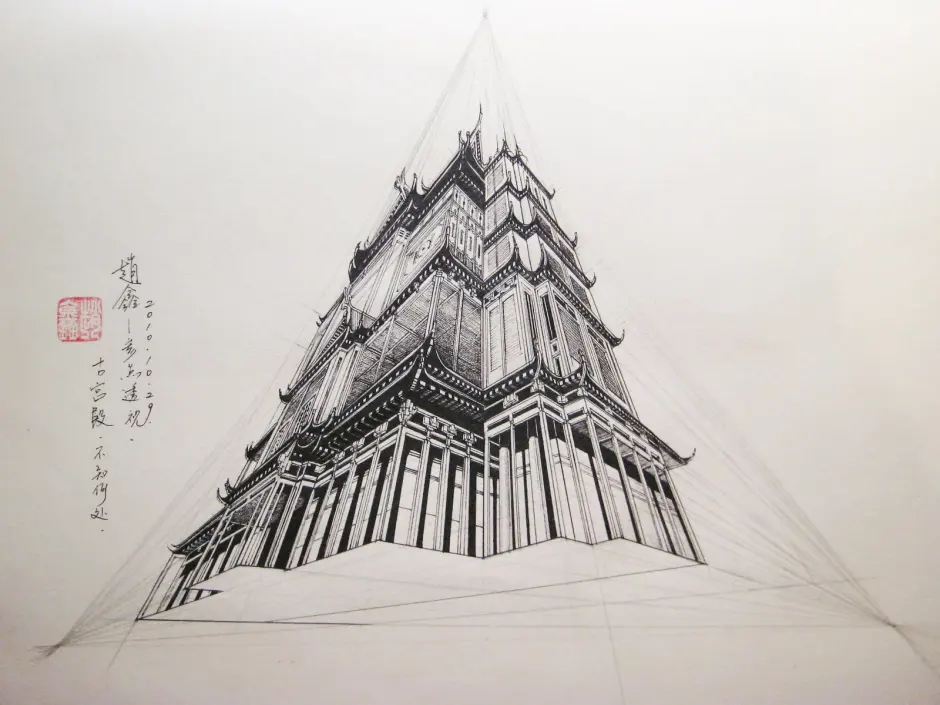
Three-point perspective is primarily used in architectural rendering, concept art, and comic book illustration to create dramatic, immersive viewpoints. Unlike one-point or two-point perspective, which keep vertical lines parallel to the edges of the paper, three-point perspective introduces a third vanishing point that forces these verticals to tilt. This technique is essential for depicting "worm’s-eye views," where the viewer looks up at a towering structure, or "bird’s-eye views," where the viewer looks down from a high vantage point.
By manipulating these three points, artists can convey a sense of scale and vertigo that simpler perspective systems cannot achieve. It is the standard method for capturing the feeling of standing at the base of a skyscraper or peering over the edge of a cliff. When used correctly, it adds a cinematic quality to a scene, making the environment feel expansive and three-dimensional rather than flat or static.
How to draw in three-point perspective
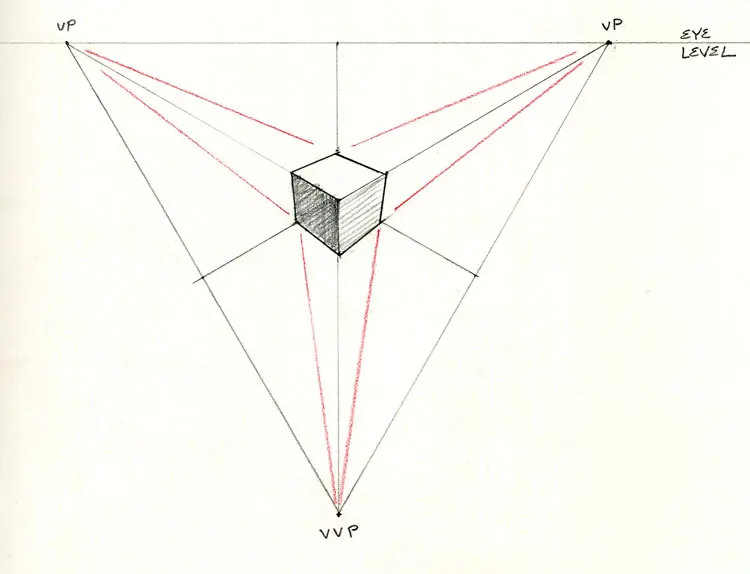
To master this technique, you must first establish your horizon line and place your three vanishing points. Two points are typically placed on the horizon line to define the width and depth of the object, while the third point is placed either high above or low below the horizon to define the vertical convergence. All lines representing the height of the object must be drawn toward this third point.
- Draw a horizon line and place two vanishing points on it, spaced widely apart.
- Place a third vanishing point either high above or low below the horizon line, centered between the first two.
- Draw lines from the two horizon points to define the base of your object.
- Connect the corners of your base to the third vanishing point to establish the vertical edges.
- Define the top or bottom cap of the object by connecting lines back to the primary vanishing points.
Why does three-point perspective look distorted?
The perceived distortion in three-point perspective occurs because the human eye and camera lenses do not capture the world in a perfectly flat grid. When you look at an object from an extreme angle, the light rays converge toward your line of sight, creating a natural tapering effect. This is mathematically accurate to how the human binocular system perceives distance, but it can look unnatural if the vanishing points are placed too close to the drawing area.
When the third vanishing point is placed too close to the object, the vertical lines converge at a sharp, aggressive angle, which creates a "fisheye" effect. This makes the object appear stretched or warped. To achieve a more realistic, cinematic look, artists often place the third vanishing point far outside the boundaries of the canvas. This subtle convergence mimics natural vision without creating the distracting distortion that occurs when the perspective is pushed to an extreme degree.
Common mistakes when drawing in three-point perspective
Many beginners struggle with the placement of the third vanishing point, often putting it too close to the horizon line. This results in an object that looks like it is collapsing or falling over rather than standing firmly in space. Another frequent error is failing to keep the lines consistent; if even one vertical edge does not align with the third vanishing point, the entire illusion of depth will break, making the structure appear crooked or broken.
- Placing the third vanishing point too close to the horizon, causing extreme, unrealistic distortion.
- Forgetting to align all vertical edges to the third point, which ruins the structural integrity of the drawing.
- Using a ruler for every single line, which can make the drawing look stiff and mechanical rather than organic.
- Neglecting the relationship between the two horizon points, which can lead to objects that look like they are floating or disconnected from the ground plane.
Best tools for learning three-point perspective
Learning this technique requires patience and the right equipment to ensure accuracy. Beginners should start with a large sheet of paper, a long metal ruler, and a mechanical pencil to maintain sharp, consistent lines. Because the vanishing points often fall far off the edge of the page, many artists use a piece of cardboard or a drafting table extension to act as a temporary surface for those distant points.
- A long, sturdy metal ruler or T-square to ensure perfectly straight lines.
- A large drawing surface, such as A2 or A1 paper, to accommodate distant vanishing points.
- Drafting tape to secure the paper to the table, preventing accidental shifts during the drawing process.
- A kneaded eraser to gently remove construction lines without damaging the paper surface after the final forms are inked.
Digital software has also revolutionized this process by offering built-in perspective grids. Programs like Adobe Photoshop or Clip Studio Paint allow users to snap lines directly to vanishing points, which eliminates the need for physical space outside the canvas. However, practicing manually on paper remains the most effective way to understand the underlying geometry before relying on digital automation for final professional projects.
Key facts
- Three-point perspective uses three vanishing points to represent objects viewed from extreme high or low angles.
- Two vanishing points are placed on the horizon line, while the third is placed far above or below it.
- This technique is essential for drawing "worm’s-eye views" looking up or "bird’s-eye views" looking down at a subject.
- All vertical lines in a three-point drawing must converge toward the third vanishing point rather than remaining perfectly parallel.
- Avoid placing vanishing points too close together, as this causes severe distortion that makes objects appear unnaturally warped.
- Use a large sheet of paper or a digital canvas that extends beyond your frame to accommodate the distant vanishing points.
The bottom line
Three-point perspective is a powerful tool for artists to create the illusion of depth and scale by incorporating a vertical vanishing point. By shifting the perspective to look up or down at an object, you add dramatic tension and realism to your work. Mastering this technique requires patience with layout, as the placement of your vanishing points dictates the final impact and structural integrity of your drawing.
People also ask
How does three-point perspective differ from two-point perspective?
Two-point perspective uses only two vanishing points on the horizon line to show the sides of an object. Three-point perspective adds a third point to account for the vertical tilt, showing the top or bottom of the object as well.
Why do my drawings look warped when using three-point perspective?
Distortion usually occurs when the vanishing points are placed too close to the center of the drawing area. Moving the points further away toward the edges of your workspace creates a more natural, realistic look.
Is three-point perspective necessary for drawing standard buildings?
It is only necessary if you want to emphasize the height or depth of a building from a dramatic angle. For eye-level views, one-point or two-point perspective is usually sufficient and easier to manage.
What is a "bird’s-eye view" in art?
A bird’s-eye view is a perspective where the viewer looks down at a scene from a high vantage point. In this setup, the third vanishing point is placed far below the horizon line.
What is a "worm’s-eye view" in art?
A worm’s-eye view is a perspective where the viewer looks up at a scene from a low vantage point. In this setup, the third vanishing point is placed far above the horizon line.
Can I use a ruler to draw three-point perspective?
Yes, a long straightedge is essential for connecting lines to distant vanishing points. Ensure your lines are precise, as even slight deviations can make the entire structure appear crooked or unstable.
This answer was created with the help of AI research tools and reference sources. Spotted an error? Let us know — we correct mistakes quickly. See our editorial policy.