How do you paint skin with acrylic paint?
Short answer
Painting realistic skin with acrylics requires building depth through thin, transparent layers called glazes. Start with a neutral mid-tone base, then gradually add highlights and shadows using a limited palette of warm and cool colors. Because acrylics dry quickly, maintaining a wet edge and using blending mediums are essential for smooth transitions.
On this page
What colors do I need for skin tones?
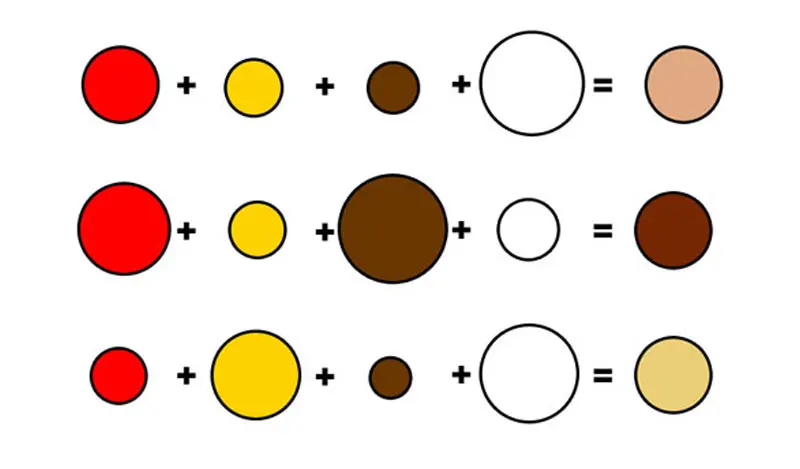
Achieving realistic skin tones does not require a specific "flesh" tube of paint. In fact, professional artists prefer mixing their own colors to match the specific nuances of a subject. A versatile palette includes a warm red like Cadmium Red Light, a cool red like Alizarin Crimson, a warm yellow like Yellow Ochre, a cool yellow like Lemon Yellow, Ultramarine Blue, Burnt Umber, and a high-quality Titanium White.
To create a base, begin by mixing these primaries with white to reach a neutral foundation. You can adjust the temperature by adding more yellow for warmth or a touch of blue to neutralize overly bright oranges. Keep in mind that skin is rarely a single flat color; it is a complex mosaic of reflected light and subsurface scattering. By mixing your own pigments, you gain control over the saturation, allowing for more lifelike results than pre-mixed paints can offer.
How to mix and apply skin tones
The secret to professional-looking skin is the application of glazes. A glaze is a thin, translucent layer of paint that allows light to pass through to the layers underneath, creating a luminous quality. To achieve this, mix a small amount of pigment with a glazing medium or water. Apply these thin veils over your dried base layers to shift the color temperature or deepen shadows gradually.
- Establish your mid-tones first to define the overall shape of the face.
- Apply deep shadows using a mixture of Burnt Umber and Alizarin Crimson, avoiding pure black which can look muddy.
- Use thin glazes of cool blue or purple in areas where veins are visible, such as the temples or wrists.
- Add final, opaque highlights on the tip of the nose, cheekbones, and chin using a thicker consistency of paint.

How to blend acrylics for skin
Acrylic paint dries significantly faster than oil paint, which makes traditional wet-on-wet blending challenging. To overcome this, use a slow-drying medium, often called a retarder, which extends the open time of the paint. Alternatively, work in small sections and keep a spray bottle of water nearby to lightly mist your palette and canvas, keeping the surface workable for longer periods.
When blending, use a soft, synthetic flat or filbert brush. Work from the mid-tones toward the shadows and highlights, using light, circular motions to soften the edges between colors. If you find the paint drying too quickly, do not try to force a blend on the surface. Instead, wait for the layer to dry completely and apply a new, semi-transparent glaze over the boundary to smooth the transition visually. This layering technique is the most reliable way to achieve a realistic, soft-focus appearance on skin.
Common mistakes when painting skin
Many beginners make the mistake of using too much white, which results in a chalky, flat appearance. Skin is translucent, and over-relying on white paint obscures the depth created by your underpainting. Always start with a darker value than you think you need and work toward the light. Another frequent error is using a single color for the entire face, which makes the subject look like a mannequin.
- Avoid using pure black for shadows, as it kills the vibrancy of the skin tones.
- Do not ignore the reflected light, such as shadows cast by the chin onto the neck or color reflected from clothing.
- Avoid heavy, thick brushstrokes in areas that should be smooth, such as the forehead or cheeks.
- Do not rush the drying process between layers, as this can cause the paint to lift and create unwanted texture or "gunk" on your canvas.
How to finish a skin portrait
Once your layers are built up and the highlights are placed, the final step involves refining the details. This is the time to add subtle variations, such as freckles, skin texture, or the delicate veins around the eyes. Use a very small, round brush to dab tiny, irregular dots of color, ensuring they are not perfectly uniform. These small imperfections are what make a portrait feel human and authentic.
Finally, consider applying a varnish once the painting has cured for at least 48 hours. A satin or matte varnish is generally preferred for portraits, as a high-gloss finish can create distracting reflections that obscure the subtle color shifts you have worked so hard to achieve. A consistent varnish layer also protects the acrylic surface from dust and UV damage, ensuring your work remains vibrant for years to come. By following these structured steps, you will find that painting skin becomes a rewarding exercise in observation, patience, and color theory.
Key facts
- Acrylic paint dries very quickly, so mix large batches of your base skin tone to ensure color consistency across the canvas.
- Use a "glazing" technique by thinning your paint with water or a matte medium to build up translucent layers of color.
- Avoid using pure white or black to lighten or darken skin tones, as these can make the skin appear chalky or muddy.
- Incorporate complementary colors like blue or green in the shadows to create depth and realism in the skin's undertones.
- Always test your mixed color on a scrap piece of paper and let it dry completely, as acrylics often darken slightly when drying.
- Use a synthetic brush with soft bristles to minimize visible brush strokes and achieve a smoother, more skin-like texture.
The bottom line
Painting realistic skin with acrylics requires a systematic approach focused on layering and color temperature. By mixing custom palettes, utilizing thin glazes, and carefully balancing warm highlights against cool shadows, you can move beyond flat colors to create depth. Patience is essential, as managing the rapid drying time of acrylics through mediums and proper blending techniques is the key to achieving a professional, lifelike finish.
People also ask
What are the best colors to mix for a basic skin tone?
Start with a mixture of titanium white, yellow ochre, and a small amount of cadmium red. Adjust the hue by adding tiny amounts of burnt umber for darker tones or ultramarine blue to neutralize overly orange mixtures.
How do I prevent acrylic paint from drying too fast while painting skin?
Add a slow-drying medium, often called a "retarder," to your paint to extend the open time. Alternatively, keep a spray bottle filled with water nearby to lightly mist your palette and canvas throughout the process.
Should I paint the shadows or the highlights first?
It is generally best to block in your mid-tones first, then work toward the darkest shadows, and finally add the brightest highlights. This layering process helps maintain control over the overall value structure of the portrait.
How do I achieve a smooth transition between skin tones?
Use a technique called "wet-on-wet" blending, where you apply a second color next to the first while both are still damp. Gently brush over the junction point with a clean, dry brush to soften the edge.
Why does my skin painting look flat or cartoonish?
Flatness usually results from a lack of value contrast or ignoring the subtle shifts in temperature. Ensure your shadows have cool undertones and your highlights have warm undertones to give the face a three-dimensional appearance.
Can I use oil paints over a dried acrylic skin base?
Yes, you can paint oils over acrylics, but never the reverse. Ensure the acrylic layer is completely dry and has a matte finish to provide enough "tooth" for the oil paint to adhere properly.
This answer was created with the help of AI research tools and reference sources. Spotted an error? Let us know — we correct mistakes quickly. See our editorial policy.