How do you draw realistic shadows?
Short answer
Drawing realistic shadows requires identifying a single light source to establish consistent direction and intensity. Artists must observe the core shadow, reflected light, and cast shadows to create depth. By varying pencil pressure and blending techniques, you can transition from sharp edges near the object to soft, diffused edges further away.
On this page
How to identify light sources for shadows
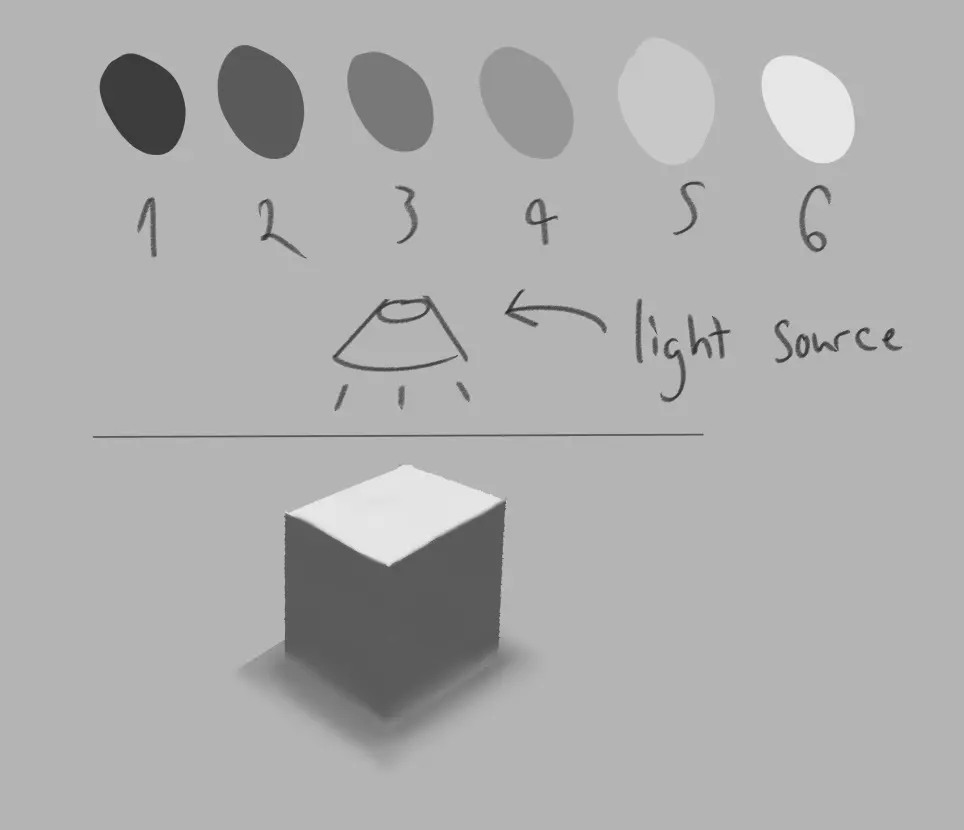
To draw realistic shadows, you must first establish the position of your light source. Imagine a single point, such as the sun or a lamp, and trace imaginary lines from that point to your subject. Everything on the opposite side of the object will fall into shadow, creating a consistent logic that the human eye instinctively recognizes as natural. If you have multiple light sources, you will create multiple, often overlapping, shadows, which significantly complicates the drawing process.
When starting, place a marker or a small dot on your page to represent the light source. This simple step ensures that every shadow you draw aligns correctly, preventing the common issue of "floating" objects that do not seem to sit on a surface. Consistency is the foundation of realism. Without a fixed point of origin, shadows appear random and disjointed, which immediately breaks the illusion of three-dimensional space on a two-dimensional surface.
How to use shadow values and gradients
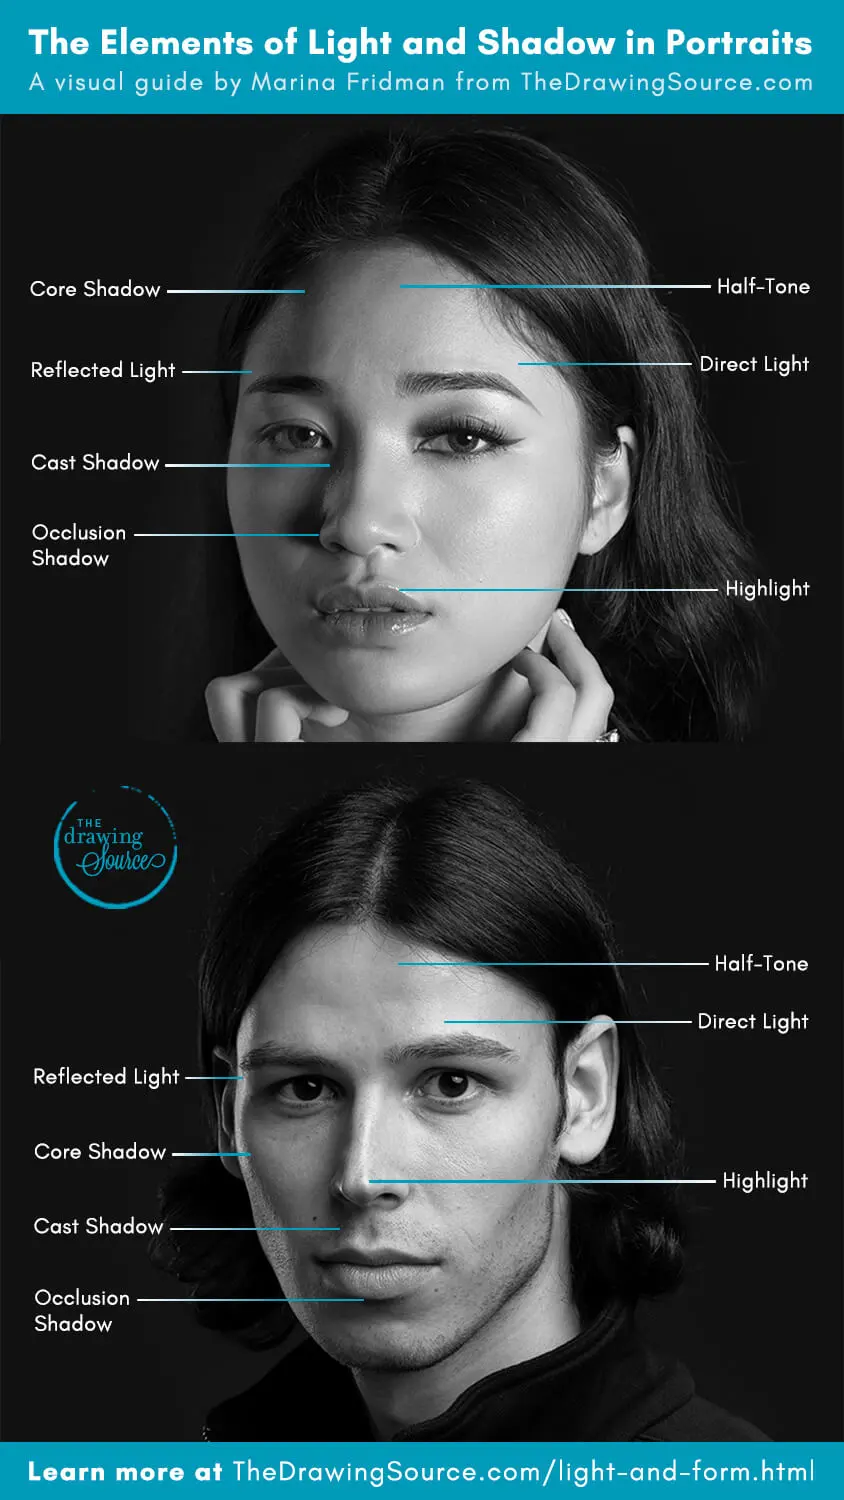
Shadows are rarely a uniform shade of black; they are composed of complex gradients that define the volume of an object. A realistic shadow typically includes the core shadow—the darkest part on the object itself—and the cast shadow, which appears on the ground. Between these areas, you should incorporate reflected light, which is light bouncing off nearby surfaces back into the shadow. This subtle detail prevents the shadow from looking like a flat, muddy hole in the drawing.
Use a range of graphite pencils, such as 2H for light under-drawings and 4B or 6B for deep, rich shadows. Practice your pressure control by creating a value scale from white to black. When applying these to your drawing, follow these steps:
- Identify the darkest point of the core shadow.
- Gradually lighten your pressure as you move toward the edges.
- Leave a thin, lighter area for reflected light to give the object weight.
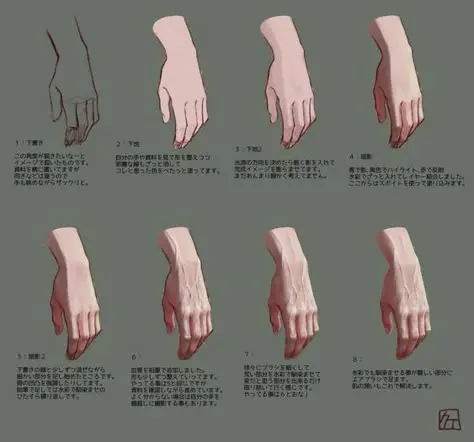
- Use a blending stump or a soft cloth to smooth transitions if you prefer a photorealistic finish.
How to draw cast shadow edges
The edge of a shadow tells the viewer about the distance between the object and the surface it rests upon. Sharp, well-defined edges indicate that the object is touching the surface or is very close to it. As the shadow extends further away from the object, the edges become softer and more diffused. This phenomenon occurs because light rays begin to scatter, a principle known in physics as the penumbra effect.
To master this technique, observe how the shadow behaves in real-world lighting. If an object is tall, the base of the shadow will be crisp, while the tip will be blurry and faint. Avoid the temptation to outline your shadows with a dark pencil line, as this creates a cartoonish effect that flattens the image. Instead, let the change in value—the transition from dark to light—define the boundary of the shadow. This natural transition is what creates the convincing appearance of depth.
Common mistakes when drawing shadows
Many beginners treat shadows as an afterthought, often drawing them too small or too light. A shadow should be treated as an essential shape, just as important as the object casting it. Another frequent error is ignoring the shape of the surface the shadow falls upon. If a shadow crosses a corner or a fold in fabric, the shadow must bend and distort to follow the contours of that surface. Failing to account for these surface changes makes the object look like it is sitting on a flat, empty plane.
Avoid these common pitfalls to improve your accuracy:
- Drawing shadows that are perfectly black, which ignores ambient light.
- Forgetting that shadows are shapes with their own unique geometry.
- Using a single pencil grade for the entire shadow, which lacks depth.
- Neglecting to observe how shadows change shape on curved or uneven surfaces.
- Over-blending, which can result in a muddy appearance rather than a clean, realistic gradient.
Best tools for shadow drawing
While you can draw effective shadows with a standard HB pencil, using a variety of tools will significantly enhance your results. A set of drawing pencils ranging from 2H to 6B allows you to build layers of graphite, which is essential for creating deep, luminous shadows. Harder pencils (H grades) are ideal for light, initial mapping, while softer pencils (B grades) provide the dark, velvety tones needed for the deepest core shadows.
In addition to pencils, consider using a kneaded eraser to "draw" with light. By pressing the eraser into your shaded areas, you can lift graphite to create highlights or soften harsh edges, which is crucial for achieving a realistic look. A blending stump is also a useful tool for smoothing out grain, but use it sparingly to avoid losing the texture of the paper. Ultimately, the best tool is your ability to observe the world around you, noting how light interacts with objects in your daily environment. Practice these techniques consistently to build your skills.
Key facts
- Light travels in straight lines, meaning shadows always fall directly away from the light source.
- A shadow consists of two parts: the umbra, which is the darkest inner core, and the penumbra, the softer outer edge.
- The closer an object is to the surface it casts a shadow upon, the sharper and more defined the shadow’s edges appear.
- Ambient light, or light bouncing off surrounding surfaces, prevents shadows from being pure, pitch black.
- Cast shadows are typically darker and cooler in color temperature than the object casting them.
- To maintain realism, ensure the shadow follows the contours of the surface it falls upon, rather than remaining flat.
The bottom line
Achieving realistic shadows requires a deep understanding of light physics and careful observation of your subject. By distinguishing between the sharp umbra and the softer penumbra, you can create a sense of three-dimensional space. Remember that shadows are never truly black; they reflect surrounding colors and surface textures. With consistent practice and attention to the contact points, you will successfully anchor your subjects within their environment.
People also ask
Why do my shadows look like they are floating?
Shadows appear to float when they are not physically connected to the base of the object. Always ensure the darkest part of the shadow touches the contact point where the object meets the ground.
How do I determine the direction of a shadow?
Draw an imaginary line from the light source through the top point of your object. The shadow must follow this trajectory to remain consistent with the light's position.
Should shadows be drawn with black pencil?
Avoid using pure black, as it often looks flat and unnatural. Instead, layer dark blues, purples, or browns to create a rich, realistic depth.
What is the difference between a core shadow and a cast shadow?
A core shadow is the darkest area on the object itself, located on the side turned away from the light. A cast shadow is the projection of the object onto an external surface.
How does the size of the light source affect the shadow?
A small, intense light source like a candle creates harsh, sharp-edged shadows. A large, diffuse light source like an overcast sky creates soft, blurred shadows with minimal contrast.
How can I make a shadow look transparent?
Keep the edges of the shadow soft and incorporate the texture or color of the surface underneath. Using a lighter pressure or a blending stump helps integrate the shadow into the background.
This answer was created with the help of AI research tools and reference sources. Spotted an error? Let us know — we correct mistakes quickly. See our editorial policy.