How do you draw shadows?
Short answer
Drawing shadows requires identifying a single light source to establish consistent direction and intensity. By observing the transition from highlight to core shadow and cast shadow, artists create the illusion of three-dimensional volume. Use varying pressure and blending tools to replicate how light interacts with surfaces, softening edges as distance increases.
On this page
How to identify light and shadow patterns
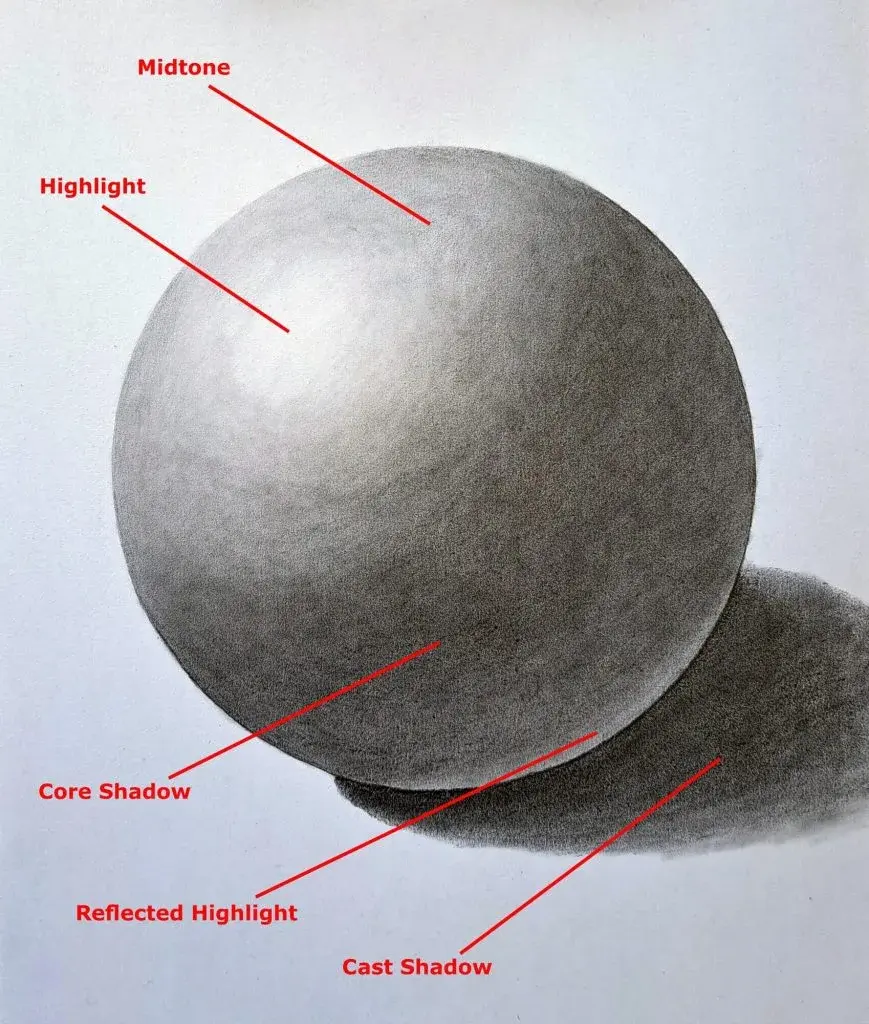
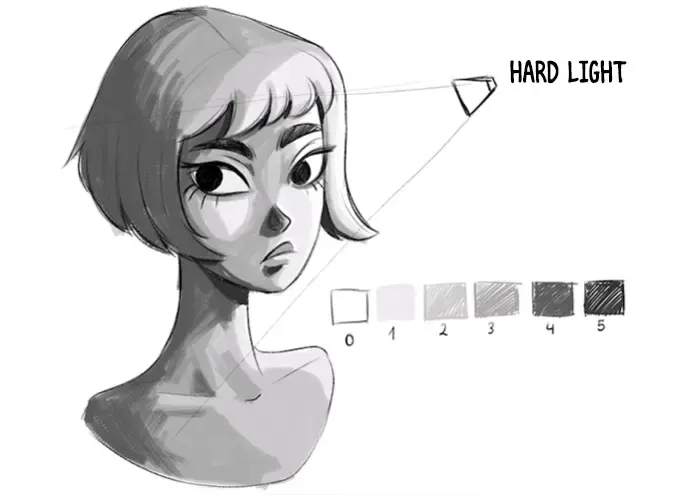
To draw realistic shadows, you must first determine the position of your light source. Whether it is sunlight, a lamp, or ambient glow, the light dictates where highlights, midtones, and shadows fall on your subject. Imagine a straight line traveling from the light source to the object; the area struck directly by this light is your highlight, while the area turned away becomes the shadow.
Once the light source is fixed, observe the specific anatomy of shadows on the object. The "core shadow" is the darkest area on the object itself, usually found where the form begins to turn away from the light. Beyond the object, you will find the "cast shadow," which is the projection of the object's shape onto the surface beneath it. Keeping these two shadow types distinct is the foundation of believable shading.
Best shading techniques for beginners
Beginners often struggle with inconsistent shading, which makes objects appear flat or distorted. The most effective way to build depth is through layering, which involves slowly increasing the darkness of a shadow rather than applying heavy pressure immediately. This allows for a smooth gradient from the brightest highlight to the deepest core shadow.
- Map out the light source and draw light outlines of the shadow areas.
- Apply a light base layer of graphite to the entire shadow region.
- Gradually darken the core shadow, ensuring it remains the deepest point.
- Use a blending stump or a soft cloth to smooth transitions between tones.
- Lift out highlights using a kneaded eraser to add sharp contrast.
Consistency is key when working with multiple objects. Ensure that every cast shadow points in the same direction and maintains a similar length relative to the light source's height.
Why shadows have different edge qualities
Not all shadows possess the same sharpness. The clarity of a shadow's edge depends on the distance between the object and the surface it is casting a shadow upon. This phenomenon is known as the "law of soft edges." When an object is touching the ground, the shadow edge is crisp and well-defined, providing a solid anchor for the form.
As the shadow moves further away from the object, the edges become progressively softer and more diffused. This happens because light rays scatter as they travel, especially if the light source is large or indirect. To replicate this effect, use a harder pencil or lighter pressure for distant shadows, and use a blending tool to blur the edges. Mastering this transition is essential for creating a sense of space and atmosphere in your drawings.
Common mistakes when drawing shadows
Many artists make the mistake of using black for all shadows, which often results in a muddy or "dead" appearance. Shadows are rarely pure black; they contain reflected light and ambient color from the surrounding environment. Instead of reaching for your darkest pencil immediately, try layering cool blues or warm browns to add depth and complexity to your shaded areas.
- Outlining shadows with harsh, dark lines that do not exist in reality.
- Ignoring reflected light, which appears as a faint glow inside the core shadow.
- Making the cast shadow too light, which makes the object look like it is floating.
- Using a single, uniform tone across the entire shadow instead of a gradient.
- Forgetting to adjust the shape of the shadow based on the surface it falls upon.
By avoiding these common pitfalls, you will find that your drawings gain significantly more weight and realism.
How to use tools for better shading
The choice of materials drastically influences the quality of your shadows. Graphite pencils are categorized by hardness, ranging from 9H (hard and light) to 9B (soft and dark). For shadows, utilize the softer B-range pencils, such as 4B or 6B, to achieve deep, rich tones without damaging the paper surface. Harder pencils are better suited for initial sketches and light midtones.
Blending tools are equally vital for achieving professional results. While your finger can be used, the oils from your skin can smudge the graphite and create uneven patches. A paper tortillon or a piece of chamois cloth provides a more controlled, professional finish. When working on large areas, use a circular motion to blend the graphite into the tooth of the paper. Always keep your eraser clean to ensure that your highlights remain bright and crisp against the dark shadows you have created.
Key facts
- Identify the light source first to determine the consistent direction of all shadows in your composition.
- Use a light touch with your pencil initially, as shadows are built in layers rather than one dark stroke.
- Cast shadows are typically darker and have sharper edges near the object, becoming softer as they extend away.
- Form shadows occur on the object itself, showing the transition from light to dark across its surface.
- Occlusion shadows are the darkest points where an object touches the ground, often appearing as a thin, sharp line.
- Always use a consistent light angle; if the sun is at a 45-degree angle, all shadows must follow that same trajectory.
The bottom line
Drawing realistic shadows requires a disciplined approach to light and geometry. By identifying your light source, layering your values, and respecting the transition from sharp occlusion points to soft, diffused edges, you create the illusion of depth. Remember that shadows are not merely dark shapes; they are complex areas containing reflected light and gradients that define the physical presence of every object you draw.
People also ask
Why do my shadows look flat or cartoonish?
Shadows often look flat because they lack a gradient or "soft edge" where the light tapers off. Try using a blending stump or a soft eraser to create a smooth transition between the darkest shadow and the mid-tones.
Should I use black to draw shadows?
Avoid using pure black, as it can make shadows look muddy or dead. Instead, mix your shadow colors with a touch of blue or violet to create depth and a more natural appearance.
How do I know how long a shadow should be?
Shadow length is determined by the height of the light source relative to the object. A low sun creates long, stretched shadows, while a light source directly overhead creates very short, compact shadows.
What is a core shadow?
A core shadow is the darkest part of the form shadow found on the object itself. It sits between the highlight and the reflected light, defining the object's volume and three-dimensional shape.
How do I handle reflected light inside a shadow?
Reflected light occurs when light bounces off a nearby surface and hits the shadowed side of an object. Keep this area slightly lighter than the core shadow to prevent the object from looking like a flat silhouette.
Can I use an eraser to draw shadows?
Yes, "subtractive drawing" is a powerful technique where you cover your paper in graphite and erase the highlights. This allows you to carve out the light, leaving the darkest shadows as the base layer.
This answer was created with the help of AI research tools and reference sources. Spotted an error? Let us know — we correct mistakes quickly. See our editorial policy.