How do you mix skin tones with acrylic paint?
Short answer
Mixing skin tones with acrylic paint requires a base of white, yellow, red, and blue. Start by creating a neutral flesh tone using a ratio of white to a small amount of red and yellow. Adjust the hue by adding tiny amounts of blue or burnt umber to darken and neutralize the mixture.

On this page
How to choose the right colors for skin tones
To mix realistic skin tones, you need a core palette consisting of titanium white, cadmium red, cadmium yellow, and ultramarine blue or burnt umber. These primary colors allow you to adjust the temperature and value of your mixture effectively. Titanium white is essential for lightening the tone and creating opacity, while the red and yellow provide the warm base necessary for most human complexions.
Professional artists often recommend adding earth tones like burnt sienna or yellow ochre to your palette to simplify the process. These pre-mixed pigments act as excellent foundations, saving time during the initial stages of color matching. Avoid using black paint to darken your skin tones, as it often creates a muddy or grayish appearance that lacks the natural vibrancy of living skin. Instead, use burnt umber or a mix of blue and orange to deepen the color while maintaining its warmth.
How to mix basic skin tones step by step
Creating a balanced skin tone is a process of gradual adjustment rather than adding large amounts of pigment at once. Begin with a generous amount of white on your palette, as you will need more base than you think to achieve the desired consistency.
- Place a large dollop of titanium white on your palette.
- Add a tiny amount of cadmium red to create a pale pink base.
- Incorporate a small amount of cadmium yellow to shift the pink toward an orange-peach hue.
- Gradually add small bits of blue or burnt umber to neutralize the brightness and match the specific skin depth.
- Test the color on a scrap piece of paper or canvas, as acrylic paint often dries slightly darker than it appears when wet.
If the mixture becomes too orange, add a touch more blue to cool it down. If it appears too pale, introduce more red or yellow to increase the saturation. Always clean your brush thoroughly between adjustments to prevent cross-contamination of your primary colors.
What are the best skin tone palettes for beginners
Beginners often struggle with "muddy" colors because they mix too many pigments simultaneously. A limited palette is the most effective way to learn color theory and consistency. Start with a four-color system that forces you to understand how temperature shifts affect the final result.
- Titanium White: Provides the necessary value and opacity for highlights.
- Cadmium Red: Adds the essential warmth found in the blood beneath the skin.
- Cadmium Yellow: Provides the golden undertones present in many complexions.
- Burnt Umber: Acts as a natural darkener that keeps the mixture from looking artificial.
By mastering these four colors, you can create a vast range of tones, from fair to deep. Once you feel comfortable with these, you can expand your palette to include specialized pigments like raw sienna, alizarin crimson, or cerulean blue to capture specific lighting conditions or unique skin characteristics.
Why skin tones look gray or muddy
The most common reason a skin tone looks muddy is the over-mixing of complementary colors. When you mix red, yellow, and blue together in equal parts, the result is a neutral gray or brown. While this is helpful for shadows, it can ruin a base tone if not controlled. Always add your darkening agents in tiny increments, using the tip of your palette knife to ensure you do not overwhelm the lighter base.
Another factor is the quality of your brushes. If your brush contains remnants of a previous color, it will contaminate your new mixture immediately. Always use a clean palette and fresh brushes when starting a new skin tone. Furthermore, remember that acrylic paint dries quickly. If you try to rework a patch of paint that is already partially dry, you will create streaks and uneven textures that make the skin look patchy rather than smooth and realistic.
Common mistakes when painting skin tones
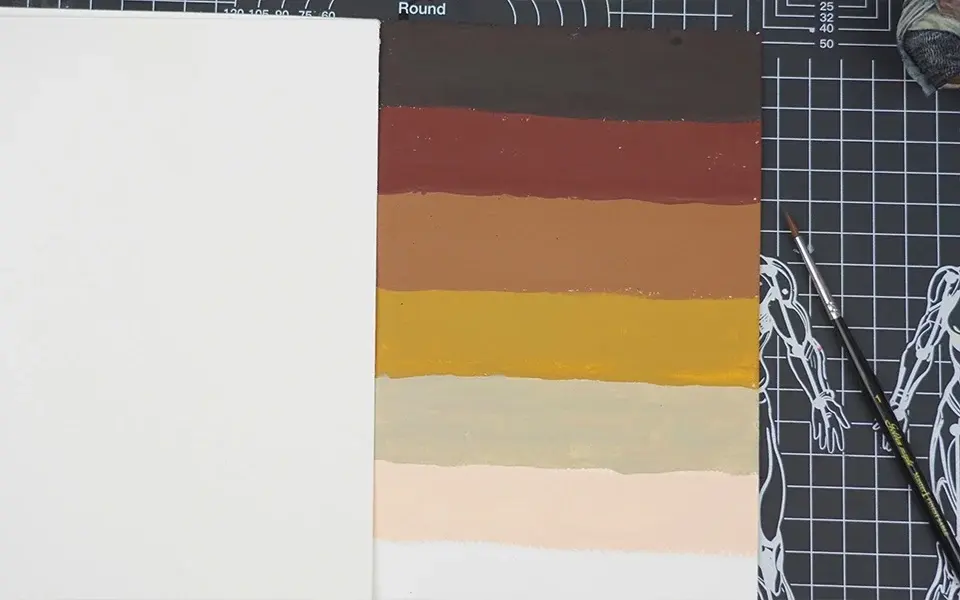
Artists frequently make the mistake of painting skin as a single, flat color. In reality, human skin is composed of many subtle variations, including cool tones in the shadows and warm tones in the highlights. Avoid using a single mixture for the entire face or body. Instead, create a range of three to five variations of your base tone, including a lighter version for highlights and a darker, cooler version for shadows.
- Forgetting to account for reflected light, which often picks up colors from the surrounding environment.
- Using too much white, which can make the skin look chalky or ghostly.
- Ignoring the importance of undertones, which can be cool (blue/purple) or warm (yellow/red).
- Failing to blend edges, resulting in a "mask-like" appearance rather than a natural transition.
To fix these issues, observe your subject closely under natural light. Notice how the skin color shifts near the jawline, around the eyes, and on the cheeks. By applying these subtle color shifts, you will add depth and realism to your portrait.
Key facts
- Start with a primary base of white acrylic paint, as it is the most efficient way to lighten darker pigments.
- Use a split-complementary approach by mixing red, yellow, and blue to create a neutral brown base before adjusting.
- Add small amounts of burnt umber or raw sienna to deepen the tone without losing warmth.
- Incorporate a touch of ultramarine blue or phthalo green to neutralize overly orange or "muddy" mixtures.
- Test your paint on a scrap piece of paper and let it dry, as acrylics often darken significantly once cured.
- Keep a "color map" of your ratios to ensure you can recreate specific skin tones for larger portraits.
The bottom line
Mixing realistic skin tones requires a patient, incremental approach rather than relying on a single tube of paint. By starting with a white base and slowly introducing red, yellow, and blue, you can achieve a wide spectrum of natural hues. Always test your colors on a separate surface and allow them to dry completely, as acrylics shift in value and temperature during the drying process.
People also ask
Why does my skin tone mixture look gray or muddy?
This usually happens when you mix too many complementary colors, such as red and green, together at once. To fix this, add a small amount of pure white or a warm yellow to brighten the mixture and restore vibrancy.
Should I use black paint to darken a skin tone?
Avoid using pure black, as it often makes skin tones look bruised or flat. Instead, use burnt umber or a dark violet to deepen the shadow areas while maintaining a natural, organic appearance.
How do I create a highlight for a skin tone?
Mix a small amount of your base skin color with a larger portion of white or a pale yellow. Avoid using pure white for highlights, as it can look chalky and unnatural against the skin.
What is the best way to paint shadows on skin?
Use a cooler version of your base skin tone by adding a tiny amount of blue or purple. Shadows are rarely just darker versions of the base color; they are usually cooler in temperature.
Can I use pre-mixed "flesh" colors?
You can use them as a starting point, but they often appear artificial and lack depth. It is better to treat them as a base and modify them with additional pigments to match the specific subject.
How do I keep my paint from drying too fast while mixing?
Use a slow-drying medium or a stay-wet palette to extend the working time of your acrylics. You can also lightly mist your palette with water to maintain the moisture levels of the paint.
This answer was created with the help of AI research tools and reference sources. Spotted an error? Let us know — we correct mistakes quickly. See our editorial policy.