How do you draw claws?
Short answer
Drawing claws requires understanding the underlying anatomy of the digit. Start by sketching a curved, tapered cone that connects to a jointed toe. Focus on the sharp point, the thick base, and the natural downward arc. By layering these shapes over skeletal structures, you create a realistic, functional appearance for any creature.
On this page
How to structure the base of a claw
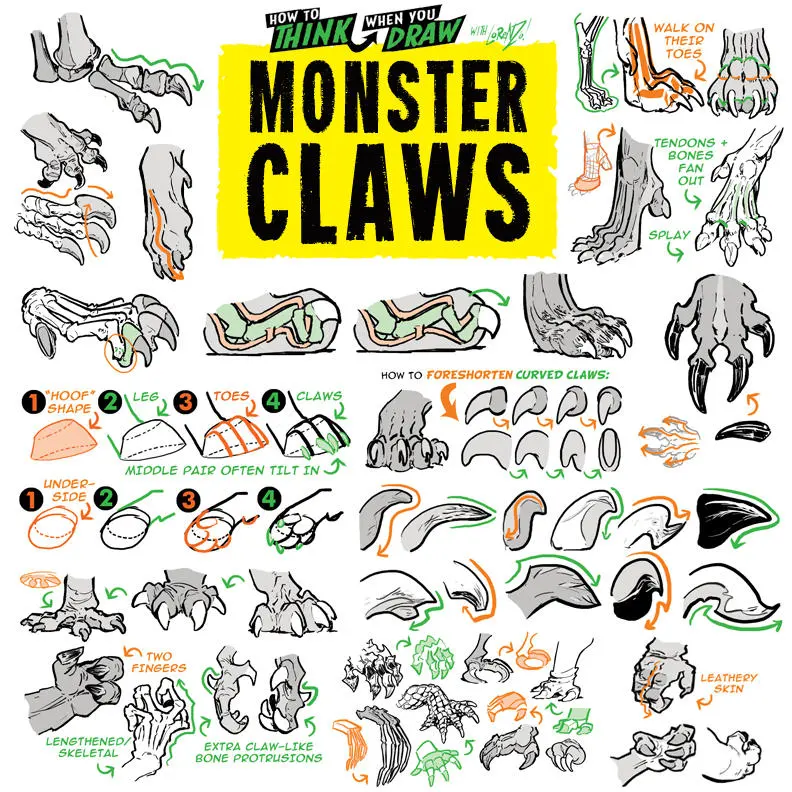
A claw is not merely a sharp triangle attached to a foot; it is a keratinous sheath covering a bony core. To draw one accurately, you must first establish the digit's skeletal structure. Think of the claw as the final segment of a finger or toe. Begin by drawing a series of cylinders or spheres to represent the knuckle and the phalanges. This provides a solid foundation that prevents the claw from appearing as if it is floating or improperly attached.
Once the joints are in place, draw a curved, tapered shape extending from the final bone. This shape should follow the natural arc of the digit. If the creature is resting, the claw should curve downward toward the ground. If the creature is striking, the claw may be extended straight out. Maintaining this connection to the anatomy ensures that the claw looks like a functional part of the animal rather than an afterthought.
How to add realistic curvature and taper
The most common mistake when drawing claws is making them perfectly straight or uniform in width. Real claws are thickest at the base, where they emerge from the skin, and they taper significantly toward the tip. Use a sweeping, C-shaped curve to define the primary silhouette. This curve should be more pronounced on the top edge than on the bottom, which is often flatter or slightly concave.
To achieve a professional look, follow these steps:
- Sketch a light, curved guideline that defines the path of the claw.
- Draw the thick base at the point of attachment, ensuring it is slightly wider than the toe segment.
- Gradually narrow the lines as they approach the tip, creating a sharp, needle-like point.
- Add a slight hook at the very end to suggest the piercing nature of the claw.
This process ensures a dynamic, organic shape that suggests weight and sharpness.
How to render texture and lighting on claws
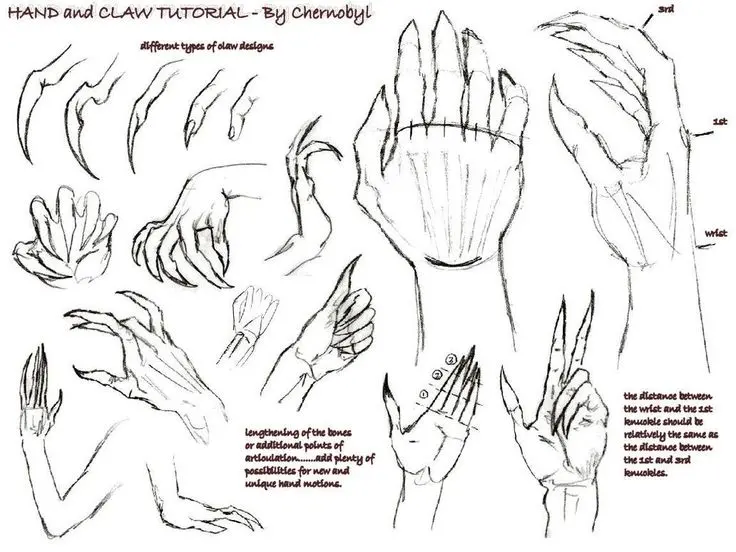
Claws are made of keratin, the same material as human fingernails. This gives them a smooth, slightly translucent, and reflective surface. When shading, avoid using a flat, matte finish. Instead, leave a thin, bright highlight along the top edge of the curve where light hits the surface most directly. This highlight should follow the length of the claw, emphasizing its cylindrical volume.
Near the base, where the claw meets the skin, the texture often becomes rougher or thicker. You can represent this with subtle cross-hatching or small, irregular lines to indicate the transition from living tissue to hardened keratin. If you are working in color, remember that the base is often darker or more opaque, while the tip may appear lighter or more translucent due to the thinning of the material. A well-placed shadow underneath the claw will also help ground it in the environment.
Common mistakes when drawing claws
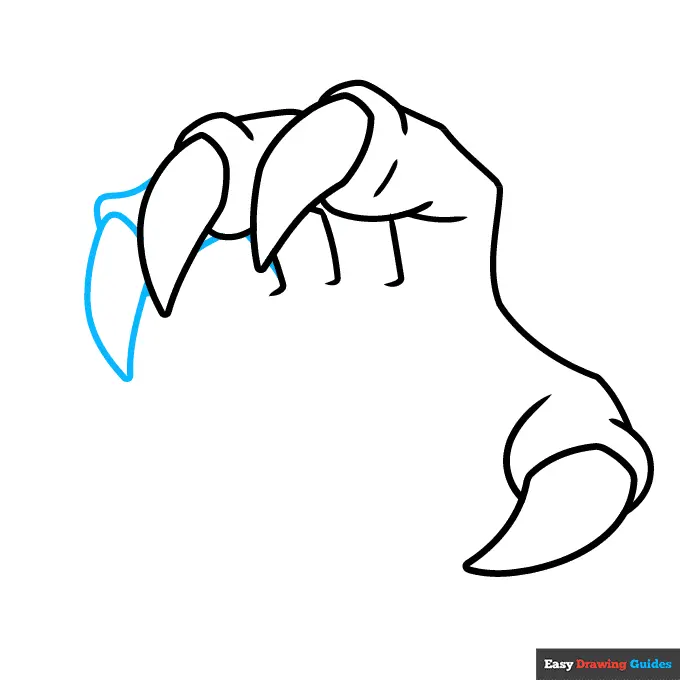
Many artists fail to account for the variety of claw shapes found in nature. A feline claw is retractable and curved, designed for gripping, while a canine claw is blunt and non-retractable, designed for traction. Avoid drawing every claw as a generic, sharp hook. Study the specific animal you are depicting to understand its unique biological needs. A bird of prey, for example, has talons that are significantly more curved and slender than those of a bear.
Another frequent error is neglecting the "quick," which is the blood supply inside the claw. The base of the claw should look attached and integrated into the toe, not just glued onto the surface. Avoid these pitfalls by:
- Researching the specific species to determine claw length and curvature.
- Ensuring the angle of the claw matches the animal’s stance.
- Avoiding overly uniform lines that make the claw look like plastic.
- Checking that the claw's size is proportional to the overall foot.
Best techniques for different creature types
When drawing fantasy or original creatures, you can adapt real-world anatomy to suit your design. If your creature is a predator, emphasize the length and the sharpness of the curve. If the creature is a burrower, consider drawing shorter, thicker, and more spade-like claws that can move dirt efficiently. The design of the claw should always communicate the lifestyle of the creature to the viewer.
For a more aggressive look, add serrations or a slight groove along the side of the claw. This adds detail and suggests how the claw might function in combat or survival. Always maintain a consistent light source across the entire foot to ensure the claws look like they belong to the same body. By combining anatomical accuracy with thoughtful design, you can create claws that look dangerous, functional, and perfectly integrated into the creature's overall form, providing a final touch of realism to your artistic work.
Key facts
- Claws are extensions of the skeletal structure, specifically the distal phalanges, covered in a hard protein called keratin.
- When drawing a claw, always anchor the base to a visible toe joint to ensure the anatomy looks functional.
- The curve of a claw typically follows a logarithmic spiral, which is a common pattern found in nature.
- Always include a slight taper toward the point; a claw that is too uniform in thickness will look like a blunt tube.
- Adding a subtle highlight along the top edge of the claw helps define its hard, reflective, and often polished surface.
- Observe the difference between retractable claws, which emerge from a sheath, and non-retractable claws that remain exposed.
The bottom line
To draw compelling claws, focus on the anatomical connection to the toe and the natural curvature of the keratin sheath. By varying the sharpness based on the animal's lifestyle and adding details like surface highlights or minor wear, you create a sense of realism. Always prioritize structural integrity at the base to ensure your subject looks capable of movement, whether it is digging, climbing, or hunting.
People also ask
Should claws always be drawn as perfectly sharp points?
No, wild animals often have blunted or worn tips due to constant contact with the ground or rough surfaces. Adding small chips or a slightly rounded tip can make your drawing look more realistic and lived-in.
How do I make a claw look threatening?
Increase the length and the degree of the curve to create a more aggressive silhouette. Placing the claw in a tensed, downward-pointing position also suggests the animal is ready to strike or grip.
Do all animal claws have the same shape?
Claws vary significantly based on their function, such as digging, climbing, or hunting. For example, feline claws are curved for latching, while canine claws are straighter and thicker to provide traction while running.
How do I draw the connection between the toe and the claw?
Use a small fold of skin or a "hood" of tissue to cover the base of the claw. This transition prevents the claw from looking like it is simply hovering on the end of the foot.
Is it necessary to draw the underside of the claw?
Drawing the underside, or the "blood groove," adds depth and realism to the structure. This concave area often holds dirt or debris, which can be a great detail for a gritty or naturalistic illustration.
What is the most common mistake when drawing claws?
The most frequent error is neglecting the weight and thickness at the base. If the claw is too thin at the connection point, it will appear fragile and anatomically impossible to support the animal's weight.
This answer was created with the help of AI research tools and reference sources. Spotted an error? Let us know — we correct mistakes quickly. See our editorial policy.