How do you draw a banana step by step?
Short answer
Drawing a banana involves capturing its signature crescent shape and tapered ends. By sketching a gentle arc, adding volume with rounded lines, and detailing the stem and ridges, you create a realistic representation. Focus on the curvature and light highlights to give the fruit a three-dimensional appearance on your page.
On this page
How to draw a basic banana shape
The foundation of a realistic banana sketch is a simple, elongated arc. Start by drawing a light, curved line that resembles a shallow crescent moon. This line serves as the spine of the fruit. Avoid making the curve too sharp, as bananas typically possess a soft, gentle bend that transitions smoothly from one end to the other.
Once the spine is established, you can build the body by drawing a second, parallel curved line beneath the first. Connect these two lines at the ends to form the tapered tips of the banana. It is helpful to keep the middle section slightly thicker than the ends to mimic the natural anatomy of the fruit. Remember to keep your initial pencil strokes light so they can be easily adjusted or erased later as you refine the proportions.
How to add texture and detail
After establishing the basic outline, you should focus on the stem and the characteristic ridges that run along the length of the fruit. The stem is essentially a short, thick cylinder attached to the top end of the banana. Draw a small, rectangular shape with rounded corners at the top, ensuring it looks sturdy and connected to the main body.
To add realistic detail, incorporate subtle lines along the curve of the banana. These ridges define the fruit's edges and help the viewer perceive its volume. You can also add small, dark spots or blemishes to suggest ripeness. Adding these minor details transforms a simple cartoon shape into a convincing botanical study. Consider these steps for refining your drawing:
- Define the stem with a distinct, slightly flared base.
- Add three to four long, soft lines running vertically to indicate ridges.
- Place small, irregular dots near the ends to show natural aging.
Best drawing tools for beginners
For those just starting, using a standard HB graphite pencil is ideal because it allows for both light sketching and darker shading. A soft eraser is equally important, as it enables you to correct the curvature of the banana without damaging the paper. Smooth, medium-weight drawing paper provides the best surface for blending graphite and achieving clean, crisp lines.
If you wish to add color, colored pencils or soft pastels are excellent choices. Yellows, greens, and browns are essential for capturing the various stages of a banana's ripeness. By layering these colors, you can create depth and interest. Start with a light yellow base and gradually add darker brown tones in the crevices and at the tips. Using a blending stump or a piece of tissue can help smooth out your shading, making the surface of the fruit appear waxy and realistic.
Why shading creates a 3D effect
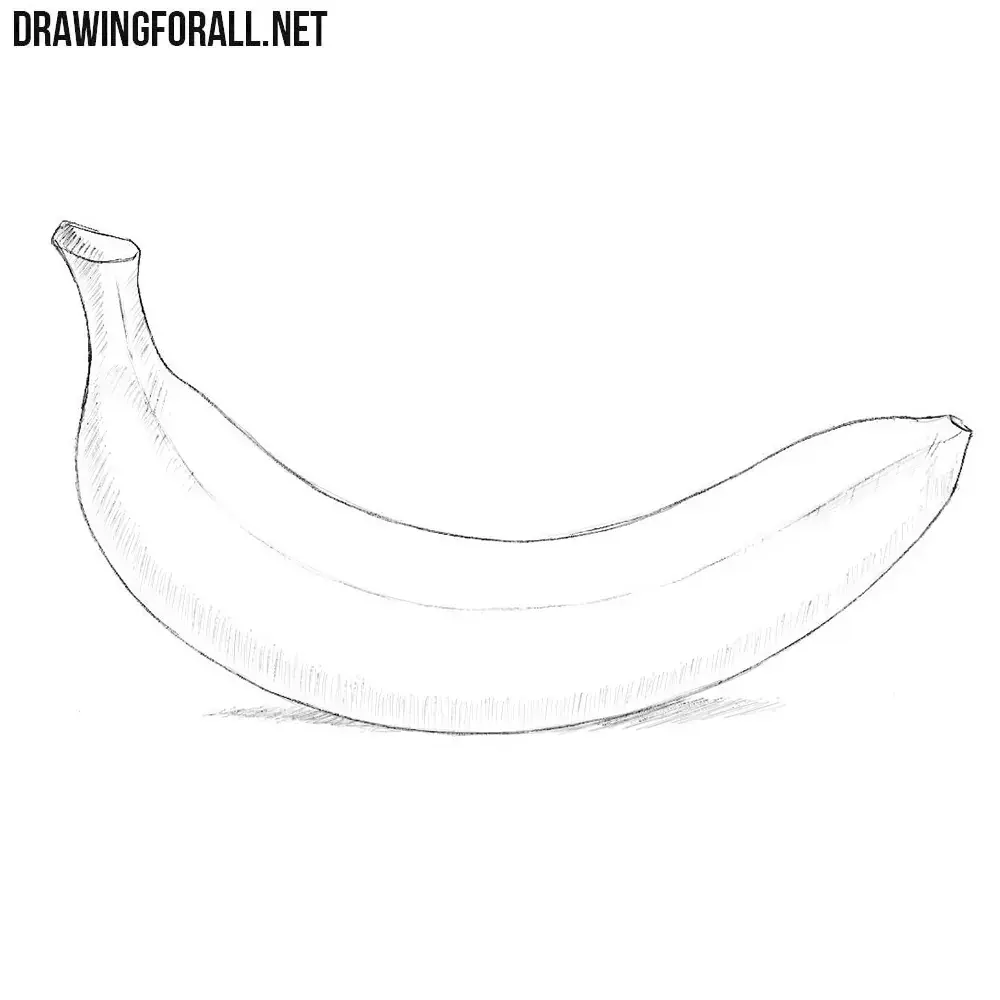
Shading is the most effective technique for making a two-dimensional drawing appear three-dimensional. Because a banana is cylindrical, light will naturally hit one side while leaving the other side in shadow. Identify where your light source is coming from before you begin shading. If the light is hitting the top of the banana, the bottom curve should be significantly darker.
Use a cross-hatching or circular motion with your pencil to build up layers of graphite on the shadowed side. As you move toward the middle of the banana, gradually lighten your pressure to create a smooth transition, known as a gradient. This technique mimics the way light wraps around a curved object. Do not forget to include a small cast shadow underneath the banana on the surface it is resting upon, as this anchors the object and prevents it from looking like it is floating.
Common mistakes when drawing fruit
A frequent error is drawing the banana too flat or too straight. Bananas are organic, living objects, so they rarely feature perfectly symmetrical or rigid lines. If your drawing looks unnatural, check the curvature of your initial arc and ensure the thickness of the fruit tapers gradually toward the ends rather than ending abruptly.
Another common pitfall is over-detailing the surface. Beginners often draw too many lines, which can make the fruit look cluttered or bruised. Focus on the overall shape first, and only add texture where it is necessary to define the form. Finally, avoid using heavy, dark outlines for the entire sketch. Instead, use varied line weights to suggest depth; thicker lines can represent shadows, while thinner, lighter lines define the lighter parts of the peel. By following these guidelines, you can improve your technique:
- Avoid perfectly straight lines; embrace the organic curve.
- Do not outline the entire banana with a bold, dark stroke.
- Ensure the stem is proportional to the size of the fruit.
- Use a light touch to build up shadows rather than pressing hard immediately.
Key facts
- A banana’s shape is defined by a gentle, elongated curve known as an arc.
- The fruit features a distinct five-sided or hexagonal cross-section when viewed from the ends.
- The stem end is typically thicker and blunt, while the blossom end tapers to a small, dark point.
- Adding a slight ridge line along the inner curve helps create a three-dimensional effect.
- Bananas are botanically classified as berries, which explains their uniform, fleshy structure.
- Use light, sweeping pencil strokes initially to establish the curve before committing to final outlines.
- Drawing Steps
- Draw a long, slightly curved horizontal line to serve as the spine of the banana.
- Add a second, parallel curved line below the first to establish the thickness of the fruit.
- Connect the ends of these lines with small, rounded caps to close the shape.
- Draw a short, thick cylinder at the top end to represent the stem.
- Add a tiny, irregular star or dot at the bottom end to indicate the blossom scar.
- Sketch three subtle, lengthwise lines running the curve of the banana to define the fruit's natural ridges.
- Common Mistakes
- Avoid making the banana a perfect "C" shape, as real bananas have a more subtle, irregular curvature. Beginners often draw the ends too sharp; ensure the stem and blossom ends remain rounded or blunt. Finally, do not use perfectly straight lines for the ridges, as they should follow the natural contour of the fruit's arc.
The bottom line
Drawing a realistic banana relies on mastering the gentle arc and the subtle, angular ridges that define its unique anatomy. By focusing on the tapered ends and adding consistent shading, you can transform a simple shape into a convincing three-dimensional object. Practice observing real fruit to understand how light interacts with the peel, and remember that slight irregularities make your drawing appear much more natural.
People also ask
Why do bananas have ridges?
Bananas have ridges because they grow in bunches and develop a pentagonal or hexagonal cross-section as they mature. These edges become more pronounced as the fruit fills out on the plant.
What is the best medium for drawing fruit?
Graphite pencils are ideal for beginners because they allow for easy erasing and shading. Colored pencils or pastels are excellent for capturing the specific yellow-to-brown transitions seen in ripening bananas.
How do I make a banana look ripe?
To depict a ripe banana, add small, irregular brown spots across the surface. Use a lighter yellow for the base and slightly darker ochre tones near the ridges to show depth.
Should I draw the banana with or without the peel?
Drawing a peeled banana requires focusing on the soft, segmented interior flesh. An unpeeled banana is easier for beginners as it focuses on the smooth, singular curve of the skin.
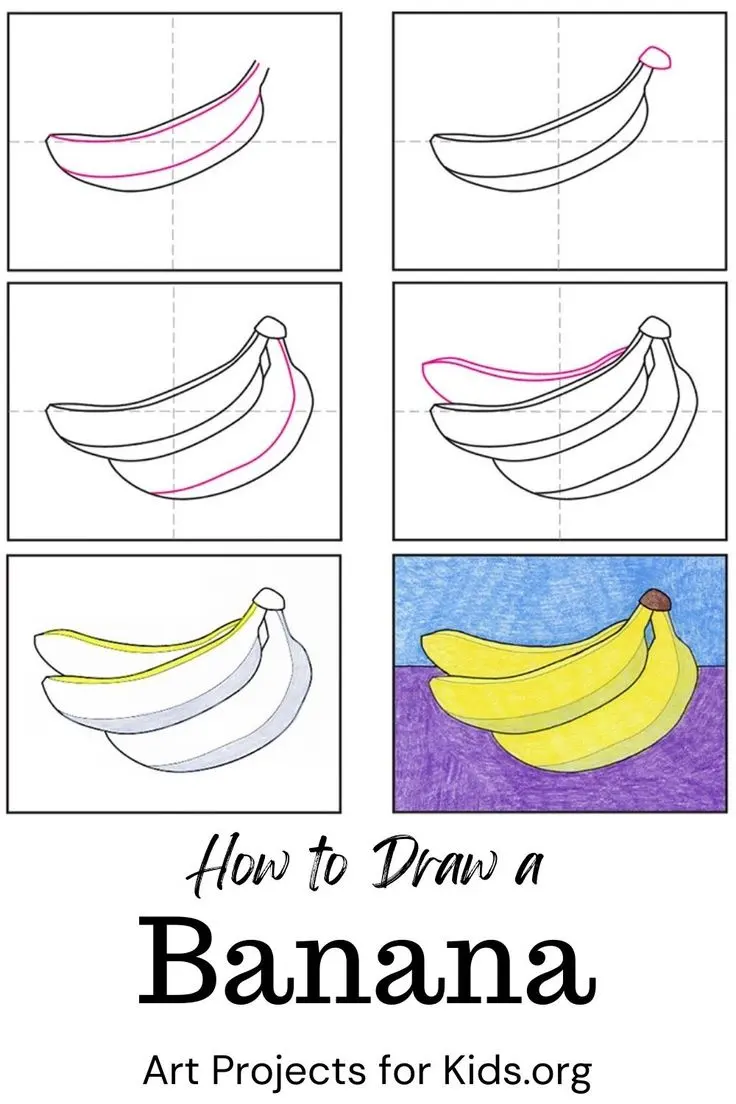
How do I draw a bunch of bananas?
Start by drawing the central stems connecting at a single point. Then, layer the individual banana shapes around this central hub, ensuring they overlap naturally to create a sense of volume.
Why does my drawing look flat?
Drawings often look flat due to a lack of shading or value contrast. Apply darker shading along one side of the banana to simulate light hitting the curved surface from a specific direction.
This answer was created with the help of AI research tools and reference sources. Spotted an error? Let us know — we correct mistakes quickly. See our editorial policy.