How do you draw a soldier step by step?
Short answer
Drawing a soldier involves constructing a human figure using basic geometric shapes to establish proportions. You then layer military-specific details like tactical gear, uniforms, and weaponry over this framework. By focusing on posture and equipment anatomy, you can create a realistic representation of a soldier in any combat or training environment.
On this page
How to draw a soldier step by step
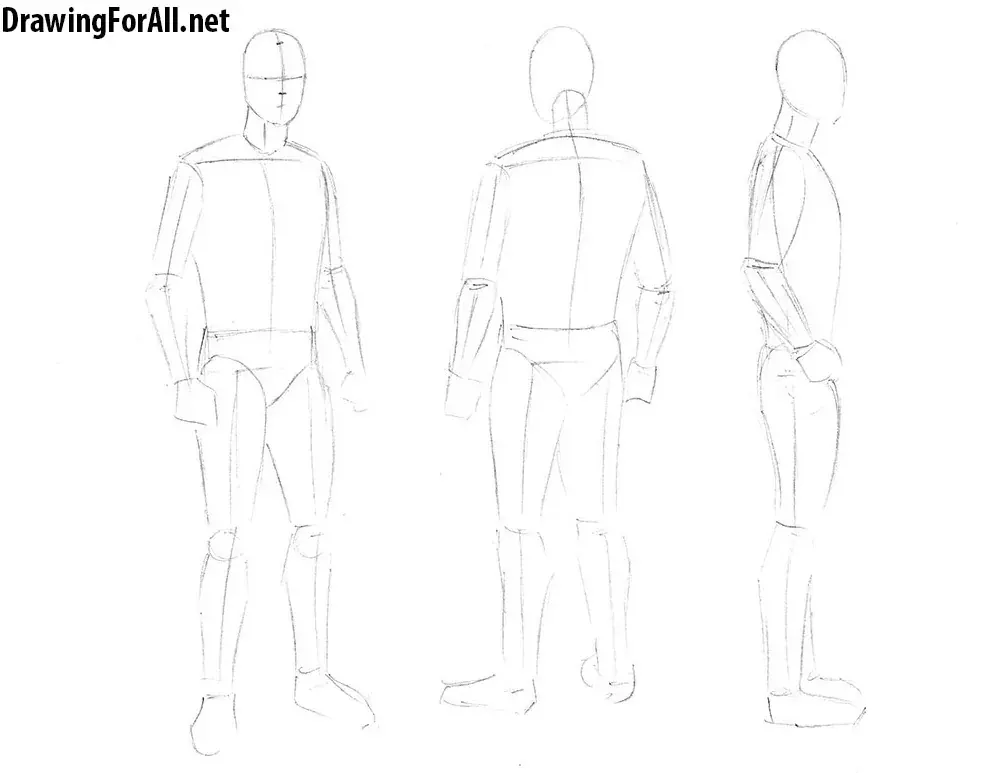
To begin your drawing, start with a skeletal framework to ensure the human body’s proportions are accurate. Use an oval for the head and a series of lines to indicate the spine, shoulders, and limbs. This "mannequin" stage is crucial because it prevents the figure from appearing stiff or anatomically incorrect before you add clothing. Once the pose is established, build up the volume of the limbs using cylinders and spheres.
After the base form is complete, refine the silhouette by adding the bulk of the uniform. Soldiers typically wear loose-fitting fatigues, so draw the fabric lines to follow the contours of the body while allowing for folds at the elbows and knees. Focus on the structural weight of the gear, such as a tactical vest or a helmet, which should sit naturally on the shoulders and head.
- Sketch a light stick figure to define the action pose.
- Add basic shapes for the torso, pelvis, and joints.
- Outline the uniform, keeping lines loose around the joints.
- Add specific details like pockets, straps, and boots.
- Apply shading to create depth and emphasize the gear's texture.
Best drawing tools for beginners
For those new to figure drawing, starting with a standard HB graphite pencil is ideal because it allows for light, erasable guidelines. You will also need a high-quality eraser, preferably a kneaded one, to lift graphite without damaging the paper surface. A smooth-surfaced sketchbook is recommended to ensure your strokes remain consistent and clear as you build the complex details of military equipment.
As you progress, consider incorporating technical pens or fine-liners to define the edges of gear and weapons. These tools help distinguish between the soft fabric of a uniform and the hard, reflective surfaces of a rifle or helmet. Using a variety of lead grades, such as 2B for darker shadows and 2H for lighter construction lines, will add professional depth to your final illustration.
- HB pencil for initial sketching and layout.
- Kneaded eraser for precise detail removal.
- Fine-liner pens for outlining equipment edges.
- Blending stump for smoothing out shadow transitions.
- Smooth drawing paper to prevent unwanted texture.
How to draw military gear and equipment
The equipment often defines the soldier's silhouette, so prioritize the placement of essential items like the plate carrier, pouches, and sidearms. A plate carrier should sit high on the chest, roughly covering the ribcage, rather than sagging toward the waist. When drawing straps and webbing, ensure they wrap around the torso and shoulders in a way that respects the underlying anatomy of the figure.
When rendering weaponry, focus on the geometric precision of the barrel, stock, and sights. Rifles are rigid, so use straight lines and sharp angles to contrast with the organic curves of the human body. Pay attention to how the hands grip the weapon, as this is a common point of failure in drawings; the fingers should wrap securely around the grip, not merely hover near it.
Common mistakes when drawing soldiers
One of the most frequent errors is ignoring the "line of action," which results in a static or lifeless figure. Even a soldier standing at ease should have a slight curve to their spine or a shift in weight to one leg. If the figure looks like a flat cutout, re-examine the angle of the shoulders and hips to ensure they are tilted in opposition to create a natural, dynamic balance.
Another common pitfall is over-detailing the uniform while neglecting the figure's underlying mass. If you draw intricate camouflage patterns or too many pockets before establishing the body's volume, the drawing will look cluttered and distorted. Always prioritize the form and proportions first; details like zippers, patches, and fabric textures should be added as the final layer to enhance, not replace, the anatomical foundation of the soldier.
How to add shading and texture
Shading is the final step that transforms a flat sketch into a three-dimensional soldier. Identify your light source early, then apply shadows to the opposite side of the body and beneath gear like helmets or pouches. Use cross-hatching or smooth gradients to differentiate between materials; for example, use sharp, high-contrast shadows for metal and soft, diffused shading for fabric folds.
Texture helps the viewer distinguish between the varied surfaces of a soldier's kit. Use small, repetitive marks to suggest the rough texture of tactical fabric or the coarse surface of boots. For reflective surfaces like goggles or metal clips, leave small areas of white paper untouched to represent highlights. By carefully balancing these textures and shadows, you create a realistic, professional-looking image that conveys the weight and presence of a soldier in the field.
Key facts
- Start with a basic stick figure or mannequin to establish the soldier's posture and balance before adding volume.
- Use geometric shapes like cylinders for limbs and ovals for the torso to build a realistic anatomical foundation.
- Focus on the silhouette of the gear, such as helmets and vests, which define the soldier's specific era and role.
- Pay attention to the "line of action," an imaginary curve that dictates the flow and energy of the character's movement.
- Add texture to clothing by drawing folds near joints, such as elbows and knees, where fabric bunches during motion.
- Keep equipment proportions consistent; a standard infantry rifle is typically about 30 to 40 inches long relative to the body.
The bottom line
Drawing a soldier requires a blend of anatomical accuracy and attention to technical detail. By starting with simple geometric forms, you can establish a solid pose before layering on the specific equipment that defines the character. Consistent practice with fabric folds and weapon proportions will improve your results. Focus on the silhouette and posture to convey the weight and intensity of a soldier in the field.
People also ask
How do I make the soldier’s uniform look realistic?
Focus on the weight of the fabric and the placement of pockets or straps. Adding subtle shading around seams and heavy gear creates the illusion of depth and utility.
What is the most common mistake when drawing soldiers?
Beginners often draw limbs that are too short or rigid. Ensure the joints align correctly and the posture reflects the weight of the equipment being carried.
Should I draw the face in detail?
If the soldier is wearing a helmet or goggles, keep facial details minimal. Focus instead on the shadows cast by the headgear to maintain a sense of realism.
How do I draw a soldier in a kneeling position?
Use a triangle shape for the lower half of the body to ground the figure. Ensure the back is slightly hunched to suggest the soldier is seeking cover.
Which tools are best for drawing military figures?
Graphite pencils are excellent for sketching initial forms, while fine-liner pens help define crisp edges on weapons and tactical gear.
How do I add perspective to a soldier?
Use foreshortening by drawing limbs that are closer to the viewer slightly larger than those further away. This technique adds dynamic depth to an action pose.
This answer was created with the help of AI research tools and reference sources. Spotted an error? Let us know — we correct mistakes quickly. See our editorial policy.