How do you draw a totem pole for beginners?
Short answer
Draw a totem pole by sketching a tall, vertical rectangle divided into equal horizontal segments. Each segment represents a stylized animal or ancestral figure using bold, geometric shapes like ovals and crescents. Focus on symmetry and thick outlines to mimic traditional wood-carving aesthetics, ensuring the figures stack vertically without overlapping too much.
On this page
How to structure a totem pole drawing
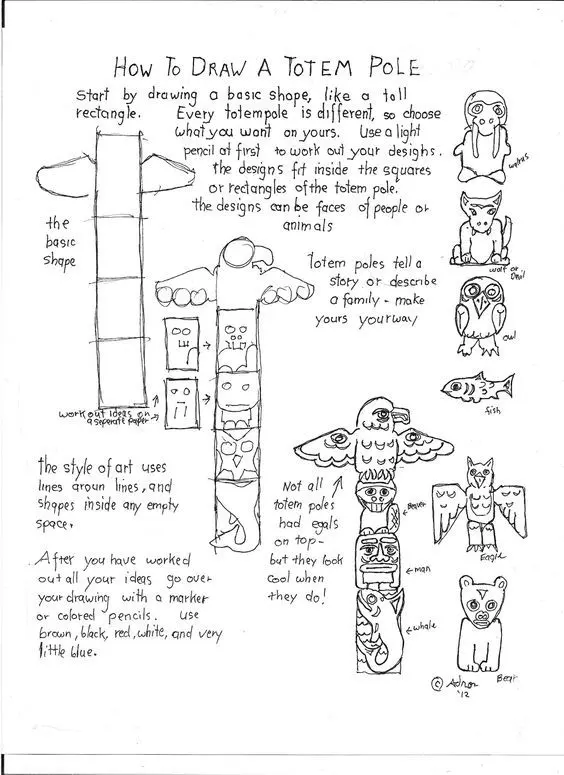
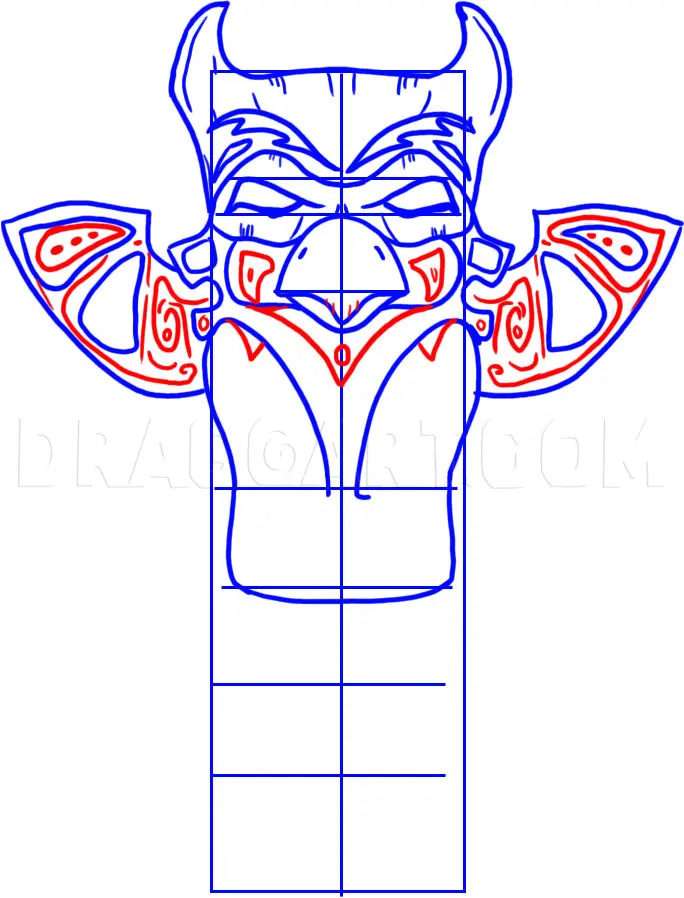
Begin by drawing a long, thin rectangle on your paper to serve as the central pillar. Divide this rectangle into three to five equal horizontal sections using light pencil marks. These sections act as frames for individual figures, such as a raven, bear, or eagle. Keeping the segments uniform ensures the pole looks balanced and structurally sound before you add specific details.
Once the segments are marked, sketch the basic shapes of your chosen creatures within each box. Use simple circles for eyes and triangles for beaks or ears. Avoid drawing full-body portraits; instead, focus on the head and torso to maintain the traditional "stacked" look. By keeping the proportions consistent across all sections, you create a cohesive design that mimics the authentic aesthetic of Pacific Northwest Indigenous art.
Best drawing techniques for beginners
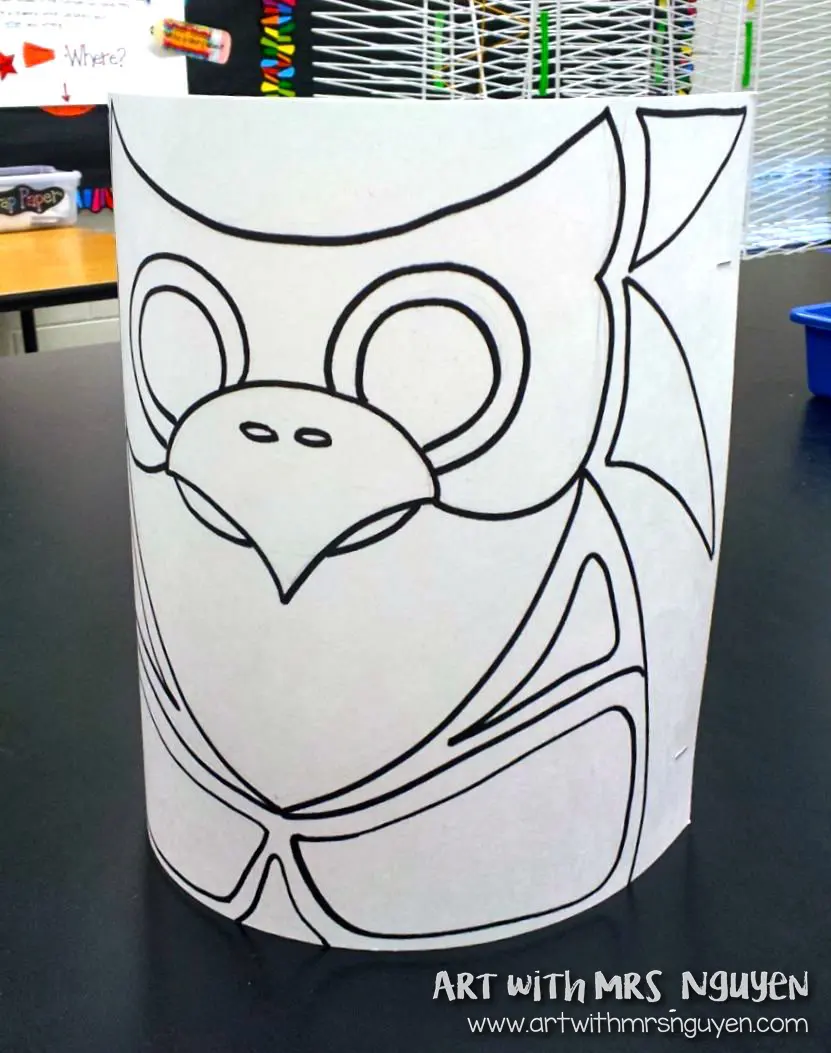
To achieve a professional appearance, emphasize bold, clean lines. Traditional totem poles were carved from cedar, so your drawing should reflect the strength and simplicity of wood-carving techniques. Use a thick marker or a dark pencil to outline your shapes, ensuring that every curve is intentional and geometric. This technique helps define the "formline" style, which is characterized by fluid, interconnected lines.
When adding features, follow these steps to maintain clarity:
- Sketch a large oval for the eye socket, then place a smaller, solid circle inside for the pupil.
- Use U-shapes and S-shapes to create decorative patterns on the cheeks or wings.
- Keep the color palette limited to traditional tones like black, red, and white to enhance the visual impact.
- Ensure the figures look forward, as this creates a direct connection with the viewer.
How to choose figures for your pole
Selecting the right figures is essential for creating a meaningful design. In many Indigenous cultures, animals represent specific clans, family histories, or moral lessons. Common subjects include the raven, which often symbolizes transformation or creation, and the bear, which represents strength and family protection. You do not need to follow a specific cultural lineage to draw a totem pole, but choosing animals with distinct features makes the drawing process easier.
When deciding on your layout, consider the hierarchy of the pole. Traditionally, the most significant figures are placed near the top, while supporting characters occupy the middle and base. If you are a beginner, start with three figures: one for the top, one for the center, and one for the bottom. This keeps the design manageable while allowing you to practice different facial expressions and animal characteristics without overwhelming your workspace.
Common mistakes when drawing totem poles
A frequent error is overcrowding the space with too much detail. Beginners often try to include every feather or fur texture, which makes the pole look cluttered and loses the impact of the bold, carved aesthetic. Stick to stylized, simplified representations of features rather than realistic ones. If the lines are too thin or too close together, the drawing will lack the visual weight necessary to represent the monumental nature of a real totem pole.
Another common mistake is ignoring symmetry. While some variation is natural, a totem pole should generally look balanced from left to right. If one side of a figure is significantly larger or differently shaped than the other, the pole will appear lopsided. Use a ruler to check the alignment of your eyes and ears frequently. If you find your drawing becoming lopsided, lightly fold your paper in half to compare the two sides and adjust your lines accordingly.
Why totem pole designs look the way they do
The distinct look of a totem pole is a result of the medium and the artistic traditions of the Pacific Northwest. Because the poles were carved from massive cedar logs, the designs had to be bold and clear enough to be seen from a distance. The use of large, rounded shapes and high-contrast colors served a functional purpose in storytelling. By understanding that these designs are meant to be iconic and symbolic rather than photographic, you can better appreciate the stylistic choices required for your own artwork.
As you finish your drawing, remember that the goal is to capture the spirit of the form rather than a perfect replica. Whether you are drawing for a school project or personal interest, focus on the rhythm of the shapes and the vertical flow of the composition. By respecting the structural rules of the art form, you will produce a piece that feels authentic and visually striking. Keep your lines confident, your shapes bold, and your composition balanced to complete a successful totem pole illustration.
Key facts
- Totem poles are monumental carvings traditionally created by Indigenous peoples of the Pacific Northwest Coast.
- Start your drawing with a tall, vertical rectangle to represent the cedar log structure.
- Divide the rectangle into three or four equal horizontal sections to plan for stacked figures.
- Use basic geometric shapes like circles for eyes and ovals for mouths to maintain a stylized look.
- Focus on symmetrical features to ensure the design looks balanced and intentional.
- Avoid overly complex details; focus on bold, thick outlines that mimic traditional wood-carving aesthetics.
The bottom line
Drawing a totem pole is an excellent exercise in structural design and geometric simplification. By dividing your canvas into distinct, stacked sections and utilizing bold, symmetrical shapes, you can capture the essence of this iconic art form. Remember that these carvings are deeply rooted in Pacific Northwest history, so approach your sketch with an appreciation for the cultural significance behind each unique, stylized animal figure.
People also ask
What do the different animals on a totem pole represent?
Animals typically represent family crests, historical events, or ancestral spirits. Common figures include the raven, eagle, bear, and killer whale, each holding specific cultural significance.
Do totem poles have a specific order for the figures?
There is no universal rule for the order of figures, as each pole is commissioned for a specific purpose. Some poles tell a chronological story, while others highlight the lineage of a specific clan.
What colors are traditionally used on totem poles?
Traditional palettes often rely on black and red, derived from charcoal and ochre. Modern poles may incorporate blue, green, or yellow, depending on the availability of pigments and tribal traditions.
Can anyone carve a totem pole?
Carving is a sacred practice within Northwest Coast Indigenous cultures, often requiring years of apprenticeship. It is important to respect these cultural protocols rather than treating the craft as a casual hobby.
Is it offensive to draw a totem pole?
Drawing a totem pole for personal practice is generally acceptable if done with respect. Avoid using sacred symbols in commercial or disrespectful contexts to honor the history of the original artists.
How do I make my drawing look more realistic?
To add depth, use shading on one side of the shapes to create a 3D effect. Adding subtle wood grain textures with light, wavy pencil lines can also enhance the appearance of carved cedar.
This answer was created with the help of AI research tools and reference sources. Spotted an error? Let us know — we correct mistakes quickly. See our editorial policy.