How do you draw a shield for beginners?
Short answer
Drawing a shield begins with establishing a vertical centerline to ensure symmetry. Sketch a basic geometric shape, such as a heater or kite shield, then add thickness by drawing a parallel inner border. Finally, refine the edges, add structural details like rivets or bosses, and apply shading to create depth and realism.
On this page
How to choose a shield shape for beginners
The heater shield is the most iconic shape for beginners, characterized by a flat top and a pointed bottom. This design is historically associated with the 12th-century knightly era and offers a balanced silhouette that is easy to replicate. If you prefer a different aesthetic, consider the kite shield, which is longer and more elongated, or the round buckler, which is simply a perfect circle. Choosing a shape with straight lines, such as the heater shield, allows you to practice symmetry and perspective without the complexities of curvature.
To begin your drawing, always start with a light construction sketch. Use a ruler to draw a vertical line down the center of your paper to serve as a guide. This ensures that the left and right sides of your shield remain balanced. Once the center line is set, mark the width at the top and the point at the bottom. By connecting these points, you create a foundational skeleton that prevents your final drawing from looking lopsided or distorted.
How to draw a shield step by step
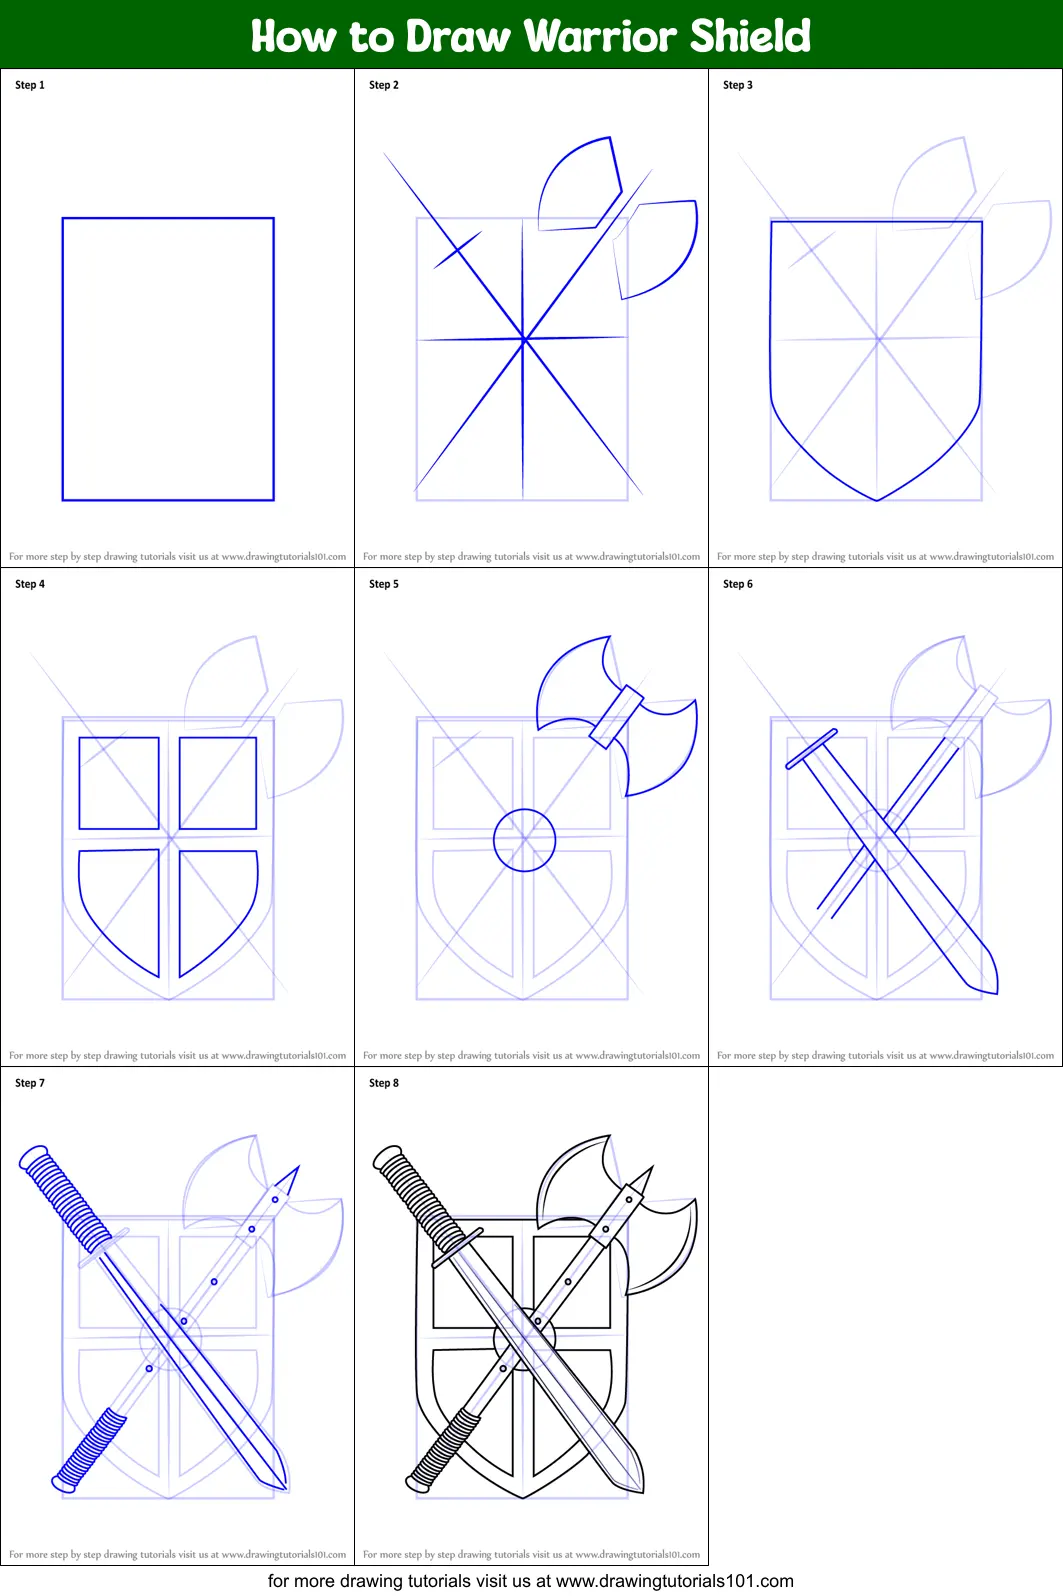
Drawing a professional-looking shield requires a systematic approach to structure and dimension. By following these steps, you can create a clean, accurate representation of medieval armor.
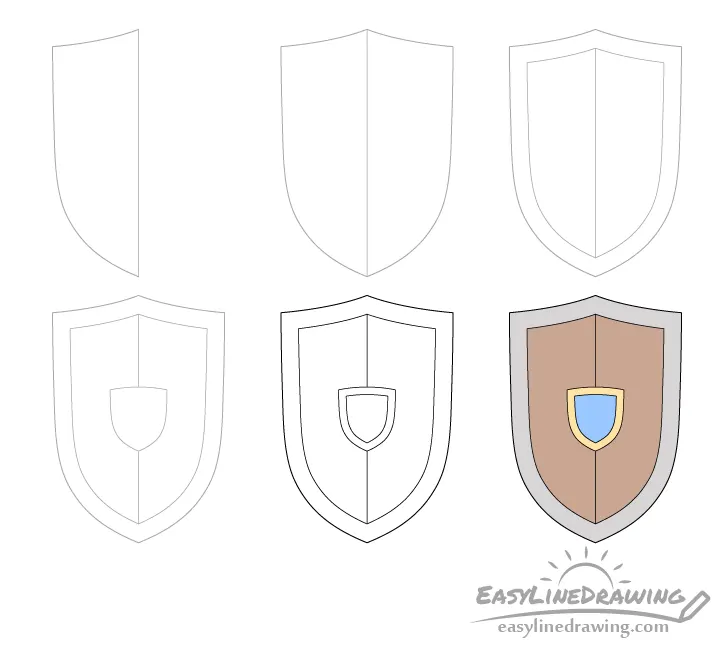
- Draw a vertical centerline and a horizontal line across the top to define the width.
- Connect the top corners to a single point at the bottom to form the basic shield outline.
- Draw a secondary, smaller outline inside the first shape to represent the thickness of the shield's edge.
- Add a central boss—a raised circular piece—in the middle of the shield to provide a focal point.
- Sketch small circles along the border to indicate rivets or decorative studs.
- Erase your construction lines and refine the outer edges with a darker pencil stroke.
This process helps you maintain control over the proportions. Always keep your initial lines very faint so they can be easily removed once the final shape is established.
Why symmetry matters in shield drawing
Symmetry is the most critical element in drawing a convincing shield. Because shields are functional defensive tools, they are designed to be balanced for the user. When one side of your drawing is wider or steeper than the other, the shield loses its sense of structural integrity. Even a slight deviation can make the object appear flimsy or improperly constructed, which detracts from the overall impact of your artwork.
To maintain symmetry, check your work frequently by flipping your paper upside down or looking at it in a mirror. This simple trick helps your brain identify lopsided areas that you might have missed while working in a standard orientation. If you struggle with freehand symmetry, you can draw one half of the shield, fold the paper along the center line, and trace the shape onto the other side. This ensures a perfect mirror image every time you draw.
Common mistakes when drawing shields
One of the most frequent errors is neglecting the perspective of the shield’s thickness. Beginners often draw the shield as a flat, two-dimensional object rather than a curved piece of metal or wood. To correct this, ensure that the top edge of the shield is slightly curved to suggest that it wraps around the user’s body. Adding a subtle highlight along the edge or the central boss can also help define the three-dimensional form of the object.
Another common mistake is placing decorative elements, such as heraldic symbols or rivets, without considering the shield's surface curvature. If you draw a pattern on a shield, the lines should follow the contour of the shape. If the shield is rounded, the pattern should appear slightly distorted toward the edges to reflect that curve. Avoid drawing perfectly straight patterns on a curved surface, as this creates a flat appearance that contradicts the physical nature of the shield.
Best shading techniques for beginners
Shading is the final step that transforms a simple outline into a realistic object. Start by identifying where your light source is coming from, such as the upper left corner. Apply darker shadows on the opposite side of the shield and beneath the central boss to create depth. Use a blending stump or a soft tissue to smooth out your pencil strokes, creating a metallic or wooden texture that looks authentic.
- Use cross-hatching for a rough, wooden shield texture.
- Use smooth, blended gradients for a polished metal or steel surface.
- Keep the brightest highlights on the edges of the shield to emphasize its thickness.
- Add cast shadows on the ground beneath the shield if you are drawing it in a scene.
Consistent shading practice allows you to define the material properties of your shield. By varying the pressure of your pencil, you can create subtle transitions that suggest the weight and durability of the armor.
Key facts
- A basic shield shape is essentially a symmetrical rectangle with a pointed bottom, known as a heater shield.
- Use a light pencil to draw a vertical center line to ensure both sides remain perfectly balanced.
- To create a 3D effect, draw a second, slightly smaller outline inside your initial shape and connect the corners.
- A shield’s top edge can be flat, arched, or curved depending on the historical style you choose.
- Avoid making the shield too wide, as a narrow design often looks more realistic and easier to handle.
- Adding a central boss—a raised circular plate—provides a focal point that adds visual depth to your drawing.
The bottom line
Drawing a shield is a foundational exercise in symmetry and structural design. By starting with a simple vertical guide line and focusing on the classic heater shape, you can easily build a balanced foundation. Adding depth through shading and personalizing the surface with heraldic patterns will transform a basic outline into a compelling piece of art. Practice consistency in your curves to achieve a professional result.
People also ask
What is the easiest shield shape to draw for beginners?
The heater shield is the most common and easiest shape because its simple geometry relies on a straight top and a curved point. It is the classic shape seen in most medieval illustrations and fantasy art.
How do I make my shield look metallic?
Use cross-hatching or shading to create light and dark areas that mimic reflective surfaces. Keep one side of the shield darker to suggest a shadow, which adds a professional, polished appearance.
Should I use a ruler for my shield drawing?
Using a ruler is highly recommended for the initial sketch to ensure your lines are straight and symmetrical. Once you have the basic structure, you can add freehand curves to soften the edges.
What are the best tools for drawing shields?
A 2B pencil is ideal for sketching, while a fine-liner pen helps define the final edges. Erasers are essential for removing the center guide lines once the main shape is complete.
How can I add detail to a plain shield?
You can add heraldry, such as crosses, lions, or geometric patterns, to the center of the shield. These symbols provide historical context and make the drawing more visually engaging and unique.
Why does my shield look lopsided?
Lopsidedness usually occurs when the vertical center line is not perfectly straight or the curves are drawn unevenly. Always check your symmetry by flipping your paper or holding it up to a mirror.
This answer was created with the help of AI research tools and reference sources. Spotted an error? Let us know — we correct mistakes quickly. See our editorial policy.