How do you draw a pineapple for beginners?
Short answer
Drawing a pineapple involves sketching an oval base and adding a crown of spiky, radiating leaves. By layering a cross-hatch pattern over the body, you create the signature texture of the fruit’s skin. With basic geometric shapes and consistent shading, beginners can easily capture the recognizable form of this tropical subject.
On this page
How to draw a pineapple shape
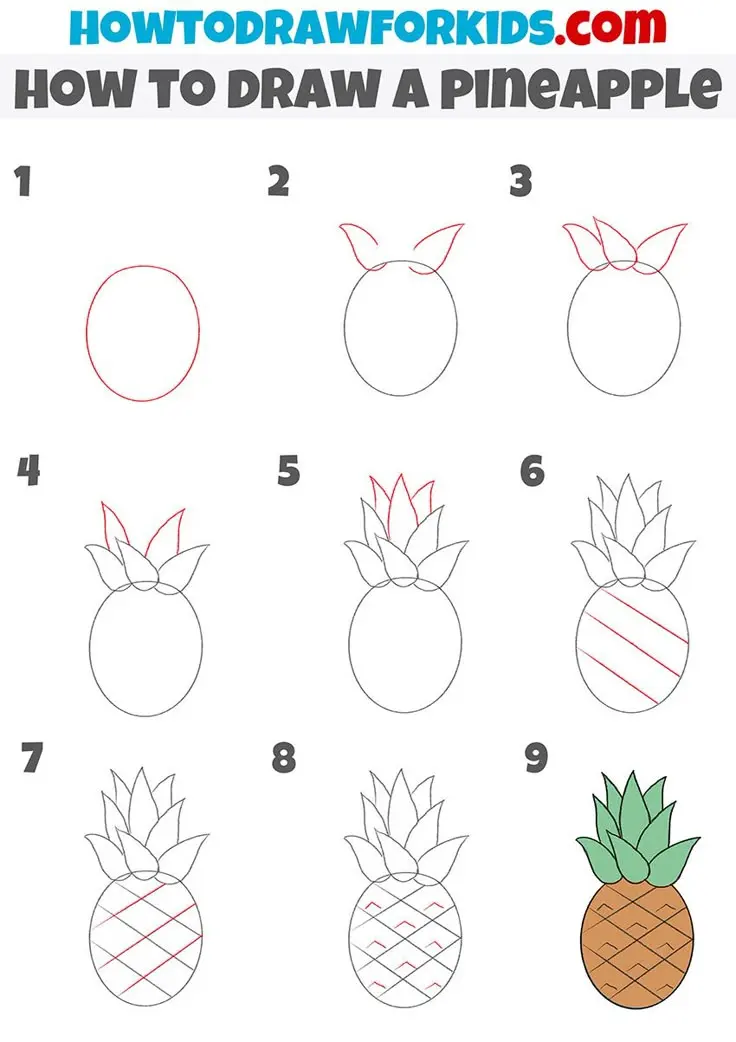
The foundation of a realistic pineapple drawing is a simple, elongated oval. Start by drawing a vertical line to act as a guide for the center of the fruit, ensuring your proportions remain balanced. Sketch the oval around this line, making the bottom slightly wider than the top to mimic the natural weight of the fruit. Avoid drawing a perfect circle, as pineapples have a distinct, slightly tapered cylindrical shape that sits firmly on a surface.
Once the body is established, add a small, rounded rectangle at the very top to serve as the base for the leaves. This connection point is essential because it prevents the foliage from appearing as if it is floating above the fruit. Keep your initial pencil lines light and loose, as you will refine the contours later. By establishing these basic geometric anchors first, you ensure that the complex textures added in later steps remain within a structurally sound frame.
Best tools for drawing pineapples
For beginners, a standard HB graphite pencil is the most versatile tool for sketching the initial outline and the cross-hatch texture. Because pineapples require a mix of soft curves and sharp, angular lines, the HB lead provides enough hardness to keep lines crisp without digging too deeply into the paper. You should also keep a kneaded eraser nearby, as it allows you to lift graphite gently to create highlights on the individual scales of the pineapple skin.
If you wish to add depth, consider using a 2B pencil for darker shadows along the sides of the fruit. A fine-liner pen or a felt-tip marker is excellent for the final step of outlining the diamond pattern, as it provides a clean, high-contrast finish. Having a sharpener on hand is also vital, as the intricate details of the leaves require a fine point to maintain precision. Using high-quality, smooth-surface paper will help your pencil glide easily when you begin the repetitive cross-hatching process.
How to draw pineapple leaves
The crown of the pineapple is characterized by a series of long, pointed leaves that radiate outward from the center. To draw these effectively, follow these steps to ensure they look natural and layered:
- Draw a series of long, thin triangles starting from the top rectangle, curving them slightly downward at the tips.
- Overlap the leaves, ensuring some are tucked behind others to create a sense of depth and volume.
- Add small, jagged notches along the edges of the leaves to represent the sharp, serrated texture found on real pineapple foliage.
- Vary the length and direction of each leaf so the crown looks organic rather than perfectly symmetrical.
Focus on the base of the crown where the leaves meet the fruit. Ensure they appear to sprout from the center point rather than just being attached to the outer rim. By layering them in clusters, you create a realistic, dense appearance that balances the heavy, textured body of the pineapple.
How to create the pineapple texture
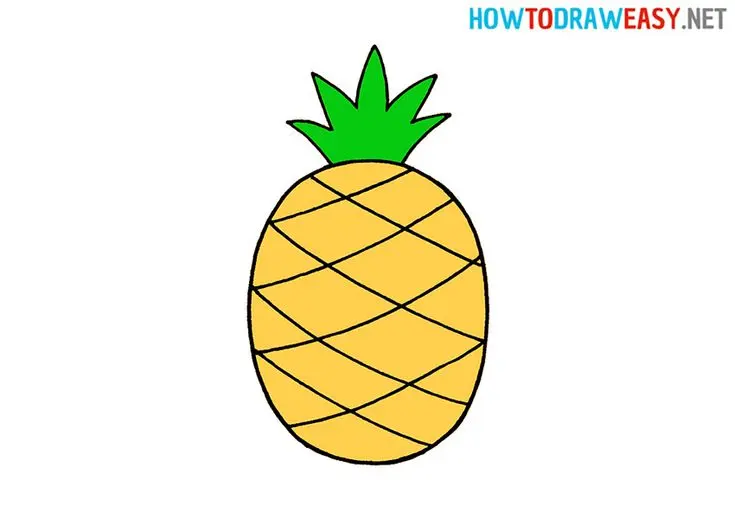
The most iconic feature of a pineapple is its diamond-shaped skin, which requires a systematic approach to draw correctly. Instead of drawing individual diamonds, use a grid-based technique to ensure consistency across the curved surface of the fruit. Follow these steps to achieve the pattern:
- Draw a series of diagonal lines sloping from the top left to the bottom right across the entire oval body.
- Cross these with a second set of diagonal lines sloping from the top right to the bottom left.
- Use your eraser to soften the lines at the edges of the oval, making the pattern appear to wrap around the fruit.
- Place a small dot or a tiny "v" shape in the center of each diamond to represent the small, prickly eyes of the pineapple.
This grid method ensures that the pattern follows the contour of the fruit. If you neglect to curve your lines, the pineapple will look flat and two-dimensional. Take your time with this step, as the repetition is what gives the drawing its professional, finished look.
Common mistakes when drawing pineapples
One of the most frequent errors beginners make is drawing the pineapple skin pattern too large or too rigid. If the diamonds are too big, the fruit loses its texture and looks more like a geometric sculpture. Conversely, if the lines are perfectly straight, the drawing will lack the organic, rounded volume of the actual fruit. Always remember to adjust the shape of the diamonds as they move toward the edges of the oval to simulate the curvature of the cylinder.
Another common mistake is neglecting the shadow, which is necessary to give the fruit weight. Without a clear light source, the pineapple will appear to float on the page. Choose one side of the fruit to be in shadow and use light, cross-hatched strokes to darken that area. Finally, do not make the leaves too uniform; nature is rarely perfectly symmetrical, and adding slight variations in leaf size and angle will make your drawing appear much more convincing and artistic.
Key facts
- A pineapple’s body is essentially an oval shape with a cross-hatched diamond pattern.
- The leaves, or crown, should be drawn as long, pointed spikes radiating from the top.
- Use a light pencil sketch for the initial oval to ensure symmetry before adding details.
- Draw diagonal lines in two directions across the oval to create the signature diamond texture.
- Place a small dot or "eye" in the center of each diamond to mimic the fruit's natural texture.
- Vary the length and curve of the leaves to make the crown look organic rather than stiff.
The bottom line
Drawing a pineapple is an exercise in combining simple geometric shapes with repetitive patterns. By starting with a balanced oval and building a consistent diamond grid, you create a recognizable foundation. The key to success lies in the crown; by varying the length and curvature of the leaves, you provide the organic contrast needed to bring your drawing to life. Practice patience with the texture.
People also ask
What is the best pencil grade for sketching a pineapple?
Use an HB pencil for your initial light outlines because it is easy to erase. Once the structure is correct, switch to a 2B or 4B pencil to darken the lines and add depth to the diamond pattern.
How do I make the pineapple look three-dimensional?
Focus on shading the edges of the oval to create a rounded effect. Apply darker pressure on one side of the fruit to suggest a light source, leaving the opposite side lighter to simulate highlights.
Should the leaves be perfectly symmetrical?
No, natural leaves are irregular and overlap each other. Draw them at varying heights and angles to prevent the crown from looking like a flat, uniform fan.
How many diamonds should I draw on the pineapple?
There is no set number, but keeping them consistent in size makes the fruit look realistic. Aim for a grid that fits comfortably within the oval shape without crowding the edges.
What is the most common mistake beginners make?
Beginners often draw the pineapple body too round or too flat. Always start with a tall, slightly tapered oval to capture the fruit's characteristic oblong silhouette.
Can I use color to make the drawing more realistic?
Yes, use yellow for the body and various shades of green for the leaves. Layering a light brown over the yellow in the diamond crevices adds realistic texture and depth.
This answer was created with the help of AI research tools and reference sources. Spotted an error? Let us know — we correct mistakes quickly. See our editorial policy.