How do you draw a maple leaf?
Short answer
Drawing a maple leaf involves capturing its iconic palmate shape with five distinct lobes. Start by sketching a central vein and two side veins to establish the structure. Connect these with jagged, pointed edges, then add secondary veins for detail. Refine the outline with irregular, tooth-like serrations to achieve a realistic appearance.
On this page
How to structure a maple leaf drawing
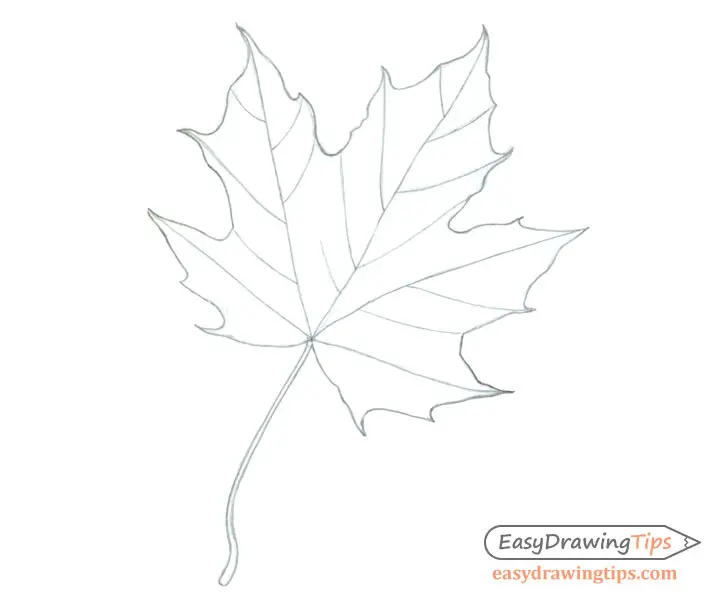
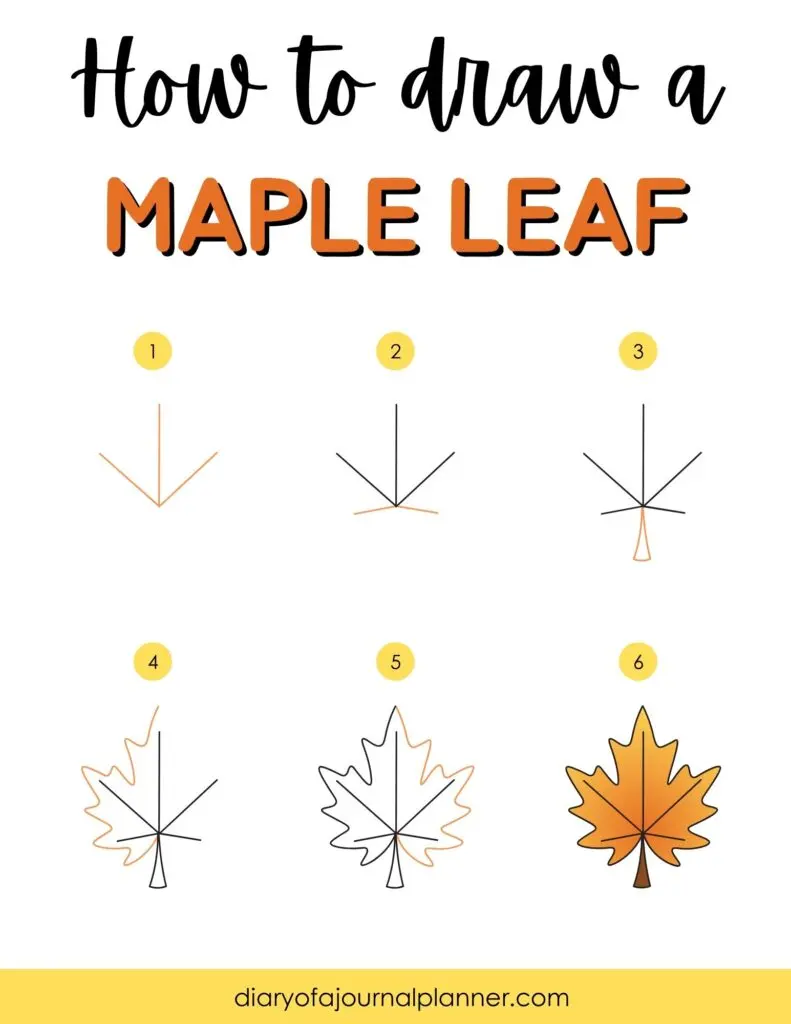
The maple leaf is defined by its palmate venation, meaning the primary veins radiate from a single point at the base of the leaf stalk, or petiole. To begin your drawing, draw a vertical line for the central lobe and two diagonal lines extending outward to form the side lobes. This simple skeletal structure acts as a guide for the rest of your work, ensuring the leaf maintains its natural proportions.
Once the main veins are established, you can mark the secondary lobes. Most maple species, such as the Sugar Maple, feature five distinct lobes, though some varieties may have more. Lightly sketching these as triangles around your central lines helps you visualize the overall size. Remember that nature is rarely perfectly symmetrical, so slight variations in the length and angle of these lobes will make your drawing look more authentic and organic.
What tools are best for beginners
For those just starting, a standard HB graphite pencil is the most versatile tool. It allows for light initial sketches that are easy to erase if you need to adjust the shape of a lobe. You should also have a soft white eraser on hand to clean up your guidelines once the final outline is complete. Using a smooth-surfaced drawing paper will help you achieve cleaner lines without the texture of the paper interfering with your pencil strokes.
If you wish to add color, colored pencils or watercolor markers are excellent choices for beginners. They allow for layering, which is essential for capturing the vibrant oranges, reds, and yellows typical of autumn foliage. When choosing your palette, keep these points in mind:
- Use a light yellow base layer to represent the leaf's chlorophyll breakdown.
- Layer deeper reds or burnt oranges over the edges to create depth.
- Keep your pencil sharp to maintain control over the fine, jagged serrations along the leaf margin.
How to draw realistic leaf edges
The most recognizable feature of a maple leaf is its serrated edge. Instead of drawing a smooth, continuous line, use short, quick strokes to create a series of small, pointed teeth. These teeth should not be perfectly uniform; vary their size and sharpness slightly to mimic the irregular growth patterns found in real plants. If you make them too symmetrical, the drawing may appear stiff or artificial.
Follow these steps to refine your leaf’s perimeter:
- Start at the base of a lobe and work your way toward the tip using a zigzag motion.
- Make the teeth point slightly toward the tip of the lobe rather than straight out.
- Connect the lobes with deep, rounded sinuses, which are the curved spaces between the main points.
- Vary the depth of these sinuses to give the leaf a more dynamic, three-dimensional appearance.
Why maple leaves look different
Not all maple leaves share the exact same silhouette, as there are over 120 species within the genus Acer. The Sugar Maple is the most common reference, known for its five lobes and relatively smooth edges. In contrast, the Silver Maple has deeper, more slender lobes with much more jagged, irregular teeth. Understanding these variations allows you to customize your drawing based on the specific type of tree you are trying to replicate.
Environmental factors also influence the appearance of the leaf. Leaves grown in shaded areas of the canopy are often larger and thinner, while those exposed to direct sunlight may be smaller and thicker with more intense coloration. When drawing, consider the "life" of the leaf. A leaf that has recently fallen might be curled or slightly dried at the edges, which you can represent by adding subtle shadows or bending the tips of the lobes inward to create a sense of volume.
Common mistakes when drawing leaves
One of the most frequent errors is making the leaf too flat or perfectly symmetrical. Because leaves grow toward light sources and are subject to wind, they rarely lie perfectly flat. To avoid a static look, try drawing the leaf at a slight angle or with one lobe folded over another. This simple adjustment introduces perspective and makes the final image feel much more grounded in reality.
Another common mistake is neglecting the petiole, or the stem. The petiole is not just a straight line; it is a structural component that connects the leaf to the branch. Ensure it is thick enough at the base where it attaches to the leaf blade and tapers slightly as it extends outward. You should also avoid outlining the entire leaf with a heavy, dark line, as this can make it look like a sticker. Instead, use varied line weights to suggest shadow and highlight, allowing the edges to emerge naturally from the surrounding space.
Key facts
- A sugar maple leaf typically features five distinct lobes, while red maples often have three.
- Start your drawing by sketching a central vertical line to serve as the leaf's primary vein.
- Draw two diagonal lines branching out from the base to establish the lower lobes.
- Use a jagged, zigzag motion for the edges to mimic the natural serrated texture of the leaf.
- Ensure the base of the leaf stem is slightly thicker than the tips of the veins.
- Always sketch lightly with a pencil first so you can easily erase guidelines before adding ink or color.
The bottom line
Drawing a maple leaf is an exercise in observing natural geometry. By establishing a strong skeletal structure with central veins and layering jagged, serrated edges over that frame, you create a convincing representation. Remember to keep your initial pencil strokes light and focus on the unique, five-lobed silhouette. With practice, you can master the organic curves that define this iconic symbol of the autumn season.
People also ask
How do I make the leaf look symmetrical?
You can achieve balance by drawing your primary veins first and using them as a mirror-image guide. Lightly mark the width of each lobe on both sides before connecting them with your outline.
What is the best way to color a maple leaf?
Use a blend of warm tones like crimson, burnt orange, and golden yellow to capture the autumn aesthetic. Layer your colors by starting with the lightest shade and adding darker hues toward the edges.
Why does my leaf look like a star instead of a maple leaf?
This usually happens when the lobes are drawn too straight or pointed. Soften the angles and ensure the indentations between the lobes are deep and curved rather than sharp.
Should I use a real leaf as a reference?
Using a physical specimen is the most effective way to understand the organic irregularities of nature. Place a leaf on your desk and observe how the veins connect to the stem.
How long should the stem be?
A maple leaf stem is typically about one-third to one-half the length of the leaf blade itself. Keeping this proportion helps the drawing look realistic and grounded.
What is the most common mistake beginners make?
Many beginners draw the edges as perfectly smooth curves, which ignores the characteristic serrated teeth of the maple. Focus on creating small, irregular notches along the perimeter to add authenticity.
This answer was created with the help of AI research tools and reference sources. Spotted an error? Let us know — we correct mistakes quickly. See our editorial policy.