How do you use blend modes in Procreate?
Short answer
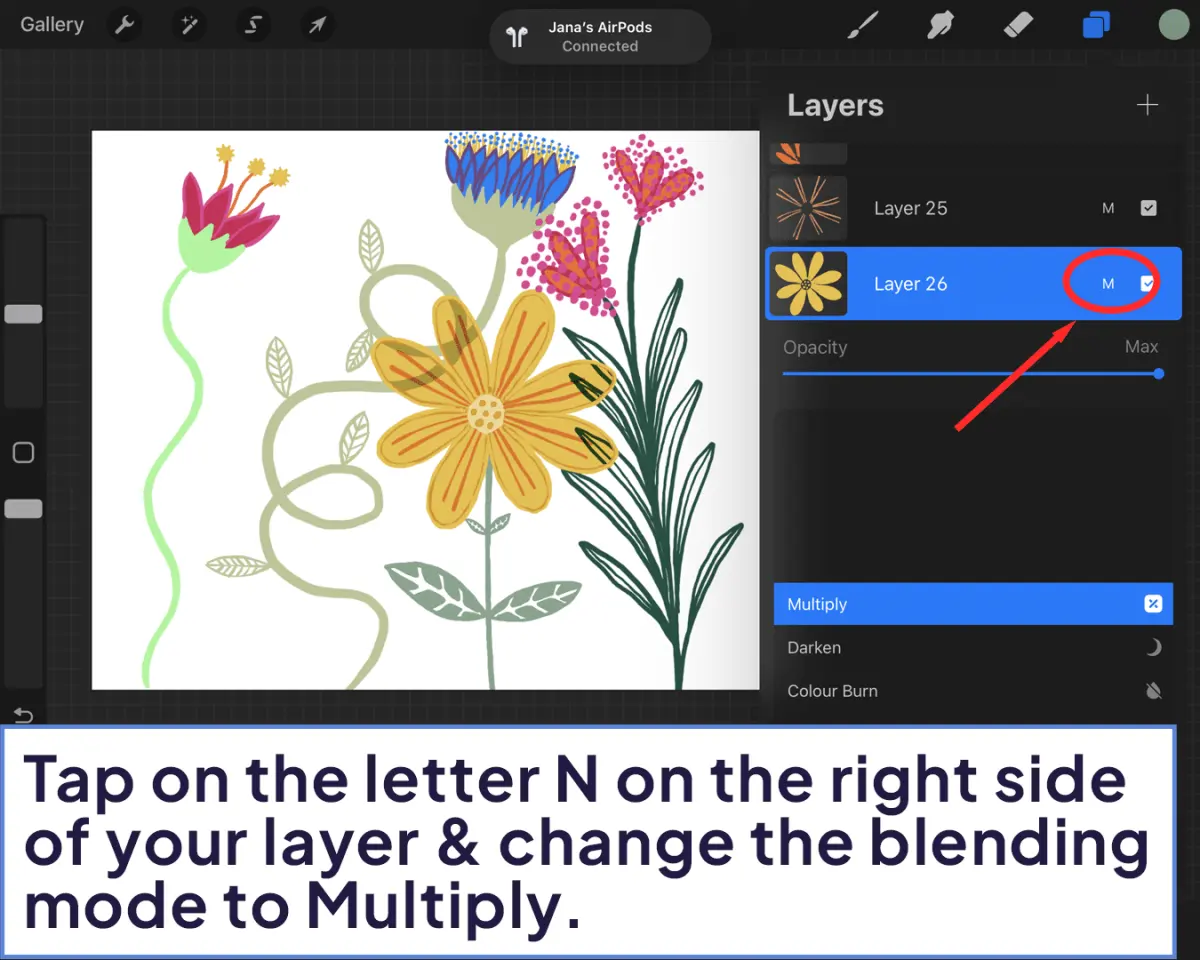
Blend modes in Procreate control how pixels on one layer interact with the colors and brightness of layers beneath them. To use them, open the Layers panel, tap the letter icon on a layer, and select a mode from the list. Adjust the opacity slider to refine the intensity of the effect.
On this page
How to access and apply blend modes
To begin using blend modes, open your artwork in Procreate and tap the Layers icon, which looks like two overlapping squares in the top right corner. Each layer has a small letter to the right of its visibility checkbox; this letter indicates the currently active blend mode, defaulting to "N" for Normal. Tapping this letter opens the Blend Modes menu, a scrollable list categorized by how the modes mathematically calculate color data.
Once the menu is open, you can tap on any mode name to instantly preview the effect on your canvas. The layer you have selected will immediately change its interaction with the layers below it. If you find the effect is too strong or overwhelming, use the Opacity slider located at the top of the menu to dial back the intensity. This non-destructive process allows you to experiment freely without permanently altering your original artwork or pixel data.
Best blend modes for beginners
If you are new to digital painting, focus on the most common modes that provide predictable, high-impact results. These modes are generally split into groups that either darken, lighten, or contrast the underlying image. Mastering just a few essential modes will significantly improve your workflow and allow you to achieve professional-looking lighting and shading effects quickly.
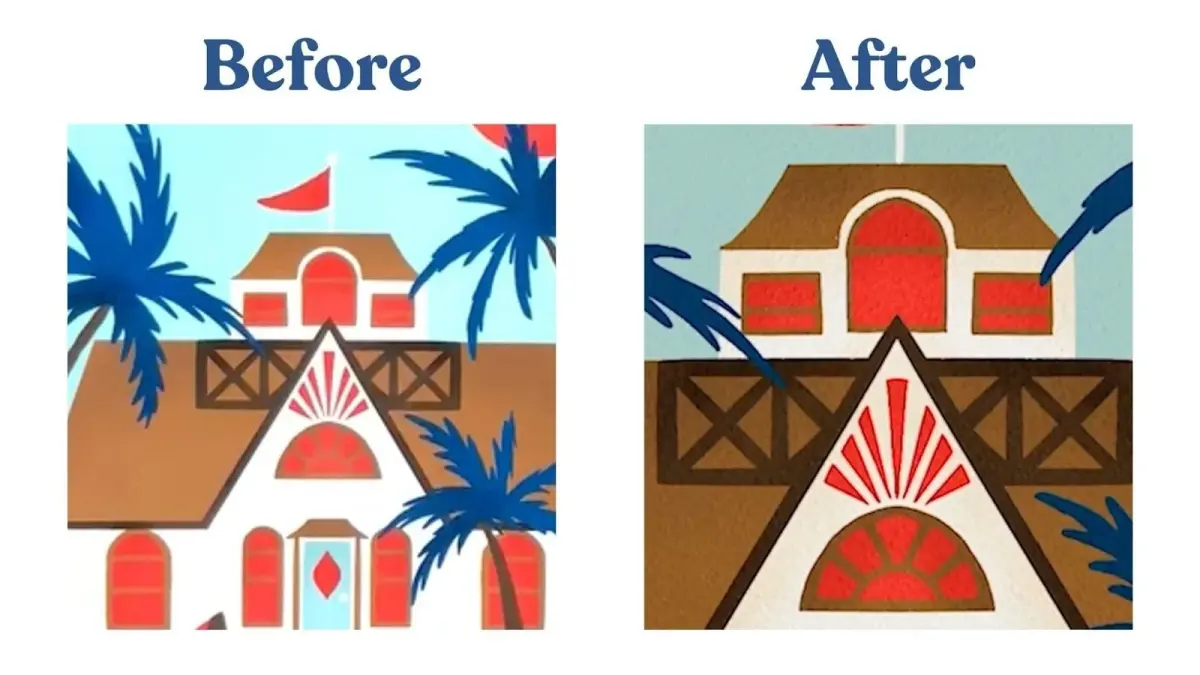
- Multiply: This is the primary choice for adding shadows. It darkens the image by multiplying the base color with the blend color, effectively removing white and making light colors transparent.
- Screen: Use this for adding highlights or light effects like glows. It acts as the opposite of Multiply, brightening the image by ignoring black pixels.
- Overlay: This mode combines Multiply and Screen. It darkens the shadows and lightens the highlights of the base layer, making it perfect for adding texture or contrast to flat colors.
- Add: This mode produces a very bright, intense glow, ideal for light sources like fire, neon signs, or magic effects.
Why blend modes change the appearance of colors
Blend modes function by applying mathematical formulas to the red, green, and blue (RGB) values of the pixels on your active layer compared to the layers beneath. When you choose a mode like "Color Burn," Procreate calculates the color data to increase contrast and darken the base image, resulting in highly saturated, deep tones. Understanding that these modes are simply complex math equations helps you predict how colors will shift when layered.
The order of your layers is crucial because blend modes only affect the layers directly below them within the same group or the entire canvas. If you place a layer set to "Screen" at the very bottom of your layer stack, it will have no visible effect because there is no color data underneath it to interact with. Always ensure your blending layer is positioned above the objects you intend to modify to see the desired visual transformation.
Common mistakes when using blend modes
A frequent error is applying a blend mode to a layer that contains no color, such as a transparent layer or one filled with pure white. If you are using a mode like "Multiply," white pixels will effectively disappear, leaving you with no visible change. Conversely, using "Screen" on a layer filled with black will result in no change at all. Always double-check your layer content if you feel like a mode is not working as expected.
Another common mistake is neglecting the Opacity slider. Beginners often apply a mode like "Hard Light" and find it looks harsh or artificial. Instead of switching to a different mode, try lowering the layer opacity to 30% or 50%. This subtle adjustment often produces a more natural, blended look that integrates the effect into the painting rather than making it look like a separate, floating layer.
How to use blend modes for professional lighting
Professional artists use blend modes to create depth and atmosphere in their work. By creating a new layer above your base colors and setting it to "Overlay," you can paint soft highlights and shadows to give objects a three-dimensional feel. This technique is often called "glazing" and allows for rapid iteration of lighting scenarios without needing to repaint the base colors from scratch.
Follow these steps to create a simple light-and-shadow pass:
- Create a new layer above your base colors and set the blend mode to "Multiply."
- Pick a cool, desaturated blue or purple color and paint your shadows across the forms.
- Create another new layer above that and set it to "Screen" or "Add."
- Use a warm, soft brush to paint light hitting the edges of your objects.
- Adjust the opacity of both layers until the lighting feels balanced and cohesive.
By utilizing these modes, you can transform a flat, dull illustration into a dynamic, well-lit scene with minimal effort, ensuring your final composition has the visual impact you desire.
Key facts
- Blend modes change how the pixels on one layer interact with the colors of the layers positioned directly beneath them.
- You access these settings by tapping the letter icon (e.g., "N" for Normal) located on the right side of any layer in the Layers menu.
- The "Opacity" slider, found in the same menu, controls the overall strength of the blend mode effect applied to that layer.
- Blend modes are divided into categories like Darken, Lighten, Contrast, and Color, each serving a distinct mathematical purpose for image manipulation.
- Multiply is the most common mode for adding shadows, while Screen is the standard choice for creating highlights or glowing effects.
- You can preview modes in real-time by scrolling through the list while keeping your layer menu open to see instant results on your canvas.
The bottom line
Blend modes are essential tools for professional digital painting, allowing artists to manipulate light, shadow, and color harmony efficiently. By experimenting with the various categories—such as the darkening effects of Multiply or the brightening power of Screen—you can create complex lighting scenarios without manually mixing every color. Always work on separate layers to keep your workflow flexible, ensuring you can refine your artistic vision anytime.
People also ask
Can I use blend modes on a folder or group of layers?
Yes, you can change the blend mode of an entire group by selecting the group folder in the Layers menu and tapping the mode icon. This applies the effect to the combined output of all layers contained within that folder.
Why does my blend mode not seem to have any effect on my artwork?
This usually happens if the layer is set to "Normal" or if the layer is completely empty or filled with a neutral color like 50% gray. Check that your layer has visible content and that you have selected a mode that reacts to the underlying colors.
What is the difference between Multiply and Linear Burn?
Multiply darkens the image by multiplying the base color by the blend color, resulting in a natural look. Linear Burn produces a much darker, high-contrast result by decreasing the brightness of the base colors.
Should I use blend modes on the same layer as my base colors?
It is best practice to keep blend modes on separate layers to maintain non-destructive editing. This allows you to adjust or remove the effect later without altering your original base artwork.
Can I change the blend mode of a brush instead of a layer?
Yes, you can set a specific blend mode for a brush in the Brush Studio settings under the "Rendering" tab. This makes the brush stroke behave according to that mode as you paint directly onto the canvas.
How do I reset a layer to its original appearance?
Simply tap the layer mode icon and select "Normal" from the top of the list. Ensure the opacity slider is set to 100% to return the layer to its default, unmodified state.
This answer was created with the help of AI research tools and reference sources. Spotted an error? Let us know — we correct mistakes quickly. See our editorial policy.