How do you sew a button?
Short answer
Sewing a button requires a needle, thread, and a few minutes of patience. You anchor the thread to the fabric, pass it through the button holes multiple times, and wrap the thread around the base to create a shank. Finally, secure the thread with a knot on the underside of the garment.
On this page
How to sew a button by hand
Sewing a button is a fundamental skill that restores functionality to clothing and extends the life of your garments. Before starting, gather a hand-sewing needle, matching thread, scissors, and your replacement button. Use a thread length of about 18 to 24 inches; anything longer tends to tangle easily during the process. If you are working with heavy fabric or a coat, consider using a thicker, heavy-duty thread to ensure the button remains securely attached under tension.
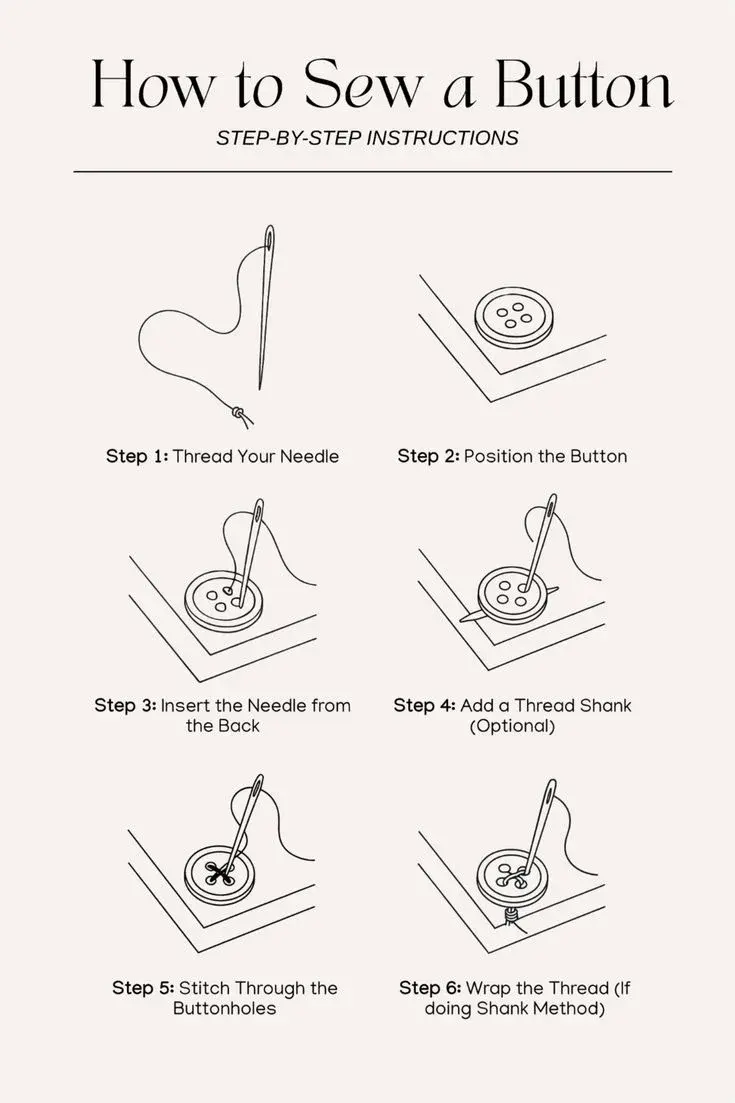
- Thread your needle and pull the ends together, tying a secure knot at the base.
- Push the needle through the fabric from the back to the front at the exact spot where the button will sit.
- Thread the needle through one hole of the button and pull it down until the button rests against the fabric.
- Continue passing the needle through the opposite hole and back down through the fabric until you have completed 4 to 6 passes.
- Wrap the thread around the base of the button several times to create a shank, which provides space for the fabric to sit when buttoned.
- Bring the needle to the back of the fabric, create a small loop, pass the needle through it to form a knot, and trim the excess thread.
Best thread and needle for beginners
Choosing the right tools makes the process significantly easier and prevents frustration. For most standard shirts and blouses, an all-purpose polyester or cotton-wrapped polyester thread is ideal because it offers a balance of strength and flexibility. If you are sewing a button onto a denim jacket or a wool coat, look for specialized upholstery or buttonhole thread, which is thicker and more resistant to abrasion. Using a needle that is too thin for your thread will make threading difficult, while a needle that is too thick may leave unsightly holes in delicate fabrics.
A size 7 or 8 sharp needle is generally the most versatile choice for standard sewing tasks. If you find it difficult to see the eye of the needle, consider using a needle threader, a small wire tool that pulls the thread through the eye effortlessly. Ensure your thread matches the color of the garment or the button itself to maintain a professional appearance. By selecting the correct materials, you ensure that your repair is not only functional but also aesthetically pleasing and durable enough to withstand regular use.
Why buttons fall off over time
Buttons typically detach because of repetitive mechanical stress and the gradual degradation of the thread. Every time you button and unbutton a garment, you exert tension on the thread, which slowly weakens the fibers. Over months or years, the friction between the thread and the button holes causes the thread to fray and eventually snap. Additionally, if the thread was not properly secured with a knot during the initial manufacturing process, the entire stitch can unravel rapidly once a single point of failure occurs.
Another common cause is the lack of a thread shank. A shank is the small gap between the button and the fabric that allows the garment material to sit comfortably underneath when fastened. Without this space, the button sits too tightly against the fabric, putting excessive pressure on the stitches every time you move. If you notice a button becoming loose, it is best to reinforce it immediately rather than waiting for it to fall off, as a loose button is far more likely to snag on objects and tear the fabric of the garment itself.
Common mistakes when sewing buttons
One of the most frequent errors is sewing the button too tightly against the fabric, which prevents the garment from closing properly and puts strain on the thread. Another mistake is failing to secure the thread with a proper knot on the underside of the fabric, which leads to the button pulling through the material. Some beginners also use thread that is far too long, which increases the likelihood of knots and tangles that can ruin the tension of the stitches.
- Sewing without a shank, causing the fabric to pucker or the button to pop off under pressure.
- Using a single strand of thread instead of a double strand, which lacks the necessary strength for daily wear.
- Neglecting to check the alignment of the button holes, which can result in a crooked button that makes the garment hang unevenly.
- Trimming the thread too close to the knot, which allows the knot to slip through the fabric and unravel the entire repair.
- Using a needle that is too large for the button holes, which can damage the button or make the sewing process unnecessarily difficult.
How long does it take to repair a button
For someone with basic skills, sewing a single button usually takes between five and ten minutes. This timeframe includes gathering your materials, threading the needle, performing the stitching, and securing the final knot. While it may take longer the first few times you attempt the process, the muscle memory develops quickly, allowing for faster repairs in the future. Keeping a small sewing kit with basic colors of thread and a variety of spare buttons can save you a trip to a tailor and keep your wardrobe in top condition.
If you have multiple buttons to sew, you can streamline the process by setting up a dedicated workspace with good lighting. Do not rush the final knotting process, as this is the most critical step for ensuring the longevity of your work. By taking your time to create a neat shank and a secure knot, you ensure that your repair will last for many years. Mastering this simple task is a rewarding way to practice sustainability and maintain the quality of your favorite clothing items for as long as possible.
Key facts
- Use a thread length of about 18 to 24 inches to prevent tangling while sewing.
- Double your thread and tie a knot at the end to ensure the button stays anchored.
- Place a toothpick or matchstick between the button and the fabric to create a thread shank for easier buttoning.
- Use a needle size appropriate for the fabric weight, such as a size 7 or 8 for standard cotton.
- Always use a thread color that matches the fabric or the button to maintain a professional appearance.
- Finish the process by wrapping the thread around the base of the button several times before tying off.
The bottom line
Sewing a button is a fundamental skill that requires only a needle, thread, and basic patience. By creating a small thread shank and ensuring your stitches are anchored securely, you can prevent future repairs. Always work with a manageable length of thread to avoid knots and finish with a firm knot on the underside of the garment to keep your button firmly in place for years.
People also ask
Can I use a sewing machine to attach a button?
Yes, most modern sewing machines have a specific button-sewing foot or a zigzag stitch setting for this task. You must align the needle holes carefully with the stitch width to avoid breaking the needle.
What is a thread shank and why is it necessary?
A thread shank is a small space created between the button and the fabric. It provides room for the fabric to sit comfortably under the button when fastened, preventing the material from puckering.
How many times should I pass the needle through the holes?
Generally, passing the needle through each set of holes four to six times is sufficient for a secure hold. If the garment experiences high stress, such as a coat button, increase this to eight passes.
What should I do if the fabric starts to fray around the button?
Apply a tiny dab of clear fray-check liquid or a small piece of fusible interfacing behind the fabric area. This reinforces the material and prevents the button from pulling through the hole.
Is there a difference between two-hole and four-hole buttons?
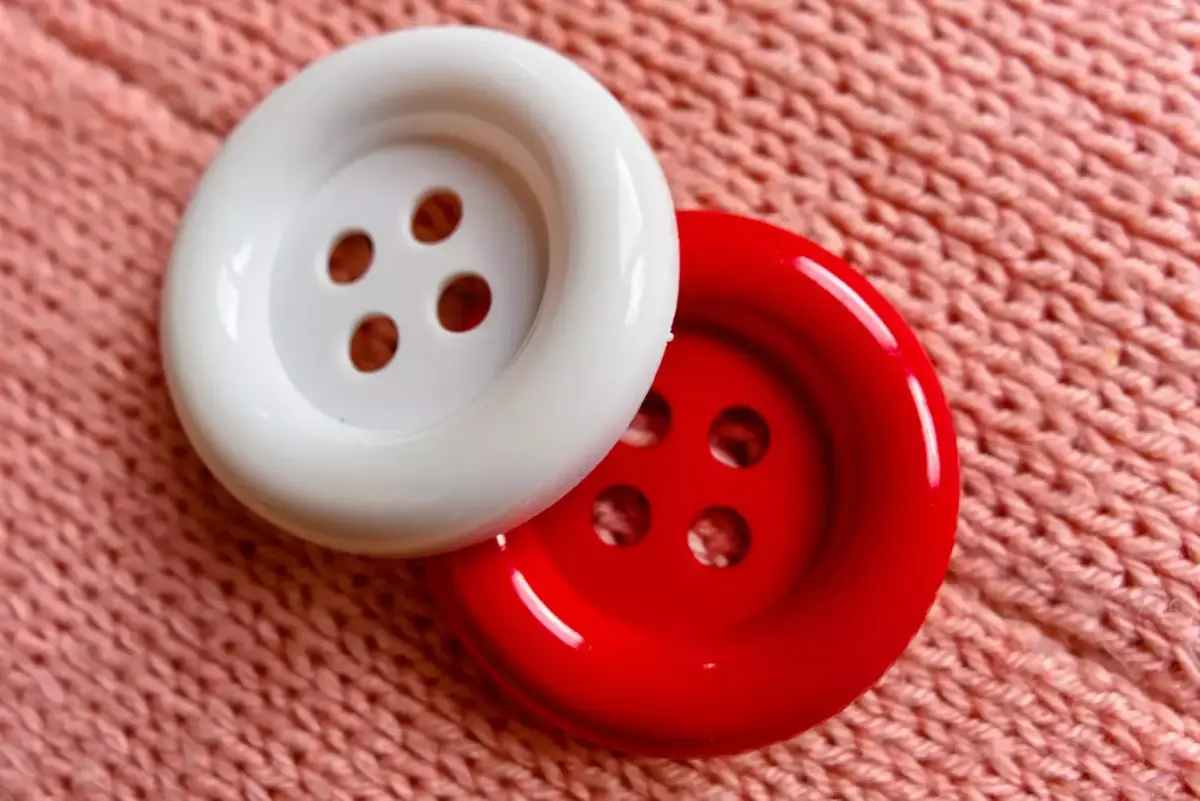
Two-hole buttons are typically sewn with parallel stitches, while four-hole buttons can be sewn in parallel, crisscross, or square patterns. The choice is often aesthetic, though crisscross patterns generally offer more structural support.
How do I secure the thread at the end of the process?
Bring the needle to the underside of the fabric and pass it through the existing stitches to create a small loop. Pull the needle through this loop to form a tight knot, then trim the excess thread.
This answer was created with the help of AI research tools and reference sources. Spotted an error? Let us know — we correct mistakes quickly. See our editorial policy.