How do you draw a video game controller?
Short answer
Drawing a video game controller requires breaking the device down into basic geometric shapes like rectangles and circles. By establishing a central chassis and layering buttons, joysticks, and triggers, you create a balanced design. Focus on symmetry and ergonomic curves to ensure the final illustration looks functional, comfortable, and technically accurate.
On this page
How to sketch the basic controller shape
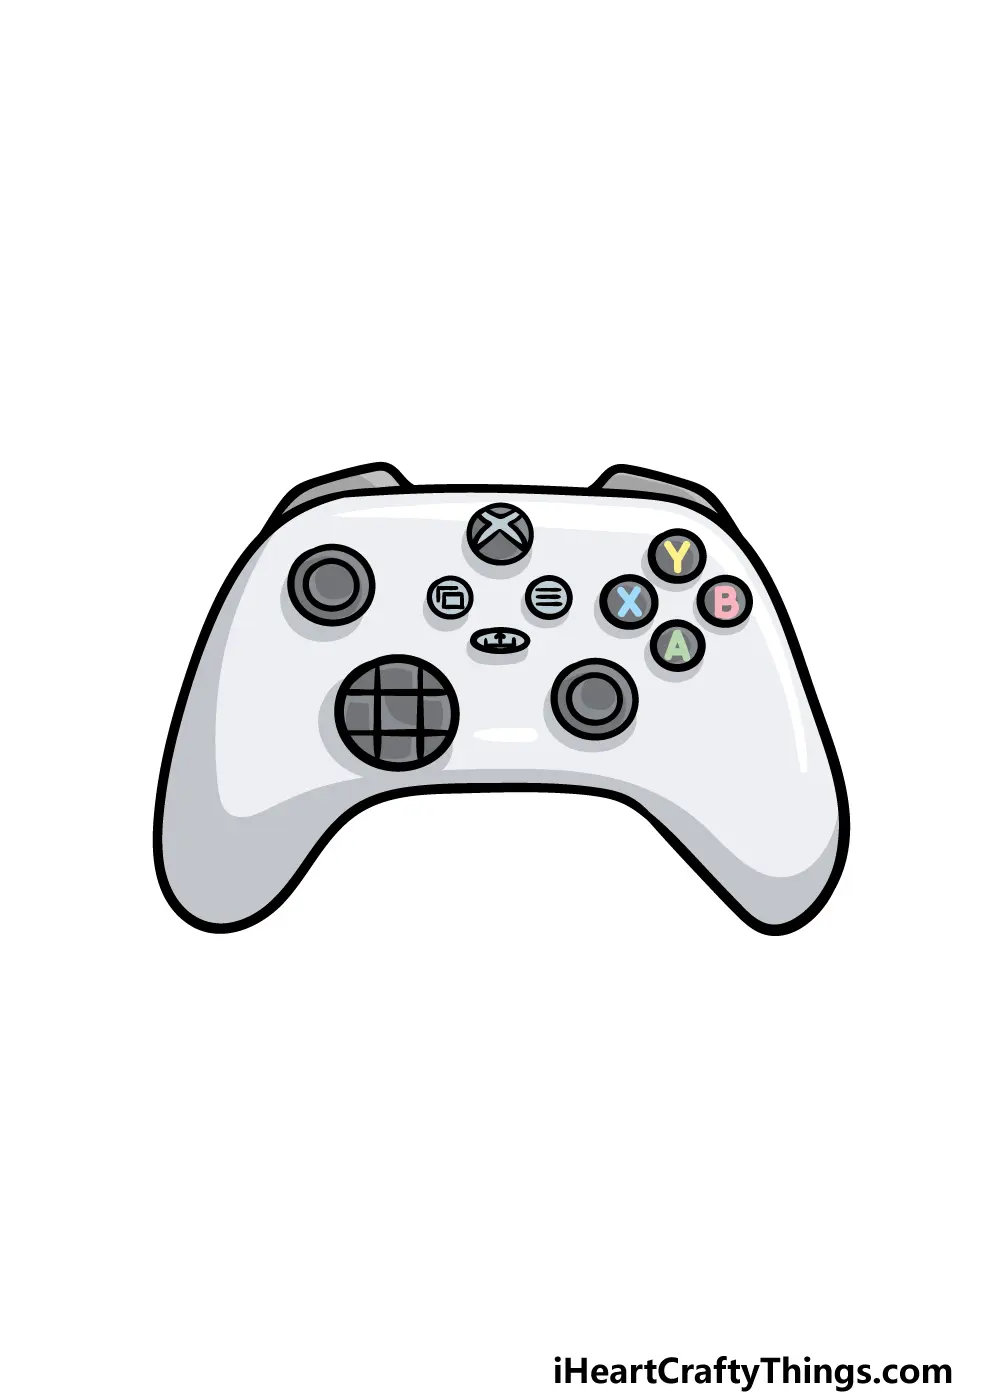
Start your drawing by establishing the silhouette of the controller. Most modern controllers, such as the Sony DualSense or the Xbox Wireless Controller, rely on a central body with two protruding handles. Begin by drawing a wide, soft-edged rectangle to represent the main housing. Below this rectangle, sketch two downward-sloping ovals or rounded triangles to serve as the hand grips.
Use light pencil strokes to ensure these shapes are symmetrical. You can use a vertical center line as a guide to mirror the left and right sides. Once the basic outline is established, round off the corners where the handles meet the main body to mimic the ergonomic feel of real hardware. Avoid sharp, rigid angles, as modern controllers prioritize smooth, organic curves for comfort during long gaming sessions.
How to place buttons and joysticks
The placement of inputs follows a standard layout found in most industry designs. To achieve a realistic look, you must follow the "cross and circle" logic used by major manufacturers. Use these steps to guide your placement:
- Draw two circles in the center of the main body for the analog sticks.
- Place a cluster of four small circles on the top right for the face buttons.
- Sketch a directional pad (D-pad) as a cross or a disc on the top left.
- Add two smaller, oval-shaped buttons in the middle for "Start" and "Select" or "Menu" functions.
Maintain consistent spacing between these elements to avoid a cluttered appearance. The analog sticks should be slightly larger than the face buttons to reflect their physical depth. Ensure the D-pad is aligned horizontally with the primary face buttons to maintain a balanced, professional aesthetic.
How to add depth to triggers and bumpers
The top edge of the controller, known as the shoulder area, contains the bumpers and triggers. These components add three-dimensional complexity to your drawing. Sketch two thin, rectangular strips along the top edge of your controller body to represent the bumpers. Beneath these, draw slightly curved, elongated shapes that extend downward to represent the triggers.
Perspective is essential here. Because these parts wrap around the top of the device, they should appear slightly foreshortened. Use thin, parallel lines to indicate the seams where these buttons sit within the controller casing. Adding a small shadow underneath the triggers will help them pop from the main body, creating the illusion that they are mechanical parts capable of being pressed.
Common mistakes when drawing controllers
Many beginners struggle with the proportions of the handles, often making them too thin or too long. If the handles are disproportionate, the controller will look like a toy rather than a piece of high-end technology. Another common error is neglecting the thickness of the controller body. A controller is not a flat object; it has depth that should be represented by adding a side profile or a slight bevel to the edges.
Avoid these frequent pitfalls to improve your results:
- Forgetting to add the small seams where the plastic casing pieces join together.
- Drawing buttons that are all the same size, which ignores the functional hierarchy of the device.
- Failing to account for the curve of the palms, which makes the handles look like straight sticks.
- Over-detailing the surface before the structural proportions are finalized.
How to refine your controller drawing
Once the structural elements are in place, focus on the details that define the controller's personality. Add a slight texture to the handles to suggest the rubberized grip often found on premium models. You can achieve this by drawing a series of tiny, repeating dots or a cross-hatch pattern. Use a darker pencil grade to define the outlines of the buttons, making them appear recessed into the controller surface.
Finally, consider the lighting source for your drawing. If your light comes from the top left, add subtle highlights to the tops of the joysticks and the upper edges of the buttons. Add corresponding shadows on the bottom right of these components to give them a rounded, tactile appearance. By carefully managing these highlights and shadows, you transform a simple line drawing into a convincing, three-dimensional representation of a modern video game controller.
Key facts
- Start by sketching a horizontal, rounded rectangle to serve as the main body of the controller.
- Place two circles on the left and right sides to represent the analog sticks, ensuring they are symmetrical.
- Draw a cross-shaped D-pad on the left side and four small circles on the right for the action buttons.
- Add two rectangular shapes at the top of the body to represent the shoulder buttons or triggers.
- Use light construction lines first so you can easily erase them after finalizing the controller's outline.
- Focus on rounded edges rather than sharp corners to mimic the ergonomic design of modern hardware.
The bottom line
Drawing a video game controller requires a focus on symmetry and ergonomic shapes. By starting with a simple rounded rectangle and using a center guide line, you can ensure your buttons and analog sticks remain balanced. Remember to incorporate subtle shading and highlights to provide a sense of volume. With practice, these basic geometric building blocks will allow you to sketch any console controller with confidence and accuracy.
People also ask
What is the best tool for drawing a symmetrical controller?
A ruler or a compass is essential for maintaining balance between the left and right sides. You can also fold your paper in half to trace a mirror image if you struggle with freehand symmetry.
Should I draw the controller from a top-down or perspective view?
A top-down view is the easiest for beginners because it eliminates complex foreshortening. Once you master the flat layout, you can experiment with isometric angles to give the object depth.
How do I make the buttons look three-dimensional?
Add a small crescent-shaped shadow on the bottom-right side of each button to simulate depth. Placing a tiny white highlight on the top-left side will make the plastic look shiny and realistic.
Why does my controller drawing look lopsided?
This usually happens when the center line is not established early on. Always draw a faint vertical center line to act as a guide for spacing your buttons and sticks equally.
What are the most common mistakes when drawing controllers?
Beginners often make the controller body too thin or forget to add the cable or battery pack space. Another common error is drawing the buttons too large, which makes the controller look like a toy.
Is it better to use ink or pencil for the final design?
Use a hard pencil for the initial layout and a fine-liner pen for the final outline. This contrast helps define the edges and makes the drawing look professional and clean.
This answer was created with the help of AI research tools and reference sources. Spotted an error? Let us know — we correct mistakes quickly. See our editorial policy.