How do you draw a jacket?
Short answer
Drawing a jacket involves establishing a basic torso silhouette, adding structural lines for shoulders and lapels, and defining the garment’s volume with shading. By focusing on the relationship between the fabric and the underlying body, you can create a realistic representation of weight, drape, and texture through simple geometric construction.
On this page
How to draw the basic shape of a jacket
To draw a jacket effectively, start by sketching a simple rectangle or trapezoid that represents the torso of the figure. This serves as your foundation, ensuring the garment aligns with the wearer's posture. Once the frame is set, draw a vertical line down the center to indicate the opening of the jacket. Add two smaller shapes at the top to represent the shoulders, which should be slightly wider than the torso to account for padding or fabric thickness.
Focus on the silhouette before adding details like buttons or pockets. A common technique is to draw the outer edges of the jacket slightly curved to suggest the natural movement of fabric around the body. Remember that a jacket is a three-dimensional object, so the lines at the bottom hem should follow the contour of the hips rather than being perfectly straight. This initial structural phase is vital for creating a believable sense of scale and proportion.
How to add details like lapels and collars
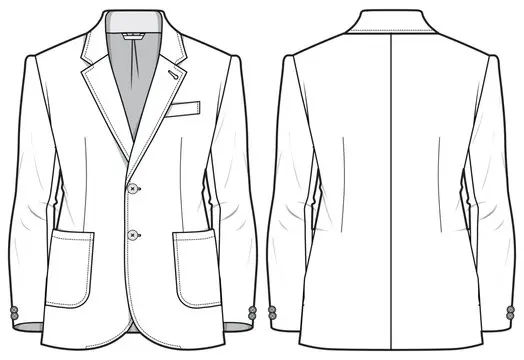
The lapels and collar define the style of the jacket, whether it is a casual blazer or a formal suit. Begin by drawing a V-shape starting from the mid-chest area and moving upward toward the neck. From this V-shape, extend two triangular flaps outward to form the lapels. The size and angle of these flaps will determine the jacket's overall aesthetic, with wider lapels often appearing more vintage and narrower ones looking modern.
- Sketch a small rectangle around the neck to serve as the collar base.
- Extend the lapel lines from the collar down to the closure point of the jacket.
- Add a small notch where the collar meets the lapel to create a professional finish.
- Ensure the lapels are symmetrical on both sides to maintain a balanced look.
Pay close attention to how the collar wraps around the back of the neck. If the collar appears flat, the jacket will look like a two-dimensional sticker rather than a garment being worn by a person.
Best tools for drawing fabric textures
Achieving a realistic look requires the right tools to simulate the weight and texture of the material. Graphite pencils are ideal for beginners because they allow for easy blending and layering of shadows. Use a 2B pencil for initial sketches and a 4B or 6B pencil to deepen the shadows in the folds of the fabric. For those working in color, alcohol-based markers or soft pastels can help create smooth gradients that mimic the sheen of wool, leather, or synthetic blends.
- Use a kneaded eraser to lift graphite and create highlights on the shoulders and sleeves.
- Employ a blending stump or a soft tissue to smooth out shading transitions.
- Utilize fine-liner pens for sharp, clean edges on buttons and pocket flaps.
- Experiment with textured paper if you want to give your drawing a more tactile, fabric-like quality.
The choice of medium significantly impacts how the light interacts with the drawing surface. A smooth surface will emphasize the sleekness of silk or leather, while a rougher paper will naturally suggest the weave of heavy tweed or denim.
Why fabric folds and wrinkles happen
Wrinkles and folds are the primary tools for showing that a jacket has volume and is interacting with the body. These lines occur wherever the fabric is compressed or stretched, such as at the elbows, the armpits, and the waist. When a person moves their arm, the fabric bunches up near the joint, creating a series of radiating lines. Understanding these tension points is essential for making the jacket look like it is actually being worn rather than just hanging on a hanger.
Gravity also plays a significant role in how fabric hangs. On a standing figure, the fabric will naturally pull downward, creating vertical folds along the sides of the torso. Always observe how the weight of the jacket pulls the fabric taut across the shoulders while allowing it to drape loosely around the waist. By observing real-life examples, you will notice that fabric rarely stays perfectly flat, and adding these subtle imperfections is what gives a drawing its professional, realistic quality.
Common mistakes when drawing jackets
One of the most frequent errors is failing to account for the thickness of the material. Beginners often draw the jacket edges as thin, single lines, which makes the garment look like paper. To avoid this, draw a double line at the hem, cuffs, and lapels to suggest the folded edge of the fabric. Another common mistake is neglecting the internal structure of the body underneath. If the jacket does not follow the curves of the torso, it will appear boxy and unnatural, losing the essential relationship between the wearer and their clothing.
- Avoid drawing buttons exactly in the center; they should follow the curve of the torso.
- Do not make the sleeves too short, as this ruins the proportions of the entire drawing.
- Refrain from over-detailing the fabric; focus on the major folds instead of every tiny crease.
- Ensure the shadow under the collar is dark enough to separate the head from the shoulders.
By consistently applying these principles and checking your proportions against a reference, you will be able to draw jackets that look both functional and stylish. Practice observing how different cuts of jackets react to body movement to refine your technique over time.
Key facts
- Start by sketching a simple torso shape, then extend lines outward for the sleeves to establish the jacket's overall silhouette.
- Use a "T" shape to define the collar and lapels, ensuring they align symmetrically on both sides of the chest.
- Draw the sleeve cuffs slightly wider than the arms to allow for the appearance of fabric volume and movement.
- Add vertical lines running down the front to represent the placket and the closure, such as buttons or a zipper.
- Place pockets at hip level, typically drawing them as small rectangles or slanted lines to indicate depth and function.
- Incorporate subtle folds near the armpits and elbows to create a realistic sense of fabric weight and natural tension.
The bottom line
Drawing a jacket effectively requires balancing structural anatomy with the fluid nature of fabric. By focusing on the torso's silhouette and adding strategic folds at points of tension, you create a sense of realism. Always prioritize curved lines over straight ones to ensure the garment appears to wrap naturally around the body, resulting in a professional, three-dimensional illustration that feels both functional and visually accurate.
People also ask
What is the best way to draw realistic fabric folds on a jacket?
Focus on "tension points" where the fabric pulls, such as the elbows or shoulders. Draw thin, V-shaped lines radiating from these joints to simulate how material bunches when the arm moves.
Should I draw the jacket as a flat shape or a 3D object?
Always aim for a 3D structure by using curved lines rather than straight ones. This helps the jacket wrap around the body's form, preventing it from looking like a piece of paper.
How do I draw a collar that looks like it sits on the neck?
Draw the collar as a separate piece that overlaps the neckline. Ensure the back of the collar is slightly higher than the front to suggest the anatomy of the neck.
How do I make a jacket look like it is made of leather versus denim?
Use sharp, high-contrast highlights and smooth shading for leather to show its reflective surface. For denim, use cross-hatching and jagged lines to mimic the texture of woven cotton.
Why does my jacket drawing look stiff or boxy?
You are likely using too many straight lines. Incorporate soft, rounded contours at the shoulders and waist to better mimic the organic shape of a human body.
How do I draw the buttons or zipper correctly?
Place buttons along the center line of the jacket, spaced evenly apart. For zippers, draw a thin, vertical track and add a small pull tab at the top to provide a clear focal point.
This answer was created with the help of AI research tools and reference sources. Spotted an error? Let us know — we correct mistakes quickly. See our editorial policy.