How do you draw scars?
Short answer
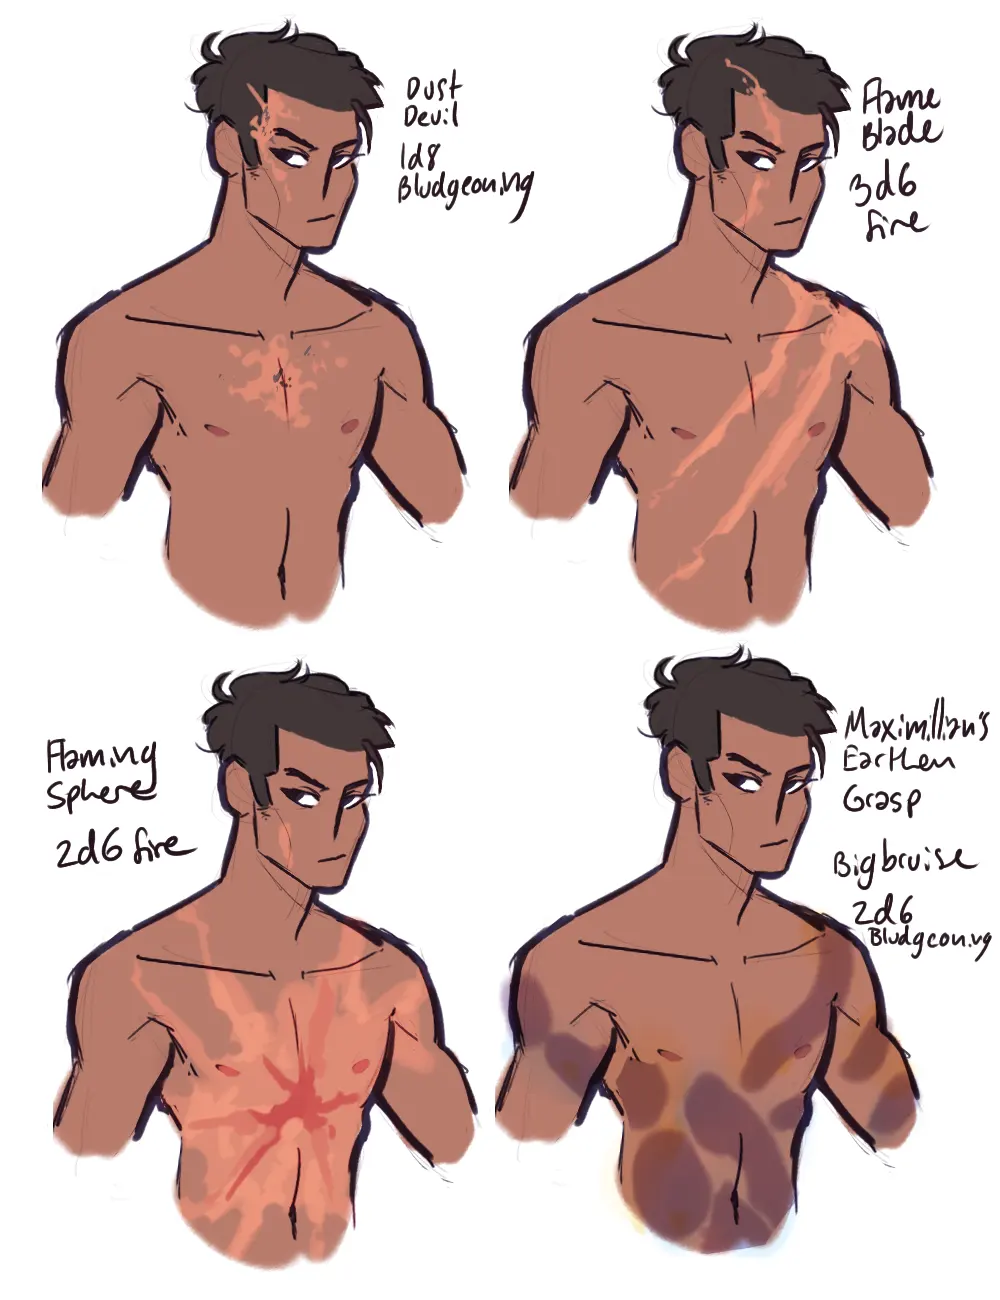
Drawing scars requires understanding that they are not mere lines, but textural disruptions on the skin. Focus on how light interacts with the raised or indented surface, using subtle highlights and shadows to create depth. By layering skin tones and varying the opacity, you can realistically depict the unique topography of healed tissue.
On this page
How to draw the texture of a scar
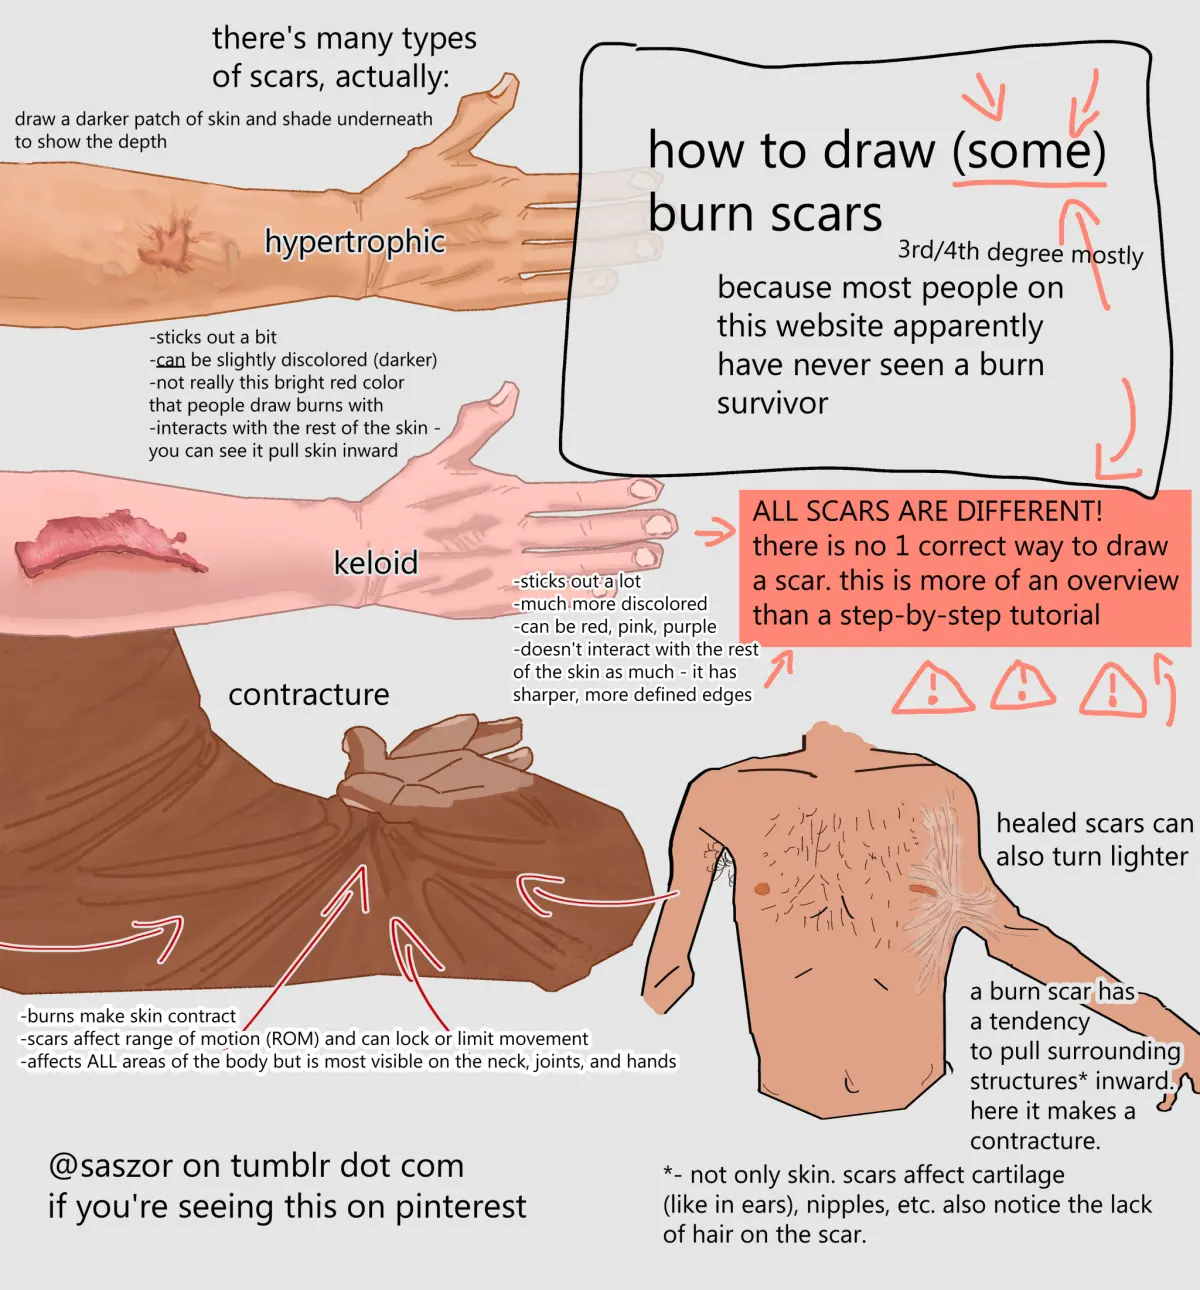
Scars are fundamentally changes in skin texture rather than just lines of color. When drawing, you must account for the way scar tissue lacks the natural pores, hair follicles, and elasticity of surrounding skin. This creates a smoother, often shinier surface that reflects light differently than the rest of the body. To achieve this, avoid using harsh, solid outlines, which make the scar look like a sticker placed on the skin. Instead, focus on the edges where the scar meets healthy tissue, as these transitions are often subtle and irregular.
When rendering the texture, consider these three physical characteristics:
- Hypertrophic scars: These are raised above the skin surface, requiring a highlight on the top edge and a shadow on the bottom to show volume.
- Atrophic scars: These are indented or pitted, meaning the shadow falls on the top edge while the highlight appears on the bottom.
- Keloids: These are thick, irregular clusters of tissue that often appear shiny or waxy, requiring high-contrast highlights to mimic light reflection.
Best tools for drawing realistic scars
The choice of medium significantly impacts the final realism of your scar. For graphite artists, a range of pencils from 2H to 4B is essential to build up the subtle gradients needed for skin. A kneaded eraser is your most important tool, as it allows you to lift pigment gently to create the soft, diffused highlights characteristic of scar tissue. Blending stumps or soft brushes help transition the scar into the surrounding skin without leaving visible stroke marks.
If you are working with digital tools or paints, focus on layering rather than single-stroke applications. Use a low-opacity brush to build the color of the scar gradually, ensuring it matches the undertones of the skin. Avoid pure white for highlights; instead, use a very light, desaturated version of the base skin tone to keep the effect natural. By working in thin, translucent layers, you can mimic the way light penetrates the upper levels of the dermis, resulting in a more convincing and organic appearance.
Why scars look different on different skin tones
The appearance of a scar is heavily influenced by the melanin levels and natural pigmentation of the individual's skin. On lighter skin tones, scars often appear pink, red, or purple due to the increased blood flow and thinner tissue. As the scar matures, it may fade to a pale, silvery white. When drawing these, use cool pinks or soft violets, ensuring that the color is desaturated enough to blend seamlessly with the surrounding flesh tones.
On darker skin tones, scars often present as hyperpigmented or hypopigmented areas. Hyperpigmented scars appear darker than the surrounding skin, often with brown or black tones, while hypopigmented scars appear lighter or ashier. To draw these effectively, follow these guidelines:
- Identify the base skin tone and create a palette of three shades: the base, a shadow tone, and a highlight tone.
- For darker scars, deepen the color within the scar boundary while maintaining the same hue as the surrounding skin.
- For lighter scars, use a slightly warmer, desaturated tone to represent the lack of melanin, avoiding stark white which can look artificial.
Common mistakes when drawing scars
A frequent error is drawing scars as perfectly straight, uniform lines. Real scars are rarely symmetrical; they follow the tension lines of the skin and the nature of the original injury. If a scar crosses a joint, it should look tighter and more distorted, as the tissue has restricted movement. Avoid making the scar too dark or too vibrant, as this distracts from the overall portrait and makes the injury look like a fresh, open wound rather than a healed scar.
Another mistake is neglecting the impact of the scar on the surrounding anatomy. A deep scar often pulls or puckers the skin, creating slight depressions or ridges around the primary site. If you ignore these secondary features, the scar will look like it is floating on top of the skin. Always observe how the skin "pinches" toward the center of the scar. By adding these subtle distortions to the surrounding area, you provide the necessary context that makes the scar feel integrated into the person's physical form.
How to add scars to a portrait
Integrating a scar into a finished portrait requires a delicate touch to avoid ruining the underlying structure. Start by lightly mapping the shape of the scar, ensuring it follows the contours of the face or body. If the subject is turning their head or moving, the scar must be distorted to match the perspective of the anatomy. Use a light touch to define the edges, keeping them soft and irregular to mimic the organic nature of healed tissue.
Once the shape is established, refine the lighting to match the light source of your portrait. If the light comes from the left, the raised parts of the scar must have a highlight on the left and a shadow on the right. Finally, add subtle skin details like pores or fine lines across the scar itself to break up the surface. This final step is crucial, as it prevents the scar from looking like a smooth, plastic patch, ensuring it looks like a genuine part of the skin.
Key facts
- Scars are areas of fibrous tissue that replace normal skin after an injury, characterized by a lack of sweat glands and hair follicles.
- To draw a scar, use a slightly lighter or darker shade than the surrounding skin to represent the change in pigmentation.
- Use thin, jagged lines rather than smooth curves to mimic the irregular nature of collagen repair in damaged dermis.
- Add subtle highlights along the edges of the scar to indicate the raised, uneven texture typical of hypertrophic or keloid tissue.
- Avoid drawing perfectly straight lines, as natural wounds rarely heal in uniform geometric patterns.
- Vary the opacity of your marks; scars often fade over time, becoming translucent or blending into the skin's natural tone.
The bottom line
Drawing realistic scars requires observing how light interacts with irregular skin textures. By focusing on subtle color shifts, jagged shapes, and strategic highlights rather than harsh outlines, you can create a convincing effect. Remember that scars are biological remnants of healing, so they should look integrated into the anatomy. Practice layering translucent tones to mimic the unique, faded appearance of mature tissue over time.
People also ask
How do you make a scar look realistic on a digital canvas?
Use a low-opacity brush to layer skin tones over the scar area, then add fine, light-colored lines for texture. Blending the edges slightly into the surrounding skin helps integrate the scar into the anatomy.
Do all scars look the same color?
No, scars vary based on age and skin tone. Fresh scars are often pink or red due to increased blood flow, while older scars may appear white, silvery, or hyperpigmented compared to the surrounding skin.
Should I use black lines to draw a scar?
Avoid using pure black, as it creates a harsh, cartoonish look. Instead, use desaturated browns, purples, or pinks that complement the base skin color to suggest depth and bruising.
How do I draw a deep, indented scar?
Focus on the shadow rather than the scar itself. A thin, dark line placed just inside the edge of the scar creates the illusion of a depression in the skin.
Are scars always flat?
Many scars are raised, especially keloids or hypertrophic scars. Use highlights on the top surface and shadows on the bottom edge to give the scar a three-dimensional, protruding appearance.
How do I draw a scar that spans across a joint?
Account for the skin's movement by breaking the scar into smaller segments. Scars over joints are often wider and more irregular because the constant stretching prevents clean, thin healing.
This answer was created with the help of AI research tools and reference sources. Spotted an error? Let us know — we correct mistakes quickly. See our editorial policy.