How do you draw a hummingbird?
Short answer
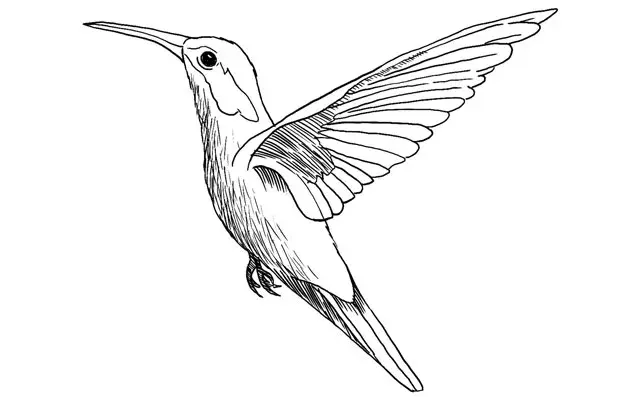
Drawing a hummingbird requires capturing its distinct aerodynamic silhouette, characterized by a long, needle-like beak and elongated, swept-back wings. Start by establishing the body’s oval shape, then add the beak and tail feathers. Focus on the rapid wing motion and sleek posture to convey the bird's characteristic energy and hovering grace.
On this page
How to sketch the basic anatomy of a hummingbird
To draw a hummingbird accurately, you must first master its unique proportions. Unlike songbirds, hummingbirds possess a disproportionately large chest area to house the powerful flight muscles required for their rapid wing beats. Begin by sketching a horizontal, slightly tilted oval for the main body. Attach a smaller circle at the front for the head, ensuring the neck area is short and thick. The beak is a defining feature; it should be as long as or longer than the head itself, tapering to a very fine point.
When positioning the tail, remember that it often fans out or remains tightly closed depending on the bird's movement. A common structural approach involves these steps:
- Draw a central axis line to define the angle of the bird's flight.
- Place the oval body along this line, keeping the chest area prominent.
- Attach the long, thin beak, ensuring it aligns with the center of the head.
- Sketch the tail as a rectangular or fan-shaped extension from the rear of the oval.
How to capture the motion of hummingbird wings
The wings are the most challenging part of a hummingbird drawing because they move in a figure-eight pattern. To represent this motion, avoid drawing static, feathered appendages. Instead, use a blurred, elliptical shape to suggest high-speed vibration. If you prefer a more detailed look, draw the primary feathers as long, stiff blades that sweep backward, creating a sense of tension and speed. The wings should attach high on the back, near the base of the neck, rather than at the center of the body.
When visualizing the wing stroke, consider the following techniques to enhance the sense of movement:
- Use light, feathery pencil strokes to create a soft edge around the wings.
- Extend the wing shape beyond the body to emphasize the wide reach of the stroke.
- Vary the thickness of your lines to show the wing's position at the top or bottom of the arc.
- Add small, curved lines near the wingtips to indicate the displacement of air.

Best drawing materials for beginners
Choosing the right tools can significantly improve your ability to render the fine details of a hummingbird. For initial sketches, use an HB or 2H graphite pencil, as these allow for light, erasable lines that won't smudge when you add darker shading later. A kneaded eraser is essential for lifting graphite to create highlights, particularly on the throat and the reflective surface of the beak. Once the structure is set, switch to a softer 2B or 4B pencil to add depth to the shadows under the wings and tail.
For those interested in adding color, colored pencils are superior to markers or watercolors for beginners. They allow for the layering of iridescent greens and blues, which are common in hummingbird plumage. Start with a base layer of light color, then build up the intensity with darker shades. Using a white gel pen at the end to add a tiny dot of light to the eye will immediately bring the drawing to life and provide a professional finish to your work.

Why hummingbird proportions often look wrong
Many artists struggle with hummingbird drawings because they inadvertently apply the proportions of a standard sparrow or finch. A frequent error is making the head too large or the beak too short, which robs the bird of its signature sleekness. Another common mistake is placing the wings too low on the body. Because hummingbirds are built for hovering, their wings must be positioned high on the torso to provide the necessary lift. If the wings appear to be growing out of the middle of the back, the bird will look grounded and heavy rather than agile.
Another issue is the lack of a clear "S" curve in the bird's posture. A hummingbird in flight is rarely perfectly straight; its body often curves slightly as it maneuvers toward a flower. By introducing a subtle bend in the neck and tail alignment, you create a dynamic composition. Always check your reference against the bird's center of gravity, ensuring the head, body, and tail form a cohesive, aerodynamic unit that suggests the bird is ready to dart away at any second.
Common mistakes when drawing hummingbird details
The most frequent mistake when finishing a hummingbird drawing is over-detailing the feathers. Because these birds are small, their feathers appear smooth and iridescent rather than individual and textured. Trying to draw every single feather often results in a cluttered, messy appearance that obscures the bird's form. Instead, focus on the overall shape and use shading to suggest the texture of the plumage. Reserve your most precise, sharp lines for the beak, the eye, and the very tips of the wings where the structure is most visible.
Additionally, avoid making the eye look like a simple black dot. A hummingbird's eye is a deep, dark orb that reflects light; leaving a tiny, unshaded spot for a highlight is crucial for realism. Finally, ensure the connection between the beak and the head is seamless. A harsh line separating the two can make the beak look like an attachment rather than a natural part of the skull. By focusing on these subtle transitions, you will achieve a much more realistic and graceful representation of this remarkable creature.
Key facts
- Hummingbirds possess a unique skeletal structure featuring a short humerus and a long, flexible wing that allows for hovering flight.
- Their bodies are roughly football-shaped, which serves as the primary geometric foundation for any accurate sketch.
- The bill length is often equal to or longer than the head, a critical proportion to maintain for visual accuracy.
- Focus on the "gorget," the iridescent throat patch, which is the most distinctive color feature on many male species.
- Use a light touch with your pencil to establish the curve of the back, which should be slightly arched rather than perfectly flat.
- Always sketch the tail as a fan shape, as hummingbirds frequently spread their feathers during high-speed maneuvers.
The bottom line
Drawing a hummingbird requires balancing delicate proportions with a sense of high-speed energy. By starting with a simple oval for the body and extending a slender, needle-like bill, you establish the essential silhouette. Focus on the arched back and fanned tail to convey movement. With consistent practice and attention to the bird's unique aerodynamic shape, you can capture the elegance of these remarkable avian creatures effectively.
People also ask
What is the best pencil grade for sketching birds?
Use an HB pencil for initial light outlines and a 2B or 4B for adding depth and darker shading. Softer leads allow you to build up the texture of feathers without pressing too hard on the paper.
How do I make the wings look like they are in motion?
Draw the wings slightly blurred at the edges or use light, directional strokes to suggest speed. Avoid drawing individual feathers on the wings, as the rapid motion makes them appear as a solid, translucent shape.
Should I start with the head or the body?
Always start with the main mass of the body, which is the oval-shaped torso. Once the body is positioned, add the head and bill to ensure the proportions remain balanced.
How do I capture the iridescent shimmer of their feathers?
Use high-contrast shading to show the sheen on the throat and wings. Leave small areas of the paper white to represent the reflection of light off the glossy plumage.
Why does my hummingbird drawing look like a generic sparrow?
You likely made the bill too short or the body too round and heavy. Hummingbirds have very slender, needle-like bills and a streamlined, aerodynamic silhouette that differs significantly from songbirds.
Is it better to draw from a photo or a live bird?
Photos are excellent for studying anatomy and specific details, but live birds are better for observing posture. If drawing from life, focus on the quick, jerky movements and the way they tilt their heads.
This answer was created with the help of AI research tools and reference sources. Spotted an error? Let us know — we correct mistakes quickly. See our editorial policy.