How can I draw a raven easily?
Short answer
Drawing a raven is achievable by focusing on the bird’s distinct silhouette: a heavy, curved beak, a wedge-shaped tail, and shaggy throat feathers. By breaking the anatomy into simple geometric shapes—circles for the head and body, and a triangle for the tail—you can build a recognizable raven figure with minimal effort.
On this page
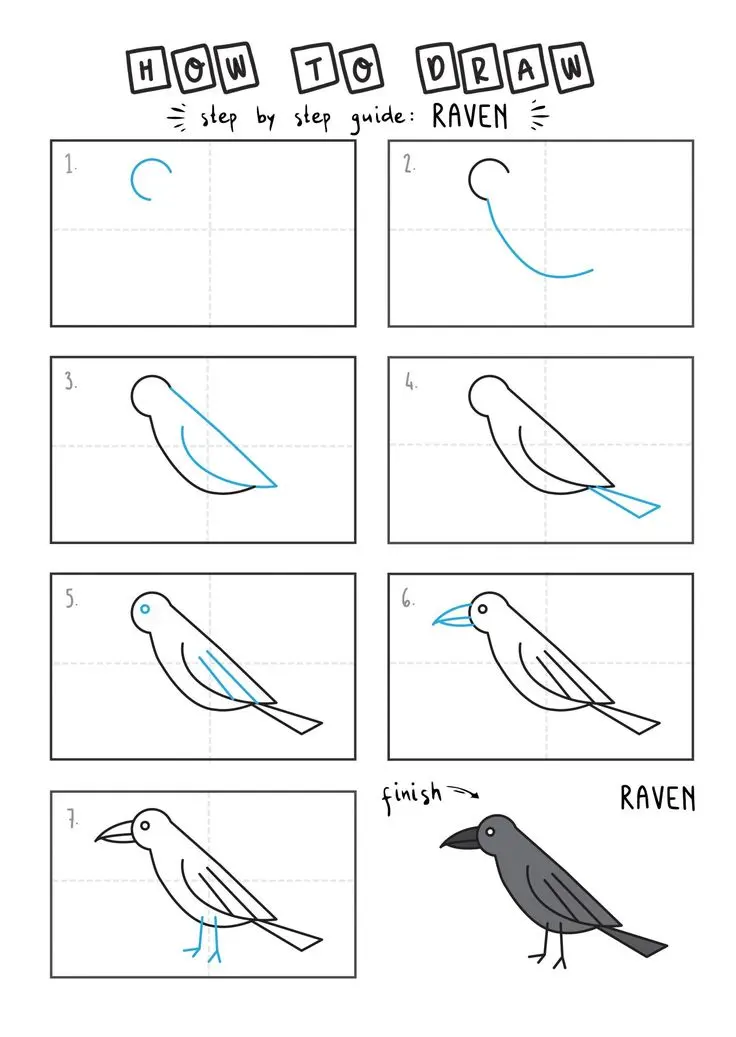
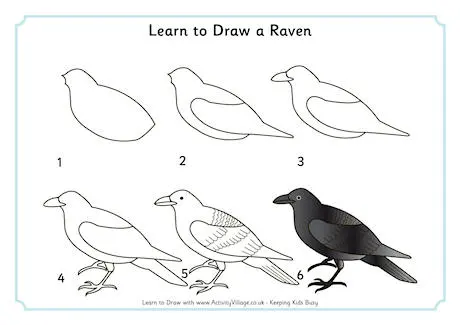
How to draw a raven step by step
To begin your drawing, focus on the core proportions of the bird. Ravens are larger and more robust than common crows, so emphasize a thick neck and a deep, powerful chest. Start with a medium-sized circle for the head and a larger, slightly elongated oval for the body. Connect these with two curved lines to represent the neck, ensuring the neck appears sturdy rather than slender.
Once the basic frame is set, add the defining features that distinguish a raven from other corvids. The beak should be thick, slightly hooked at the tip, and roughly the same length as the head. Add a wedge-shaped tail extending from the back of the body, which is a key diagnostic feature of the species. Use these steps to guide your initial sketch:
- Sketch a circle for the head and a larger oval for the torso.
- Draw a thick, slightly curved beak attached to the front of the head circle.
- Add a wedge-shaped tail at the rear, pointing downward at a slight angle.
- Connect the head and body with a thick neck line.
Best drawing tools for beginners
For those just starting, graphite pencils are the most forgiving medium. A standard HB pencil is perfect for the initial layout, as it is light enough to erase easily if you make a mistake. Once you have finalized your lines, you can move to a 2B or 4B pencil to add depth and darkness to the feathers. Using a kneaded eraser is also recommended, as it allows you to lift graphite gently without damaging the paper.
If you prefer working with ink, fineliner pens are excellent for capturing the texture of raven feathers. Start with a 0.3mm pen for fine details around the eye and beak, then switch to a 0.8mm pen for the broader, darker areas of the wings. Remember that ravens have iridescent plumage, so leaving small white gaps in your ink work can simulate the reflection of light on their black feathers. Always keep a scrap piece of paper nearby to test your pen flow before applying it to your final drawing.
Why raven anatomy is unique
The raven is characterized by its massive, heavy bill and shaggy throat feathers, known as hackles. Unlike the sleeker look of a crow, a raven’s throat often appears ruffled or bristled, especially when the bird is calling. When drawing, pay attention to these throat feathers, as they provide a sense of volume and realism. The eye should be placed relatively high on the head, just behind the base of the upper beak, and should be kept small and dark.
The wings are another critical area of study. When folded, the primary feathers of a raven extend well past the base of the tail. When in flight, the individual feathers at the tips of the wings—often called "fingers"—spread out significantly. Capturing this spread is essential for a dynamic drawing. Keep these anatomical details in mind:
- The beak is heavy and slightly arched along the top ridge.
- Throat feathers appear as loose, jagged strokes rather than smooth lines.
- The wingtips show distinct, finger-like gaps when the bird is in flight.
- The legs are stout and covered in dark, scaly skin.
Common mistakes when drawing ravens
A frequent error is drawing a raven with the proportions of a common crow. Crows are generally smaller, with thinner beaks and a square-ended tail rather than a wedge shape. If your drawing looks too delicate, you likely need to increase the thickness of the beak and the neck. Another common issue is making the eye too large; ravens have intense, dark eyes that are relatively small compared to their massive skulls.
Over-detailing the feathers is another trap that can make the drawing look cluttered. Instead of drawing every individual feather, focus on the overall shape of the bird and group the feathers into larger masses. Use shading to suggest texture rather than drawing hundreds of tiny lines. If you find your drawing looks flat, it is likely because you are not using enough contrast. Ravens are famously dark, so do not be afraid to use deep, heavy blacks in the shadowed areas to create a three-dimensional effect.
How to add texture to feathers
Feathers are not uniform, and capturing their texture is what brings a drawing to life. Use short, overlapping "U" shapes or jagged strokes to mimic the look of plumage. On the wings, use longer, more tapered strokes to represent the primary feathers. The key is to follow the contour of the bird’s body; feathers should always lie flat against the skin, following the curve of the torso or the angle of the wing.
To make the feathers look realistic, vary the pressure of your pencil or pen. Use lighter pressure for the edges of the feathers where light might catch them, and heavier pressure toward the base of the wing or the underside of the body. You can also use a blending stump or a soft tissue to smudge your graphite, creating a soft, velvety texture that mimics the look of a raven’s dark, dense coat. Practicing these shading techniques will help you achieve a professional finish that captures the majestic nature of the bird.
Key facts
- Ravens are significantly larger than crows, often reaching lengths of 24 inches with a wingspan of up to 50 inches.
- Focus on the beak; a raven’s bill is heavy, curved, and features a distinct shaggy throat patch called hackles.
- Start your sketch with two overlapping ovals to establish the bulky head and the robust, rounded body shape.
- Use a wedge-shaped tail as a primary identifier, as this distinguishes ravens from the fan-shaped tails of crows.
- Keep the eye placement high on the head, positioned just above the base of the thick, powerful upper mandible.
- Practice drawing the feathers in clumps rather than individual lines to capture the bird's sleek, iridescent black plumage.
The bottom line
Drawing a raven effectively relies on capturing its robust silhouette and distinct features, such as the heavy, hooked beak and wedge-shaped tail. By focusing on the bird's bulky proportions rather than minute feather details, you can create a recognizable and powerful image. Practice layering your shadows to imply the iridescent texture of its plumage, ensuring the final result conveys the raven's characteristic intelligence and imposing presence.
People also ask
How can I distinguish a raven from a crow in my drawing?
Draw the raven with a much thicker, hooked beak and a wedge-shaped tail. Crows have smaller, straighter beaks and rounded, fan-like tails.
Should I use pure black for the feathers?
Avoid using solid black for the entire body. Use shades of dark grey and blue highlights to show the sheen of the feathers.
What is the best pencil grade for sketching birds?
Use an HB pencil for light initial outlines. Switch to a 4B or 6B pencil to add depth and dark shadows to the wings.
How do I draw the raven's wings when they are folded?
Keep the wings tight against the body, overlapping the primary feathers in a long, layered stack that extends toward the tail.
Is it necessary to draw the feet in detail?
You only need to suggest the feet with three forward-facing toes and one backward-facing toe. Keep them dark and slightly textured to look like scales.
How do I make the raven look intelligent?
Give the eye a sharp, bright highlight. A small white dot in the dark pupil creates a sense of alertness and focus.
This answer was created with the help of AI research tools and reference sources. Spotted an error? Let us know — we correct mistakes quickly. See our editorial policy.