How can I draw a cliff easily?
Short answer
Drawing a cliff is best achieved by focusing on irregular, jagged lines that mimic natural geological erosion. Start by establishing a strong horizon line, then build the vertical face using sharp, angular strokes. By layering shadows and varying the texture of the rock surface, you create depth and a realistic, rugged appearance.
On this page
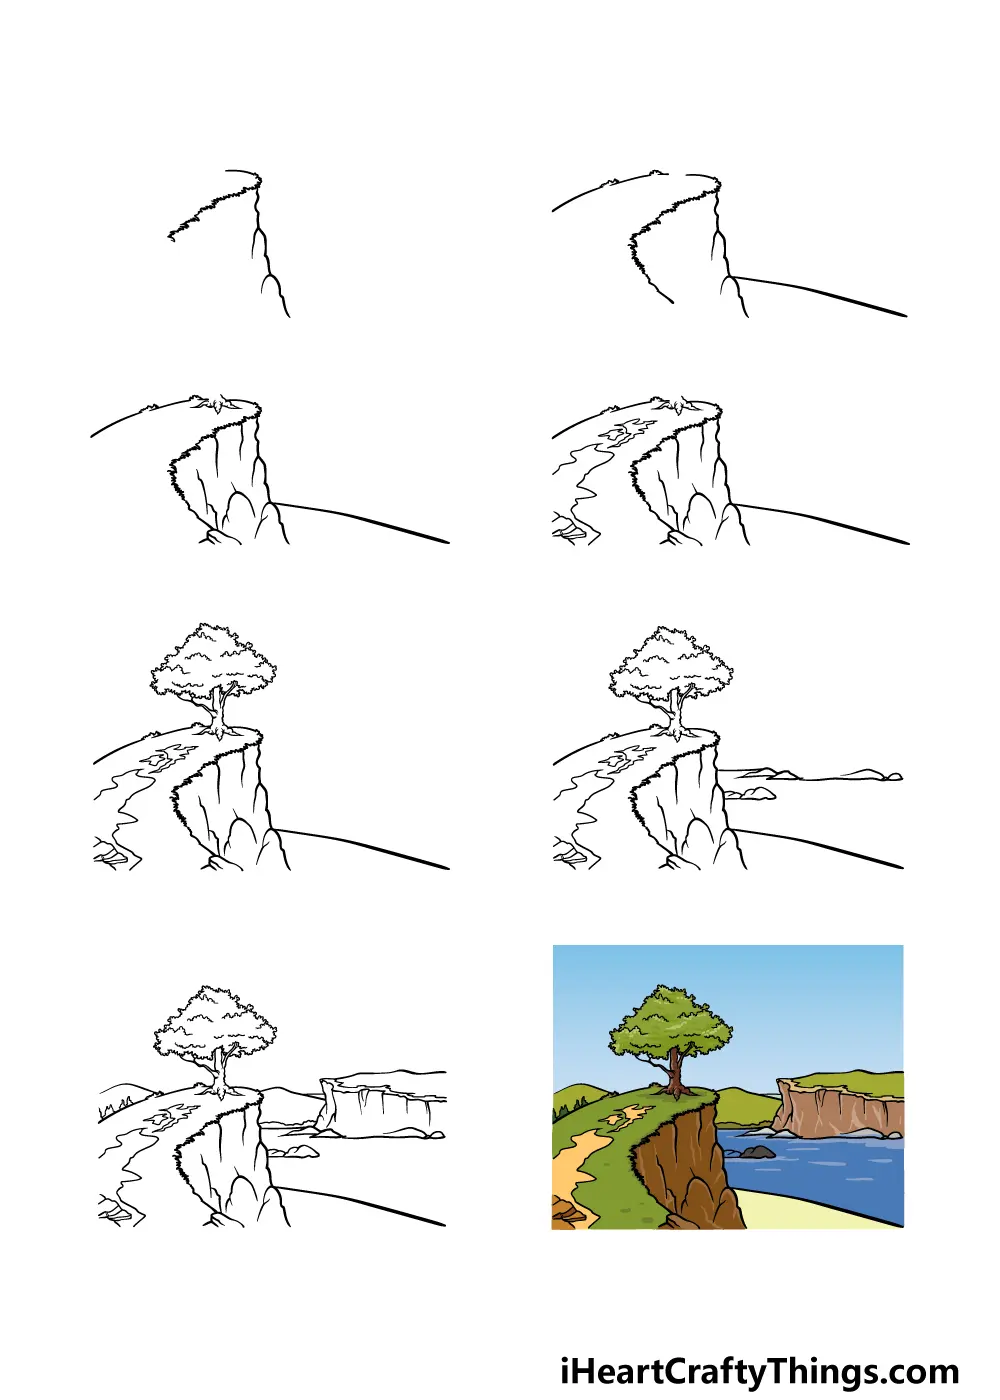
How to draw a cliff step by step
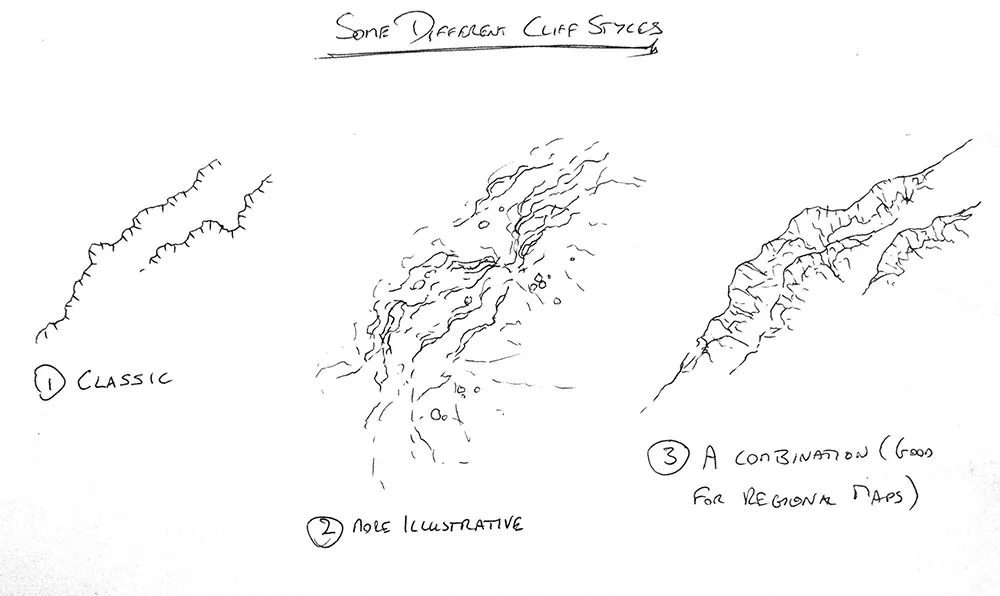
Drawing a convincing cliff face begins with defining the overall silhouette. Use a light pencil to sketch the general shape of the cliff, keeping in mind that nature rarely follows perfectly straight lines. Once the outline is established, you can begin adding the internal structure that suggests the weight and age of the rock.
- Sketch the primary outline using long, jagged vertical lines to establish the height.
- Add horizontal cracks and crevices to represent the layering of sedimentary rock.
- Use varying line weights to emphasize the parts of the cliff that protrude toward the viewer.
- Add small, triangular shapes at the base to represent fallen debris or scree slopes.
- Finish by adding vertical hatching to indicate the steepness and texture of the rock face.
By following these steps, you create a skeletal framework that allows you to build complexity without losing the original sense of scale. Focus on the interplay between the verticality of the cliff and the horizontal lines of the landscape surrounding it.
Best tools for drawing landscapes
To achieve the best results when drawing natural formations, you should select tools that allow for both precision and soft shading. Graphite pencils in various grades, such as HB for sketching and 4B or 6B for deep shadows, are essential for creating contrast. A kneaded eraser is also vital because it allows you to lift graphite to create highlights on rock edges.
- HB pencil: Ideal for initial light outlines and structural planning.
- 2B pencil: Useful for mid-tone shading and defining secondary rock features.
- 4B/6B pencils: Necessary for creating deep, dark crevices and heavy shadows.
- Kneaded eraser: Perfect for pulling out light reflections on jagged edges.
- Blending stump: Helps soften transitions between light and shadow on smooth rock surfaces.
Using these tools effectively allows you to mimic the rough texture of granite or the layered appearance of limestone. Experimenting with different pressures will help you distinguish between the sharp edges of a cliff and the softer, weathered surfaces found near the base.
Why cliffs look flat in drawings
A common issue for beginners is that their cliff drawings appear two-dimensional, lacking the massive scale of real geological features. This usually happens because the artist fails to account for light source direction and atmospheric perspective. If the entire cliff is shaded with the same intensity, the eye cannot perceive the depth of the crevices or the projection of the rock ledges.
To fix this, identify a single light source and remain consistent with your shading. Surfaces facing the light should remain bright, while those turned away should be significantly darker. Additionally, consider atmospheric perspective: objects closer to the viewer should have higher contrast and more detail, while distant parts of the cliff should be lighter and less defined. This technique forces the viewer’s eye to travel across the surface, creating the illusion of a three-dimensional, towering structure that occupies real space.
Common mistakes when drawing rock textures
Many artists make the mistake of drawing repetitive, uniform patterns when attempting to represent rock texture. Nature is chaotic and irregular, so using a consistent, repeating shape will make the cliff look artificial or like a cartoon. Avoid drawing perfectly parallel lines or identical cracks, as these do not occur in natural geological formations.
Another frequent error is neglecting the base of the cliff. A cliff does not simply end at a line; it interacts with the ground through erosion and fallen rock. By adding a transition zone of smaller stones, dirt, and vegetation, you anchor the cliff to the landscape. Failing to include this transition makes the cliff look as if it is floating or pasted onto the background rather than growing out of the earth. Always ensure that the shadows at the base are deep enough to ground the structure firmly in the environment.
How to add realistic details to cliffs
Adding realistic details involves observing how light hits different types of stone. For example, smooth surfaces reflect light differently than porous, jagged ones. Use short, flicking strokes to suggest lichen or moss, which often grows in the crevices of older cliffs. These small additions provide a sense of scale, helping the viewer understand just how massive the cliff is compared to the surrounding flora.
- Observe the direction of the light and keep all shadows consistent.
- Add small, irregular dots and dashes to represent surface weathering and erosion.
- Use cross-hatching in deep cracks to suggest extreme depth and darkness.
- Leave small areas of white paper untouched to represent the brightest highlights on sharp edges.
- Vary the density of your marks to show where the rock is dense versus where it is crumbling.
By focusing on these finer details, you transform a basic silhouette into a complex, weathered cliff face. Remember that patience is key, as layering these textures requires a steady hand and a clear understanding of how light interacts with irregular, natural surfaces.
Key facts
- Use jagged, irregular lines rather than smooth curves to mimic the natural erosion of rock faces.
- Establish a clear light source to determine where shadows fall, which creates the illusion of depth.
- Incorporate horizontal strata lines to suggest layers of sediment or stone compressed over geological time.
- Vary the thickness of your lines to emphasize foreground edges while keeping background details lighter and thinner.
- Add vertical cracks and fissures to break up large, flat surfaces and add visual interest.
- Place small, triangular shapes at the base to represent scree or fallen rock debris, grounding the cliff in the landscape.
The bottom line
Drawing a convincing cliff relies on embracing irregularity and understanding how light interacts with complex surfaces. By focusing on jagged outlines, consistent light sources, and subtle textures like cracks and debris, you can transform a simple shape into a towering geological feature. Practice observing real rock formations to understand how layers stack, and remember that nature’s imperfections are the key to creating a realistic, compelling landscape.
People also ask
How do I make a cliff look tall?
Use a low horizon line in your drawing to make the cliff tower over the viewer. Adding small elements at the bottom, like tiny trees or people, provides a sense of scale that emphasizes the cliff's height.
Should I use a ruler to draw cliff edges?
Avoid using a ruler, as natural rock formations are rarely perfectly straight. Freehand drawing allows for the organic, unpredictable shapes that make a cliff look authentic and weathered.
How do I shade a cliff effectively?
Apply hatching or cross-hatching to the sides of the cliff that face away from your light source. Keep the brightest highlights on the top edges to create a sharp contrast that defines the rock's volume.
What is the best way to draw vegetation on a cliff?
Draw small, tufted shapes clinging to cracks or ledges where soil might collect. Do not cover the entire cliff in plants, as leaving large areas of exposed stone is essential for maintaining the rocky texture.
How do I show the texture of the rock?
Use short, stippled dots or small dashes to simulate the rough, gritty surface of stone. Concentrating these marks near the edges and crevices helps to define the form without cluttering the entire drawing.
What is a common mistake when drawing cliffs?
A frequent error is drawing the cliff face as a single, flat plane. To fix this, break the surface into multiple planes and ledges to show that the rock has physical depth and mass.
This answer was created with the help of AI research tools and reference sources. Spotted an error? Let us know — we correct mistakes quickly. See our editorial policy.