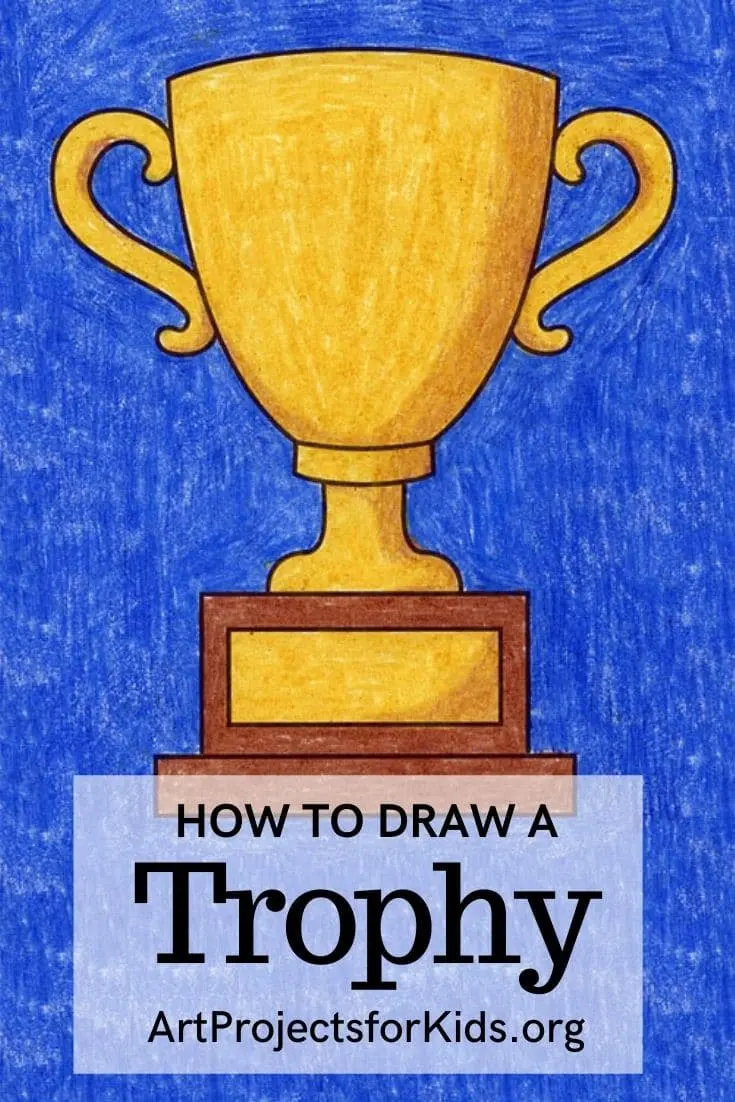
How do you draw a trophy step by step?
Short answer
Drawing a trophy involves constructing a symmetrical base, a central stem, and a bowl-shaped top using basic geometric shapes. By sketching a vertical axis line, you ensure balance before adding details like handles or engravings. With practice, you can refine these proportions to create a realistic, polished representation of a victory cup.
On this page
How to draw a trophy step by step
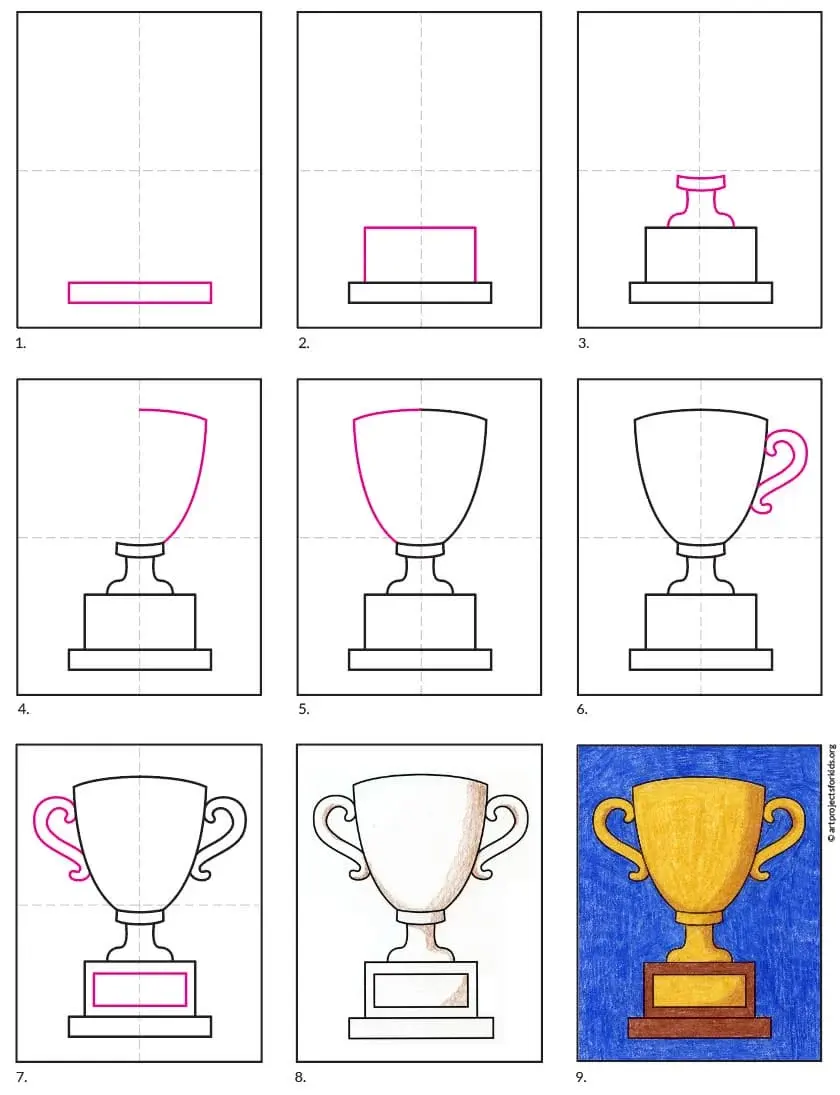
To begin your drawing, establish the structure using a light pencil to create a vertical center line. This line acts as a guide to ensure both sides of the trophy remain symmetrical throughout the process. Start by drawing a wide rectangle at the bottom for the base, a thin cylinder for the stem, and a large semi-circle or cup shape at the top.
Once the basic framework is in place, you can refine the curves and add depth. Follow these steps to build the form:
- Sketch an oval at the top of the cup to represent the opening’s rim.
- Draw two symmetrical "S" curves on either side of the cup to form the handles.
- Add a smaller rectangular plinth beneath the base for added stability.
- Use an eraser to remove the initial center line and any overlapping construction marks.
Best drawing techniques for beginners
Beginners often struggle with perspective, so focusing on the "ellipse" is essential for a professional look. An ellipse is simply a flattened circle, which is necessary for drawing the top rim and the base of the trophy. Always draw through your shapes, meaning you should sketch the hidden back edges of the cup to understand how the object sits in space.
When shading, identify a consistent light source to create realistic highlights and shadows. If the light comes from the top left, the right side of the cup and the underside of the handles should be darker. Use a blending stump or a soft tissue to smooth out graphite transitions, which gives the trophy a metallic, reflective appearance. Practice drawing the cup as a series of stacked cylinders to master the curvature.
How to add realistic details and textures
A trophy looks flat without proper detailing, so consider adding a decorative rim or an engraved plaque on the base. Use thin, parallel lines to suggest the shine of polished metal, leaving white spaces where light hits the surface most intensely. If you want the trophy to look like gold or silver, use varying degrees of pencil pressure to create sharp contrast between light and dark areas.
Consider these finishing touches to enhance the visual appeal:
- Add small, dark dots or cross-hatching near the base to suggest shadows cast on the surface.
- Use a white gel pen or a kneaded eraser to lift highlights on the handles and the rim.
- Draw a subtle horizontal line across the base to indicate the table or shelf it rests upon.
- Vary the thickness of your outlines, using bolder strokes for the exterior edges to make the object pop.
Common mistakes when drawing trophies
The most frequent error is neglecting symmetry, which makes the trophy appear lopsided or unstable. To avoid this, frequently flip your paper upside down or hold it up to a mirror; this helps your brain identify lopsided proportions that you might have missed while staring at the drawing from one angle. Another mistake is drawing the handles at different heights, which ruins the balance of the entire composition.
Avoid making the stem too thin, as it must look capable of supporting the weight of the cup. Always check that the bottom of the bowl is centered perfectly over the stem. If you find your lines are too dark early on, you will struggle to correct mistakes later. Keep your initial construction lines extremely faint so they can be easily removed once the final shape is established.
How long does it take to draw a trophy?
For a simple, stylized trophy, a beginner can complete a sketch in about fifteen to twenty minutes. If you are aiming for a highly detailed, realistic rendering that includes complex metallic reflections and intricate engravings, expect the process to take an hour or more. Speed is not the goal; accuracy in proportion and shading will determine the overall quality of your final piece.
If you are working on a larger project, break the session into two parts: one for structural layout and one for shading and refinement. This prevents hand fatigue and allows you to return to the drawing with fresh eyes, which is vital for spotting errors. Whether you spend ten minutes or an hour, the key is to maintain a steady hand and focus on the geometric relationships between the base, the stem, and the bowl.
Key facts
- Start by drawing a vertical center line to ensure the trophy remains symmetrical on both sides.
- Use a series of stacked geometric shapes, such as a circle for the cup and a rectangle for the base, to build the structure.
- Apply light shading on one side of the trophy to create a realistic metallic effect.
- Draw the handles as mirrored "S" or "C" shapes attached to the upper bowl section.
- Keep your initial construction lines very light so they can be easily erased after the final outline is drawn.
- Add a highlight line near the rim of the cup to represent the reflection of light on polished metal.
The bottom line
Drawing a trophy is an exercise in symmetry and geometric construction. By starting with a central axis and building the cup, stem, and base as distinct, proportional shapes, you can create a balanced foundation. Focus on metallic shading techniques—using sharp contrasts between light and shadow—to bring the object to life. With practice, these simple steps will help you render a professional-looking award with ease.
People also ask
What is the best pencil grade for sketching a trophy?
Use an HB pencil for initial light construction lines. Switch to a 2B or 4B pencil for darker shading and final outlines to provide better contrast.
How do I make the trophy look like it is made of gold or silver?
Use high-contrast shading by placing dark shadows directly next to bright white highlights. This creates the illusion of a reflective, metallic surface.
Why does my trophy drawing look lopsided?
This usually happens because the left and right sides are not mirrored correctly. Always use a center guide line and measure the width of the handles from that center point.
Should I draw the base before the cup?
It is generally better to draw the top cup first to establish the scale of the object. Once the cup is sized, you can build the stem and base proportionally beneath it.
How do I draw the handles so they look three-dimensional?
Draw the outer curve of the handle thicker than the inner curve. This creates a sense of depth and volume, making the handle look like a solid object.
What is the most common mistake when drawing a trophy?
The most frequent error is neglecting the perspective of the rim. Ensure the top opening is drawn as an ellipse rather than a flat line to show depth.
This answer was created with the help of AI research tools and reference sources. Spotted an error? Let us know — we correct mistakes quickly. See our editorial policy.