How do you draw a bridge?
Short answer
Drawing a bridge requires establishing a strong horizon line and a central vanishing point to create realistic perspective. By sketching the structural skeleton first—including piers, deck, and cables—you can build depth and scale. Focus on geometric shapes to define the bridge's architecture before adding details like railings, textures, and lighting effects.
On this page
How to draw a bridge in perspective
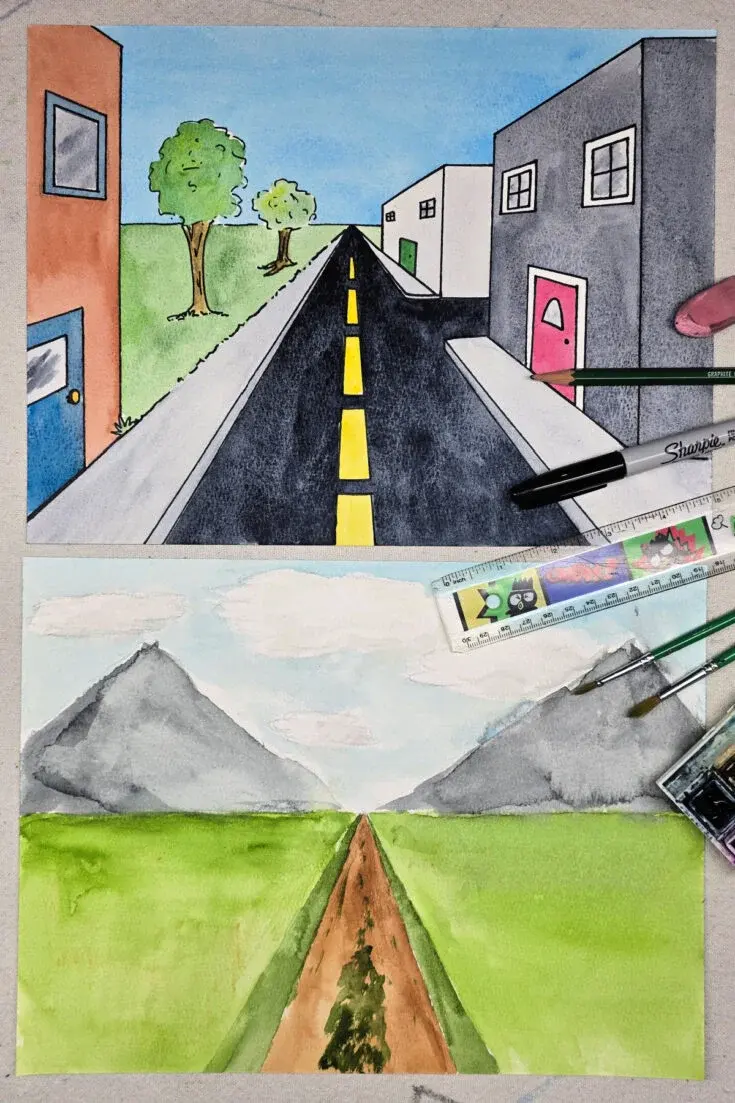
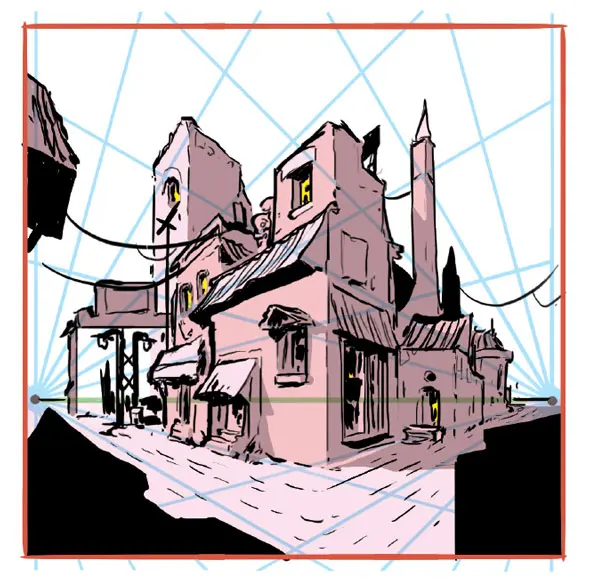
To draw a bridge that looks three-dimensional, you must master linear perspective. Start by drawing a horizontal line across your paper representing the eye level of the viewer. Place a single vanishing point on this line if you are drawing a bridge viewed from the front, or two vanishing points on the edges if viewing it at an angle. All lines representing the sides of the bridge deck must converge toward these points.
Using a ruler for these initial guidelines ensures your structure remains rigid and professional. Once the perspective lines are set, sketch the main deck as a long, tapering rectangle. This foundation provides the necessary spatial framework to place supports, towers, or suspension cables accurately. Without this underlying geometry, the bridge will appear flat or distorted, failing to convey the sense of distance and scale inherent in civil engineering structures.
Best bridge drawing techniques for beginners
Beginners should focus on breaking down complex bridges into simple, recognizable shapes. Most structures, from stone arches to modern steel trusses, are composed of basic rectangles, triangles, and semicircles. By sketching these shapes lightly, you can refine the proportions before committing to darker, permanent lines. This method prevents the common frustration of trying to draw intricate details before the overall structure is balanced.
- Draw a light horizon line to anchor the scene.
- Sketch the primary silhouette using basic geometric blocks.
- Add vertical lines to represent piers or suspension towers.
- Connect the deck to the towers using converging diagonal lines.
- Refine the outlines by adding thickness to the deck and supports.
By following these steps, you maintain control over the composition. Always keep your pencil strokes light during the initial phase so that you can easily erase or adjust the proportions as the drawing progresses.
Why bridge drawings look distorted
Distortion often occurs when the artist neglects the relationship between the bridge and the surrounding environment. If the vanishing points are placed too close together, the bridge will appear unnaturally steep or narrow. Conversely, if the lines do not converge at all, the bridge will look like a two-dimensional cutout rather than a massive physical object. Always ensure that the angle of the cables or trusses matches the trajectory of the deck.
Another common issue is inconsistent scale. If the bridge supports in the foreground are not significantly larger than those in the background, the viewer loses the sense of depth. You must account for atmospheric perspective as well; objects further away should be drawn with less detail and lighter shading. By observing real-world examples, such as the Golden Gate Bridge or the Brooklyn Bridge, you can see how engineers and artists use tapering lines to lead the eye toward the horizon.
Common mistakes when drawing bridges
One frequent error is failing to account for the thickness of the bridge deck. In reality, a bridge deck is a substantial slab of concrete or steel, not a thin line. When drawing, represent the deck as a three-dimensional plane with a visible side edge. Another mistake is ignoring the structural logic of the bridge. For instance, suspension bridges require cables that curve downward, while truss bridges rely on a repeating pattern of triangles to distribute weight.
- Forgetting to draw the bridge’s reflection if it spans over water.
- Drawing cables that are perfectly straight when they should have a slight, natural sag.
- Neglecting to add shadows cast by the deck onto the piers or the ground below.
- Using uniform line weight, which makes the drawing look flat and lifeless.
To avoid these pitfalls, study photographs of various bridge types. Notice how light hits the structural members and where the deepest shadows fall, as these details provide the necessary contrast to make the structure pop.
How to add realistic details to your bridge
The final stage of drawing a bridge involves adding textures and lighting to convey material reality. Use short, rhythmic strokes to suggest the texture of concrete, or clean, parallel lines to represent steel beams. Lighting is crucial; decide on a light source and ensure all shadows are cast in the same direction. If the sun is to the left, the right side of your piers and towers should be shaded to create volume.
Adding small details like railings, street lamps, or passing vehicles provides a sense of scale that helps the viewer understand how massive the bridge truly is. Keep these elements subtle so they do not distract from the main structural form. By layering these finer details over your accurate perspective framework, you transform a basic geometric sketch into a convincing illustration. With practice, you will be able to capture the unique character and architectural elegance of any bridge you choose to draw.
Key facts
- Use a vanishing point on the horizon line to ensure your bridge maintains correct perspective as it recedes into the distance.
- Start by drawing a light horizontal line to represent the horizon, which anchors the structure within the landscape.
- Sketch the main span as a simple rectangle or arch first before adding structural details like cables or trusses.
- Maintain symmetry by drawing a vertical center line to align the supports on both sides of the span.
- Use parallel lines for the bridge deck to create a sense of depth and realistic scale.
- Add shadows beneath the deck and along the supports to provide weight and three-dimensional volume to your drawing.
The bottom line
Drawing a bridge successfully relies on mastering linear perspective and structural symmetry. By establishing a clear horizon line and using a vanishing point, you create a realistic foundation for any span. Focus on the geometry of the supports before detailing cables or masonry. With consistent practice in shading and line weight, you can transform simple geometric shapes into a convincing, three-dimensional architectural masterpiece that anchors your landscape.
People also ask
How do I draw a suspension bridge cable curve?
Draw a gentle U-shape connecting the tops of the towers to the deck. Ensure the curve is consistent on both sides to maintain the structural integrity of the visual representation.
What is the most common mistake when drawing a bridge?
The most frequent error is failing to align the bridge deck with the vanishing point. This causes the bridge to look tilted or disconnected from the background environment.
Should I use a ruler for my bridge drawing?
Using a ruler is helpful for initial structural lines and long, straight spans. However, freehand sketching adds character and organic texture to the final piece.
How do I represent the texture of a stone bridge?
Use short, irregular hatch marks to indicate individual stones. Vary the pressure of your pencil to create highlights and shadows on each block for depth.
How do I draw water beneath a bridge?
Draw horizontal lines across the water surface to represent ripples. Use darker tones directly under the bridge to suggest the reflection and the shadow cast by the structure.
What pencil grade is best for sketching bridges?
Start with an H or HB pencil for light construction lines that are easy to erase. Switch to a 2B or 4B pencil for final outlines and shading to add contrast.
This answer was created with the help of AI research tools and reference sources. Spotted an error? Let us know — we correct mistakes quickly. See our editorial policy.