How do you draw a comic book character step by step?
Short answer
Drawing a comic book character involves building a foundation with geometric shapes, refining the anatomy, and adding defining details like costumes and expressions. By mastering proportions and silhouette, you create a character that is visually distinct. Consistent practice with basic anatomy and perspective ensures your figures look dynamic and professional on paper.
On this page
How to structure a comic character anatomy
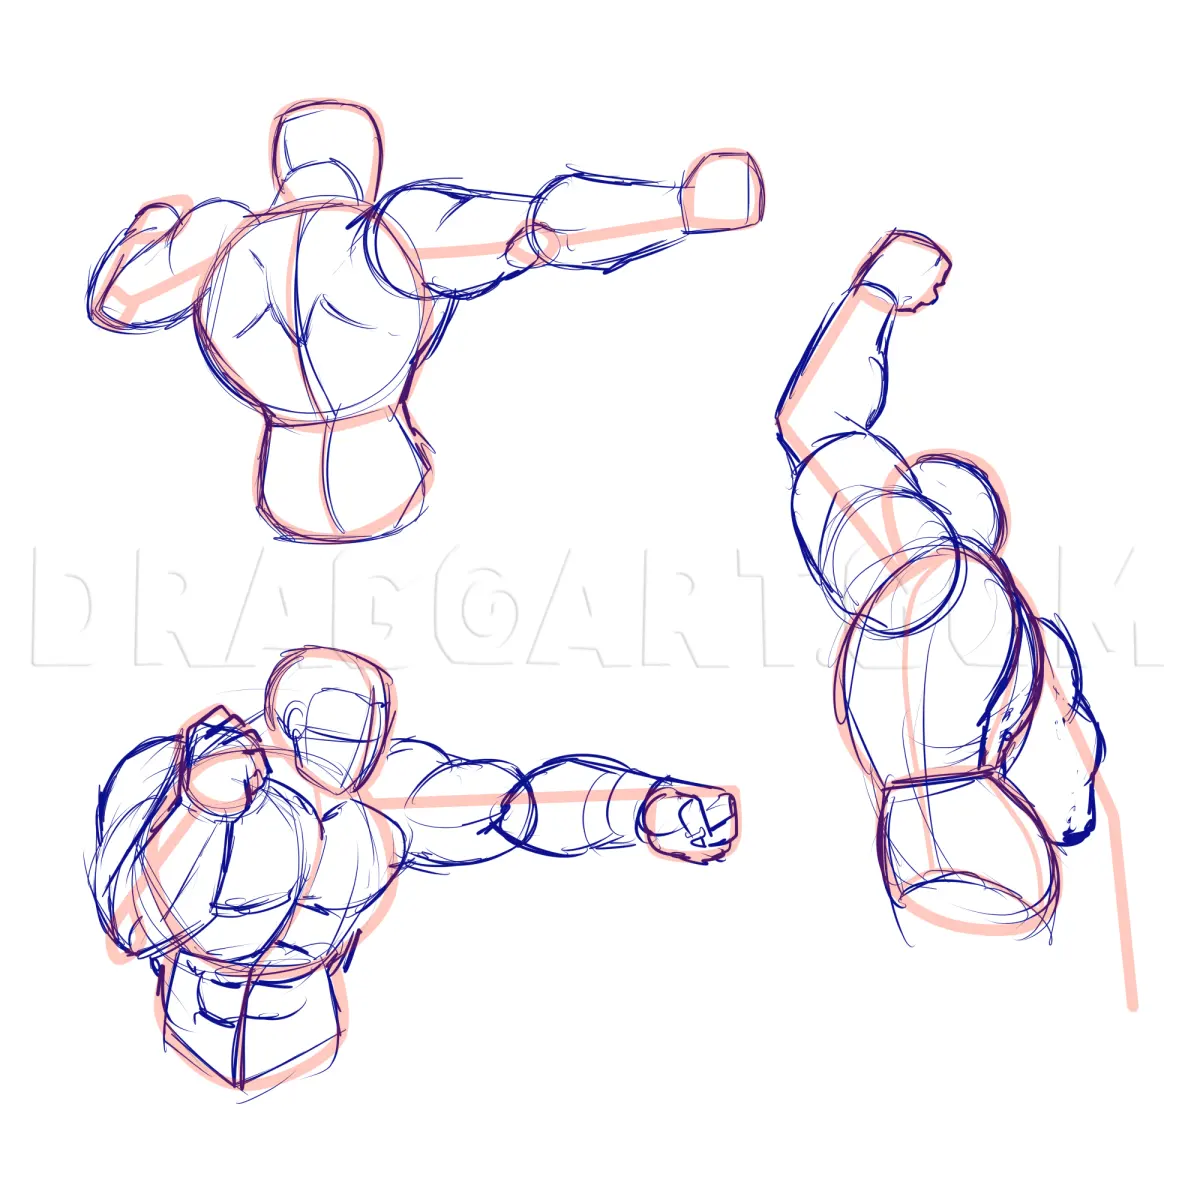
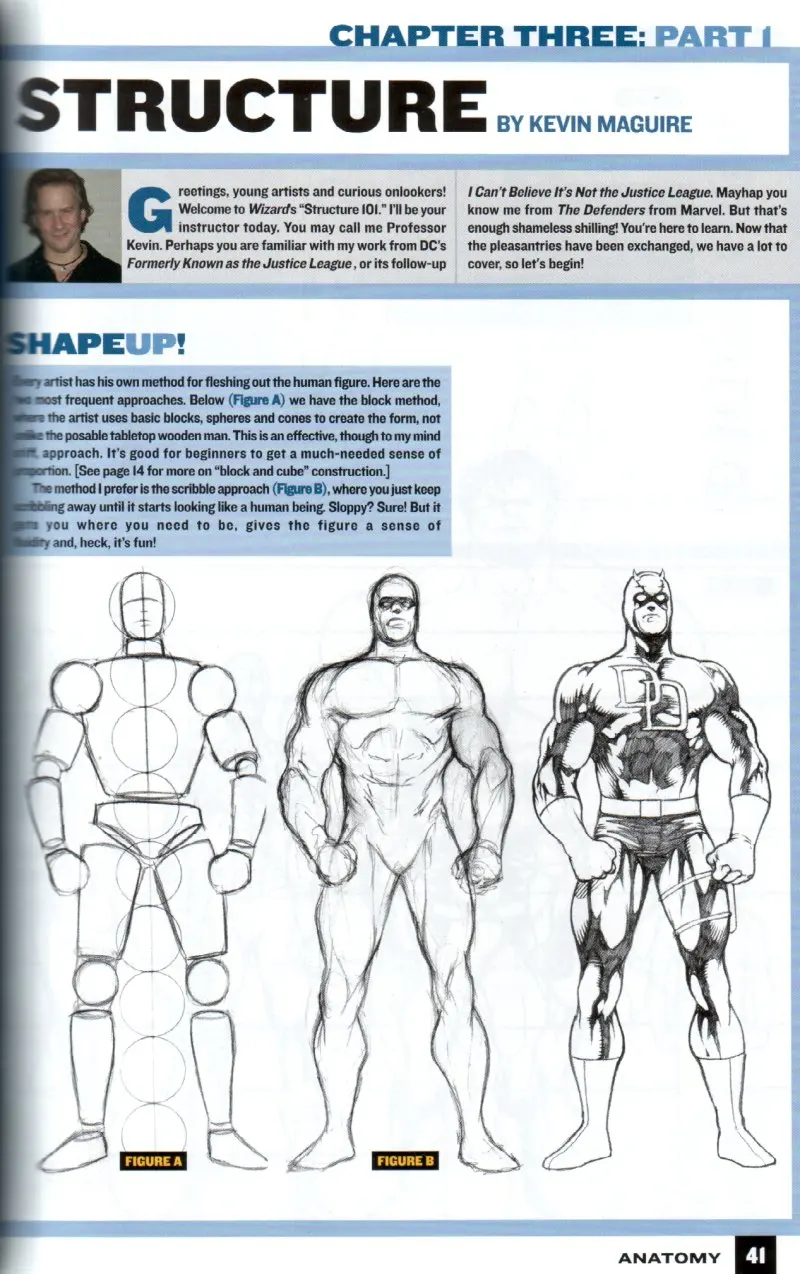
The foundation of any comic character is the gesture drawing, which captures the movement and pose before you add muscle or detail. Start by using simple shapes like spheres for the head, cylinders for the limbs, and a box for the torso. These basic forms allow you to establish the character's balance and weight in space. Once the pose is set, you can refine the anatomy by adding muscle groups and joints.
Proportions are critical for maintaining consistency throughout a comic series. A standard comic book hero is often drawn using a "seven-to-eight heads tall" ratio, which gives them a heroic, elongated appearance. Use these guidelines to ensure your character remains recognizable across different panels:
- Sketch a vertical line to establish the spine's curve.
- Mark the head, chest, hips, and knees on this line.
- Use circles to represent joints, ensuring limbs are correctly hinged.
- Connect the shapes with fluid lines to form the silhouette.
How to design a unique comic costume
A character’s costume serves as a visual shorthand for their personality, powers, and background. When designing an outfit, focus on a clear silhouette that makes the character instantly recognizable even in shadow. Incorporate functional elements that suggest how the character interacts with their world, such as utility belts for gadgets or reinforced padding for combat. Avoid over-complicating the design with too many small details, as these become difficult to replicate consistently in every panel.
Color theory and texture play a vital role in defining the costume's material. Use high-contrast colors to draw the eye to the character's face or primary weapon. Consider these practical steps when finalizing your design:
- Sketch three variations of the costume to test different themes.
- Select the most functional elements from each sketch for the final version.
- Add unique accessories like emblems or capes to anchor the design.
- Draw the character from front, back, and side views to ensure structural accuracy.
How to convey emotion through facial expressions
Facial expressions are the primary tool for storytelling, as they communicate a character’s internal state to the reader. Focus on the relationship between the eyebrows, eyes, and mouth to create distinct emotions. For instance, lowering the eyebrows and narrowing the eyes creates a look of anger, while raising the eyebrows and widening the eyes signifies surprise or fear. Practice drawing these features in a grid to understand how subtle shifts change the entire mood of the face.
The head shape itself also contributes to character design and personality. A square jawline often suggests strength and determination, while a softer, rounded face can imply youth or innocence. When drawing expressions, remember that the eyes are rarely perfectly symmetrical in a dynamic perspective. Use the following techniques to improve your character's range:
- Study real-life facial muscles to see how skin bunches during expressions.
- Use exaggerated features for comedic characters and subtle lines for dramatic ones.
- Ensure the hair follows the movement of the head to maintain a natural look.
How to use dynamic posing for action scenes
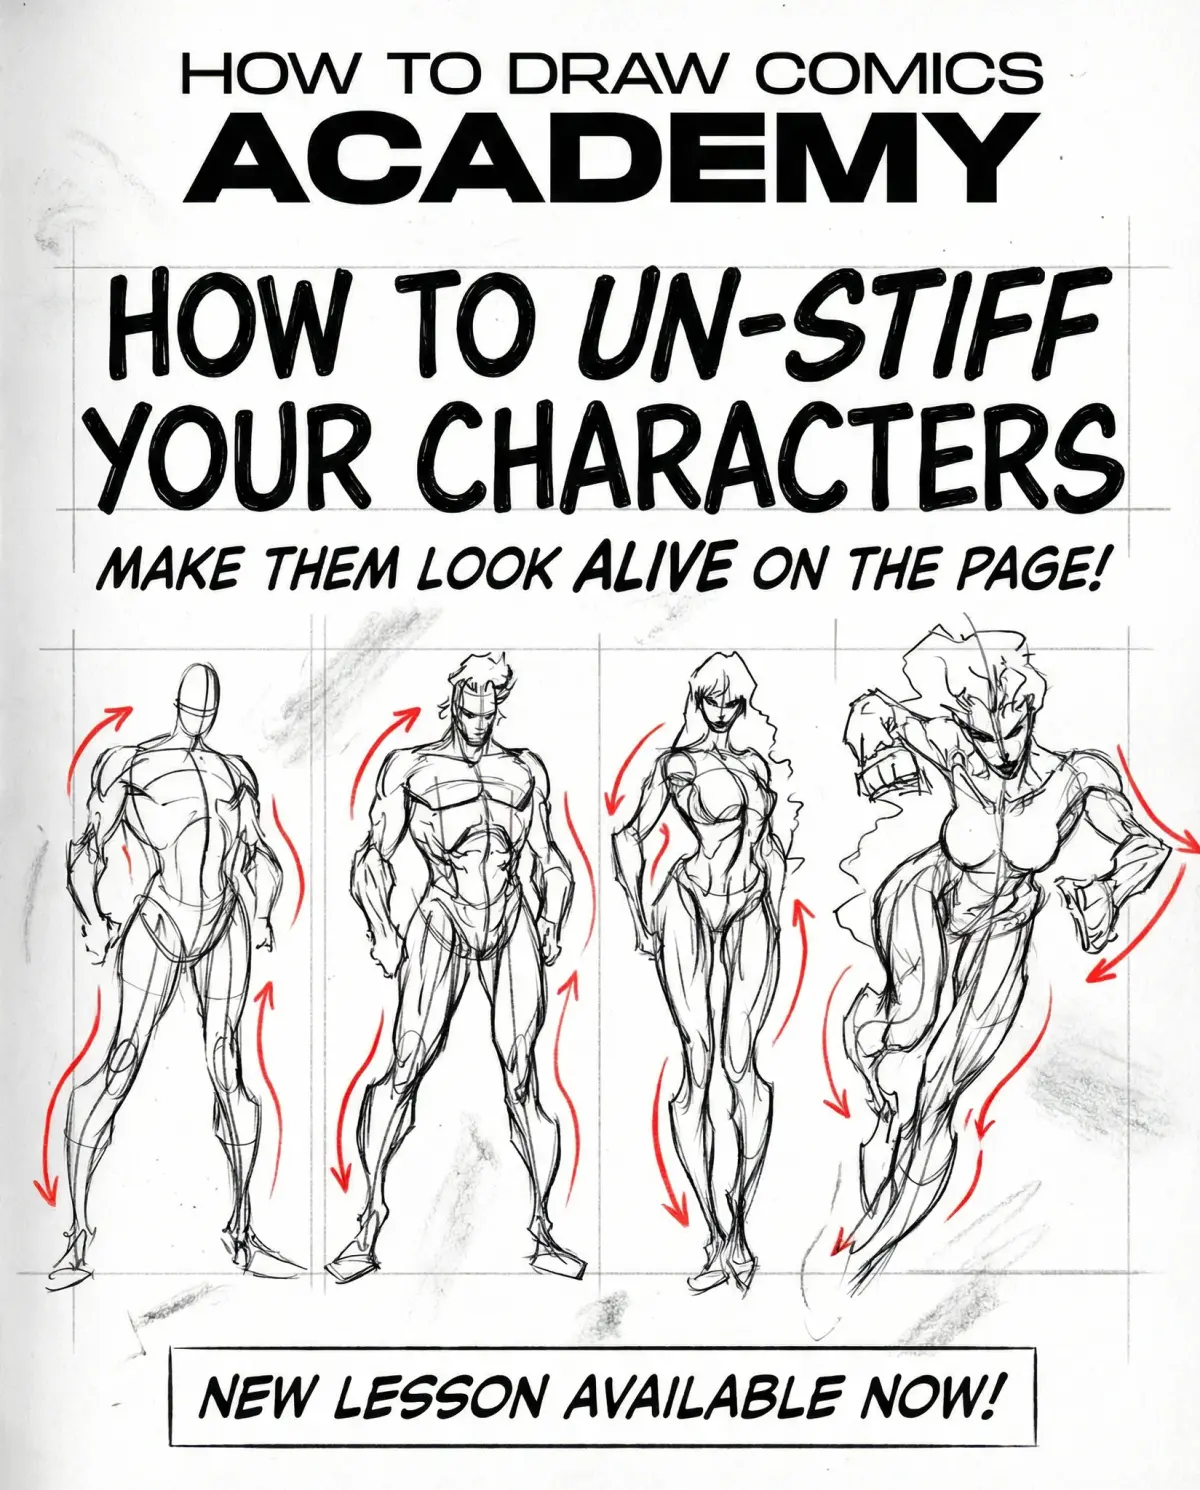
Dynamic posing is what separates a static drawing from a compelling comic book panel. To achieve a sense of action, use the "line of action," an imaginary curve that runs through the character's body to dictate the flow of movement. Place the character’s weight on one leg to create a natural lean, and use foreshortening to make limbs appear as if they are reaching toward or away from the viewer. These techniques create depth and energy within a two-dimensional space.
Avoid "stiff" poses by ensuring that the spine is curved and the shoulders are tilted in opposition to the hips. This principle, known as contrapposto, adds a realistic tension to the figure. Keep these tips in mind for action sequences:
- Always start with the line of action before drawing any anatomical details.
- Use overlapping lines to indicate depth and distance between body parts.
- Keep the character's center of gravity in mind to ensure the pose feels grounded.
- Experiment with extreme camera angles to make the action feel more cinematic.
Common mistakes when drawing comic characters
One of the most frequent errors beginners make is neglecting the "construction phase," leading to figures that look flat or anatomically impossible. Skipping the initial geometric shapes often results in limbs that are too long or torsos that lack proper volume. Another common mistake is inconsistent detailing, where a character's costume or face changes significantly from one panel to the next. To avoid this, create a "character sheet" that serves as a permanent reference guide for your specific design choices.
Over-rendering is another pitfall, where too many lines clutter the drawing and obscure the character's silhouette. Remember that comic art relies on clarity and readability; if the reader cannot tell what is happening in a panel, the drawing has failed. Focus on clean lines and strategic use of shadows to define form rather than excessive hatching or cross-hatching. By simplifying your process and focusing on the core structure, you will produce more professional and impactful comic book characters that resonate with your audience.
Key facts
- Use the "eight-head rule" to establish correct human proportions, where the total height of the character is eight times the size of their head.
- Start with a "mannequin" sketch using simple geometric shapes like spheres for joints and cylinders for limbs to establish the pose.
- Establish a "line of action" early to give the character a sense of movement and dynamic energy before adding muscle detail.
- Use a light blue pencil for the initial sketch, as it is easier to erase or ignore when finalizing lines with ink.
- Maintain a consistent light source throughout the drawing to ensure shadows and highlights appear realistic and grounded.
- Keep the character’s silhouette distinct so that the pose is instantly recognizable even without internal details or colors.
The bottom line
Drawing a compelling comic book character requires mastering basic human anatomy and using geometric scaffolding to build a dynamic pose. By focusing on the line of action and maintaining consistent proportions through character sheets, you can create figures that feel alive. Practice regularly, pay attention to consistent lighting, and simplify your designs to ensure they remain recognizable and visually striking across every page of your story.
People also ask
How do I create a unique costume for my character?
Focus on a color palette of three primary colors and incorporate shapes that reflect the character's personality, such as sharp angles for aggressive heroes. Ensure the costume design remains simple enough to be drawn repeatedly without losing its core identity.
What tools do professional comic artists use?
Most professionals use a combination of traditional bristol board, technical pens for inking, and digital software like Clip Studio Paint. Beginners can start with basic graphite pencils, an eraser, and waterproof fine-liner pens.
How do I make my character look like they are in motion?
Utilize "foreshortening," which involves drawing limbs closer to the viewer larger than those further away to create depth. Adding speed lines or dust clouds around the character further emphasizes movement.
Should I draw the face or the body first?
It is generally best to sketch the body first to establish the pose and scale. Once the frame is set, draw the head and facial features to ensure they are proportional to the rest of the figure.
How do I keep my character's design consistent across different panels?
Create a "character sheet" that shows your hero from the front, side, and back views. Refer to this sheet frequently while drawing to ensure that costume details and proportions remain identical in every frame.
Why do my drawings look stiff or static?
Stiffness often results from drawing characters in a perfectly straight line. Avoid this by tilting the shoulders and hips in opposite directions to create a natural, relaxed posture.
This answer was created with the help of AI research tools and reference sources. Spotted an error? Let us know — we correct mistakes quickly. See our editorial policy.