How do you shade an egg?
Short answer
Shading an egg requires observing a single light source to establish highlights, midtones, and shadows. By using a soft graphite pencil, you apply light pressure to build layers gradually, following the egg’s curvature. Blending these transitions creates a three-dimensional illusion, transforming a flat oval into a realistic, volumetric object on paper.
On this page
How to set up lighting for drawing an egg
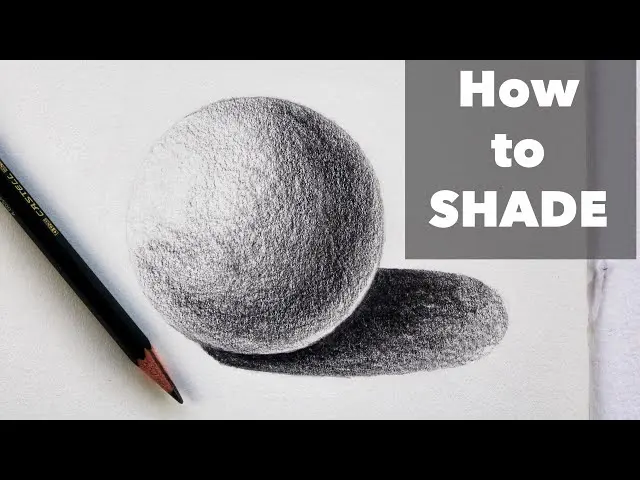
The most critical step in shading an egg is establishing a consistent light source. Without a clear light direction, the egg will look flat and lack depth. Place your egg on a neutral, non-reflective surface and position a single, strong lamp to one side. This setup creates a distinct highlight on the egg and a clear, cast shadow on the surface behind it.
To ensure success, observe the object before touching your pencil to the paper. Notice how the light hits the side closest to the lamp, creating a bright spot known as the highlight. As the surface curves away from the light, the values should transition smoothly into midtones and eventually into the core shadow. Using a single light source prevents conflicting shadows, which is the most common cause of confusion for beginners attempting to render realistic forms.
Best shading techniques for beginners
When beginning to shade, focus on the concept of "value," which refers to the relative lightness or darkness of a color. Start with a hard pencil, such as an HB or 2H, to lightly outline the egg and map out the shadow areas. Use a gentle, circular motion or light hatching strokes to build up your values slowly. Never press hard initially, as it is difficult to erase dark graphite once it is embedded into the paper's tooth.
- Identify the highlight: Leave the brightest area of the paper completely white.
- Apply midtones: Use light pressure to shade the area between the highlight and the core shadow.
- Establish the core shadow: This is the darkest part of the egg, located just before the reflected light.
- Add reflected light: Keep the very edge of the egg slightly lighter than the core shadow to show that light is bouncing back onto it.
- Draw the cast shadow: This area should be the darkest part of your drawing, anchoring the object to the surface.
How to create smooth transitions
Achieving a realistic look depends on the smoothness of your gradients. Avoid harsh lines between different shades; instead, use a blending stump or a piece of soft tissue to soften the transitions. If you do not have a blending tool, you can use your finger, though the natural oils in your skin may occasionally smudge the graphite unevenly. Focus on the "turn" of the form, where the egg curves away from the light.
The transition from light to dark should be gradual rather than abrupt. If you find your shading looks patchy, use a technique called cross-hatching, where you overlap thin, directional lines to build density. By layering these strokes, you create a seamless gradient that mimics the subtle curvature of the eggshell. Always keep your pencil sharp to maintain control over the texture, as dull pencils often lead to muddy, imprecise marks that ruin the illusion of volume.
Why shadows are essential for realism
A common misconception is that shading is only about the object itself. In reality, the cast shadow is what truly grounds the egg in a three-dimensional space. The cast shadow is usually darkest near the base of the egg and becomes lighter and softer as it extends away from the source. This gradient in the shadow itself provides important visual cues about the distance and intensity of the light.
- The darkest point of the cast shadow is called the "occlusion shadow," located directly under the egg.
- As the shadow stretches away, the edges should become blurrier to indicate the distance from the object.
- Ensure the cast shadow follows the perspective of the surface, as it will distort based on the angle of the light.
- Pay attention to the shape of the shadow; it should mimic the silhouette of the egg while conforming to the surface it sits upon.
Common mistakes when shading eggs
Many beginners struggle because they outline the egg too darkly, which prevents the object from looking integrated into the scene. A heavy, dark outline makes the egg look like a sticker rather than a solid object. Instead, let the change in shading define the edge of the egg. If you must use an outline, keep it extremely faint so it can be blended into the surrounding shadows later in the process.
Another frequent error is neglecting the reflected light on the shaded side of the egg. Without this sliver of light, the egg will appear to have a "dead" or flat side. Remember that light bounces off the table and hits the underside of the egg, creating a subtle highlight in the dark region. Finally, avoid using a black pencil; even the darkest shadows are usually a deep, warm grey. By observing these nuances, you will successfully create a convincing, three-dimensional representation of an egg.
Key facts
- An egg is an ovoid shape, meaning it is essentially a 3D ellipse that is wider at one end.
- Use a light source positioned at a 45-degree angle to create a clear highlight, midtone, and shadow.
- The "core shadow" is the darkest area on the object itself, located just before the reflected light.
- Reflected light occurs on the side of the egg opposite the light source, caused by light bouncing off the surface below.
- A cast shadow should be darkest near the base of the egg and gradually soften as it extends away.
- Use a soft-grade pencil like a 4B or 6B to build up layers of graphite rather than pressing hard in one stroke.
The bottom line
To effectively shade an egg, focus on capturing the transition from highlight to core shadow while respecting the object’s elliptical geometry. By establishing a consistent light source, you can create volume through a full range of values. Always remember to include reflected light in the shadow area and soften the cast shadow as it recedes. Consistent practice with layering graphite will yield a realistic, three-dimensional result.
People also ask
Why does my shaded egg look flat?
It often looks flat because the transition between the midtones and the shadow is too abrupt. Ensure you use a gradual gradient to show the curvature of the shell.
Should I use a blending stump to smooth the shading?
While a blending stump can soften edges, it often creates a muddy appearance if overused. Try using cross-hatching or circular pencil strokes to maintain texture and depth.
Where is the highlight located on an egg?
The highlight is the brightest spot on the egg, usually positioned on the upper curve closest to the light source. Leave this area white or very lightly shaded to represent the glossy surface.
How do I draw the cast shadow accurately?
The cast shadow should follow the contours of the surface the egg is resting on. It should be darkest directly underneath the egg where the object blocks the most light.
Does the egg's color affect how I shade it?
Yes, a white egg has a wider range of values, from bright white highlights to deep, dark shadows. A brown egg will have a darker overall midtone, reducing the contrast between light and dark areas.
What is the purpose of reflected light?
Reflected light prevents the shadow side of the egg from looking like a flat black hole. It provides a subtle glow that helps define the egg's rounded volume against the background.
This answer was created with the help of AI research tools and reference sources. Spotted an error? Let us know — we correct mistakes quickly. See our editorial policy.