How do you shade with a pencil?
Short answer
Shading with a pencil involves varying pressure and layering graphite to create the illusion of three-dimensional form. By controlling the density of marks and utilizing different pencil grades, artists transition smoothly between light and shadow. Mastery requires consistent practice with stroke direction, pressure sensitivity, and intentional blending techniques to define volume.
On this page
How to choose the right pencils for shading
Drawing pencils are categorized by the hardness of their graphite core, indicated by a letter and number system. The "H" series stands for hard, producing light, crisp lines, while the "B" series denotes blackness, indicating softer, darker graphite. For a complete shading kit, beginners should acquire a range of pencils including 2H, HB, 2B, 4B, and 6B.
Harder pencils like the 2H are ideal for initial sketches and light highlights where minimal graphite deposit is desired. Conversely, the 6B pencil is essential for deep, rich shadows and high-contrast areas. Using the correct grade prevents the common mistake of pressing too hard with a light pencil, which can damage the paper's surface.
- 2H to H: Best for technical work and light value mapping.
- HB: The standard office pencil, useful for mid-tones.
- 2B to 6B: Essential for building dark, velvety shadows.
How to control pencil pressure and technique
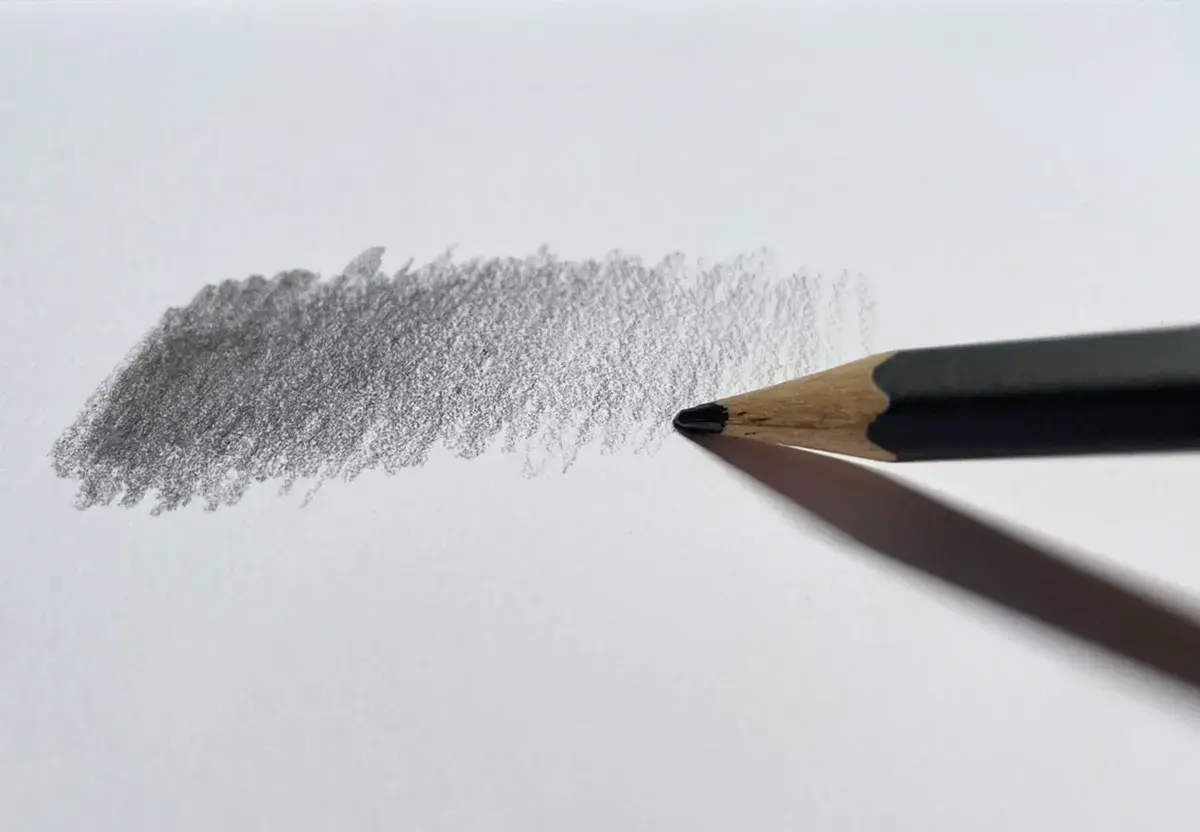
The foundation of realistic shading lies in your ability to manipulate pressure. By gradually increasing the force applied to the pencil, you create a smooth gradient from white paper to dark graphite. Practice this by drawing a long rectangle and filling it with a value scale, moving from the lightest touch to the heaviest pressure.
Consistency in your stroke direction also defines the texture of your drawing. Cross-hatching, where lines intersect at angles, builds depth, while circular shading creates a soft, organic appearance. Avoid "scrubbing" the graphite, which often results in uneven, patchy tones. Instead, layer your marks deliberately to build up the desired level of darkness.
- Start by holding the pencil further back from the tip to reduce pressure.
- Apply light, parallel strokes to establish the lightest mid-tones.
- Gradually increase pressure and overlap strokes to darken the shadows.
- Use a kneaded eraser to lift graphite for highlights or to soften transitions.
Why shading creates the illusion of depth
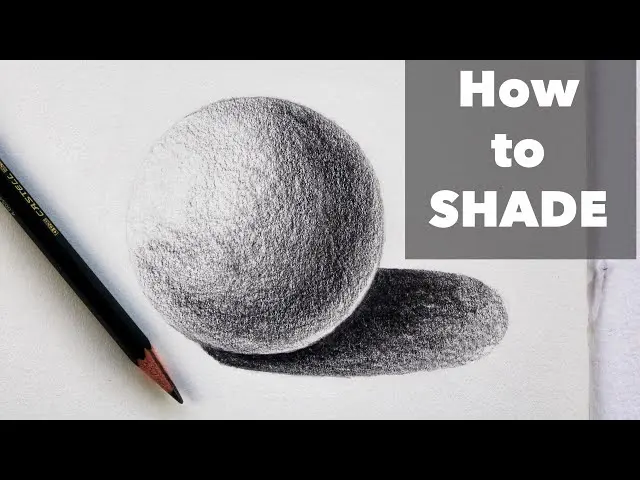
Shading works by mimicking how light interacts with physical objects in the real world. When light hits an object, it creates a highlight, a mid-tone, a core shadow, and a cast shadow. By accurately placing these values, you convince the viewer’s eye that a flat surface possesses volume and weight.
The core shadow is the darkest part of the object itself, usually found where the light is blocked. The cast shadow, which falls onto the surface beneath the object, is often darker and sharper near the base, gradually softening as it extends outward. Understanding these light physics allows you to move beyond simple coloring and into true representational art. Without these distinct value ranges, objects appear flat and lack a sense of presence within a space.
Common mistakes when shading with pencils
Many beginners struggle with "smudging," the habit of using a finger to blend graphite. While this may seem effective, it introduces natural oils from your skin onto the paper, which can create permanent, muddy streaks that are impossible to erase. Instead, use a paper blending stump or a clean tissue to smooth out transitions without compromising the paper's tooth.
Another frequent error is failing to observe the full range of values in a subject. Artists often settle for a narrow range of grays, resulting in drawings that look dull or washed out. Aim for a high-contrast image by ensuring your darkest shadows are truly dark and your highlights remain clean. Always keep your pencils sharp; a dull point prevents the precision required for detailed shading and often leads to messy, inconsistent marks.
- Never use your finger to blend, as it creates oily, uneven patches.
- Avoid outlining objects with heavy, dark lines, which flattens the form.
- Do not ignore the reflected light found within the darkest shadows.
- Keep a scrap piece of paper under your hand to prevent smearing your work.
How to practice shading for better results
Consistent, deliberate practice is the only way to refine your shading skills. Spend time daily drawing simple geometric shapes like spheres, cubes, and cylinders. These forms are the building blocks of everything you see, and mastering the way light moves across their surfaces will translate to more complex subjects like portraits or landscapes.
Set up a single light source, such as a desk lamp, to observe how shadows behave in a controlled environment. Take note of how the shadow changes shape and intensity as you move the light. By documenting these observations in a sketchbook, you train your eye to see value rather than just lines. Over time, your hand will naturally adapt to the pressure required to achieve smooth, professional-looking gradients that bring your drawings to life with depth and realism.
Key facts
- Graphite pencils are graded on a scale from 9H (hardest, lightest) to 9B (softest, darkest).
- Pressure control is the primary method for adjusting tone; use a light touch for highlights and firmer pressure for deep shadows.
- Hatching involves drawing parallel lines, while cross-hatching layers these lines at angles to create denser, darker values.
- Stippling creates texture and shadow through the application of small, concentrated dots rather than continuous strokes.
- Blending stumps or tortillons allow artists to smooth out graphite, though over-blending can result in a muddy, dull appearance.
- An eraser is not just for mistakes; it is a drawing tool used to "lift" graphite and create highlights or fine details.
The bottom line
Mastering pencil shading requires a balance of pressure, technique, and patience. By utilizing the full spectrum of pencil grades and learning to control your touch, you can create depth and volume on a two-dimensional surface. Remember to protect your work from smudges, use tools like blending stumps effectively, and always prioritize high contrast. Consistent practice with basic shapes will eventually lead to sophisticated, realistic drawings.
People also ask
What is the difference between HB and 2B pencils?
An HB pencil is a middle-ground lead that is relatively hard, making it ideal for sketching and light lines. A 2B pencil is softer and contains more graphite, allowing it to produce much darker, richer tones that are perfect for shading.
Read the full answer →Should I use my finger to blend pencil shading?
It is generally recommended to avoid using your fingers because they contain natural oils that can smudge the paper and create uneven, greasy patches. Use a paper blending stump or a clean tissue instead to maintain a professional, consistent texture.
How do I prevent my hand from smudging my work?
Place a clean sheet of scrap paper under your drawing hand to act as a barrier between your skin and the graphite. This technique keeps the paper surface clean and prevents your hand from dragging through areas you have already shaded.
What is the best way to achieve a smooth gradient?
Start by applying a very light layer of graphite and gradually add more pressure or additional layers as you move toward the darkest area. Use small, circular motions to ensure the graphite fills the tooth of the paper evenly without leaving harsh lines.
Why does my shading look flat?
Flat shading often occurs when there is not enough contrast between the lightest highlights and the darkest shadows. Ensure you are utilizing the full range of your pencil’s capabilities by pushing for deep blacks and leaving the white of the paper untouched for highlights.
How do I shade round objects like spheres?
To create volume, follow the contour of the object with your pencil strokes rather than shading in straight lines. Focus on identifying the core shadow, reflected light, and the cast shadow to give the object a three-dimensional appearance on a flat surface.
This answer was created with the help of AI research tools and reference sources. Spotted an error? Let us know — we correct mistakes quickly. See our editorial policy.