How do you get smooth shading with graphite?
Short answer
Achieving smooth graphite shading requires layering light pressure, using appropriate pencil grades, and utilizing blending tools to soften transitions. By gradually building value through circular or cross-hatching motions and avoiding heavy-handed application, you can eliminate visible stroke marks, creating a consistent, polished surface that appears uniform and professional in appearance.
On this page
How to choose the right graphite pencils for shading
Selecting the correct graphite grade is the foundation of smooth shading. Graphite pencils are categorized by the HB scale, where 'H' stands for hard and 'B' for black or soft. Harder pencils, such as 2H or 4H, contain more clay and leave lighter, thinner marks that are ideal for initial outlines or very subtle shading. Softer pencils, ranging from 2B to 8B, contain more graphite and produce darker, richer tones that are easier to blend into a seamless finish.
For a professional-looking gradient, you should keep a small range of pencils on hand. A common set for beginners includes:
- 2H for light, structural work.
- HB for mid-tone transitions.
- 4B for deep, velvety shadows.
- 6B for final contrast adjustments.
Avoid using very soft pencils like 8B too early in the process, as they can quickly fill the paper's "tooth" or texture, making it impossible to add further layers without creating a muddy or waxy appearance.
How to apply graphite for a smooth finish
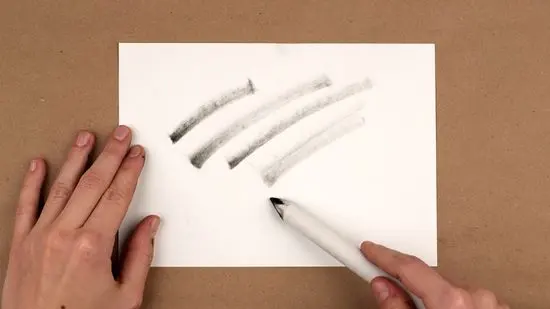
The secret to smooth shading lies in your physical application technique. Instead of pressing hard, use a light, consistent touch that allows the graphite to sit on top of the paper's surface rather than being ground into the fibers. Hold your pencil at a low angle, almost parallel to the paper, to maximize the contact area of the lead. This technique helps cover more surface area evenly and reduces the appearance of harsh, individual stroke lines.
Follow these steps to build your values:
- Start with the lightest tone using a hard pencil, applying graphite in small, overlapping circular motions.
- Gradually transition to a softer pencil to build up the mid-tones, ensuring you overlap your previous layers.
- Use a light touch to "feather" the edges of your shadows, moving from the darkest point toward the lighter areas.
- Continue layering until the transition between tones is no longer perceptible to the eye.
How to use blending tools effectively
Blending tools are essential for softening the transition between graphite marks. While many artists use their fingers, this is generally discouraged because natural skin oils can transfer to the paper, creating uneven patches that resist further graphite application. Instead, use professional tools designed to move and smooth the pigment without damaging the paper's integrity.
Commonly used blending tools include:
- Tortillons or paper stumps: Compressed paper sticks that allow for precise, controlled blending in small areas.
- Chamois cloth: A soft leather cloth ideal for smoothing large, open areas of shading.
- Makeup brushes: Soft, synthetic brushes that can gently buff graphite into the paper grain for an extremely smooth, airbrushed effect.
When using these tools, always start with a clean surface. If your tortillon becomes saturated with graphite, rub it on a scrap piece of paper or sand the tip with fine-grit sandpaper to restore its ability to blend cleanly.
Common mistakes when shading with graphite
Even experienced artists encounter issues when trying to achieve a perfectly smooth look. One of the most frequent errors is "burnishing," which occurs when you press too hard with a soft pencil. This traps the graphite under a shiny, slick layer, preventing you from adding more detail or achieving a deeper black. Once the paper surface is burnished, it becomes difficult to erase or layer effectively.
Another common pitfall is failing to protect your work from smudging. As you shade, your hand will naturally rest on the paper, potentially dragging graphite across your clean areas. To avoid this, always place a clean sheet of scrap paper under your drawing hand. Additionally, avoid over-blending. If you spend too much time rubbing the graphite, the drawing may lose its crispness and appear dull or muddy. Always prioritize layering over excessive blending to maintain the clarity of your light and shadow.
How to maintain consistency across the drawing
Consistency is achieved by controlling the pressure and the direction of your strokes throughout the entire piece. If you change your technique halfway through a drawing, the shading will look patchy and disjointed. It is helpful to test your pencil pressure on a separate piece of paper before applying it to your main work. This ensures you are aware of how dark a specific grade will appear under your current hand pressure.
To keep your shading uniform, consider these final tips:
- Rotate your pencil frequently to keep the tip sharp or flat, depending on the desired texture.
- Work from the background to the foreground to maintain depth.
- Use a kneaded eraser to "lift" graphite if an area becomes too dark, as this is gentler on the paper than a standard rubber eraser.
By consistently applying these methods, you will develop the muscle memory required to create smooth, professional-grade shading that elevates the quality of your graphite drawings significantly.
Key facts
- Use a range of graphite pencils from 4H (hard, light) to 6B (soft, dark) to build layers gradually.
- Apply graphite in light, circular motions rather than heavy, directional strokes to avoid visible lines.
- Utilize a blending stump or a piece of chamois to soften transitions between light and dark values.
- Keep a clean piece of scrap paper under your hand to prevent skin oils from smudging the graphite.
- Avoid using your finger to smudge graphite, as natural oils can create uneven, permanent dark spots.
- Build up tone through multiple thin layers rather than pressing harder, which can burnish the paper surface.
The bottom line
Achieving smooth graphite shading relies on patience, proper layering, and the right tools. By using a variety of pencil grades and applying light, circular strokes, you can fill the paper's texture without creating streaks or dark spots. Always protect your work from skin oils and use blending tools sparingly to maintain control. With consistent practice, you will master the transition from light to dark tones.
People also ask
What is the best paper for smooth graphite shading?
Smooth or hot-pressed paper is ideal because it lacks a deep texture that can cause "white spots" in your shading. Rougher papers, such as cold-pressed watercolor paper, are better suited for expressive, textured drawings rather than smooth gradients.
How do I fix a dark spot in my shading?
Use a kneaded eraser to gently lift the excess graphite by dabbing the area. Do not rub aggressively, as this can damage the paper fibers and make it difficult to add more graphite later.
Should I use mechanical or wooden pencils?
Both work, but wooden pencils offer more versatility for broad shading because you can expose more of the lead. Mechanical pencils are excellent for precise details and fine-tuning edges after the initial shading is complete.
How do I create a deep black without making the paper shiny?
Avoid pressing down too hard, which creates a reflective, metallic sheen known as burnishing. Instead, use a very soft pencil like a 6B or 8B and apply many light layers until you reach the desired depth of tone.
Why does my shading look streaky?
Streaks usually occur when you use too much pressure or move the pencil in only one direction. Try switching to a softer pencil and using light, overlapping circular motions to fill in the tooth of the paper more evenly.
Can I use a tissue to blend graphite?
Yes, tissues are effective for blending large areas, but they can sometimes leave lint or texture on the page. Ensure the tissue is clean and unscented, and use a light touch to avoid removing too much of the graphite you have already applied.
This answer was created with the help of AI research tools and reference sources. Spotted an error? Let us know — we correct mistakes quickly. See our editorial policy.