How do you make a pom-pom?
Short answer
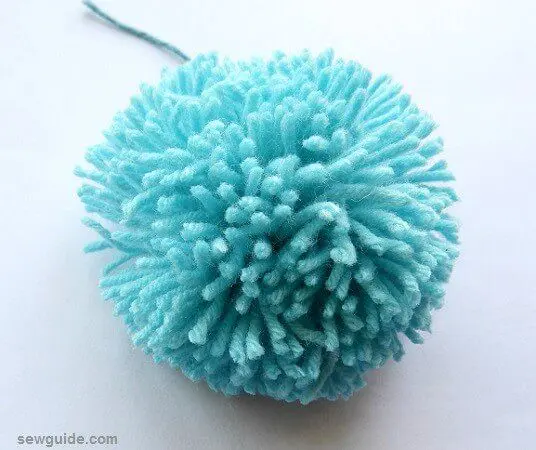
Making a pom-pom involves wrapping yarn around a circular template or cardboard cutout, securing the center with a tight knot, and trimming the loops to create a sphere. By layering yarn densely and using sharp scissors, you can produce a uniform, fluffy pom-pom suitable for hats, scarves, or decorative home crafts.
On this page
How to make a pom-pom with cardboard
Creating a pom-pom using simple cardboard is an accessible method that requires no specialized equipment. You begin by cutting two identical doughnut-shaped discs out of stiff cardboard. The size of the hole in the center determines the density of the pom-pom, while the outer diameter dictates the final size of the finished sphere.
- Place the two cardboard discs together and begin wrapping yarn through the center hole and around the outer edge.
- Continue wrapping until the center hole is nearly filled, ensuring the yarn is distributed evenly for a balanced shape.
- Carefully slide your scissors between the two cardboard discs and cut along the outer edge of the yarn.
- Tie a long piece of yarn tightly between the two cardboard discs to secure the center, then remove the cardboard.
This technique is excellent for beginners because it provides a rigid frame that keeps the yarn in place during the wrapping process. Ensure the center knot is extremely tight to prevent the yarn strands from falling out after the cardboard is removed.
Best yarn for pom-poms
The choice of yarn significantly impacts the final texture and durability of your pom-pom. Acrylic yarn is widely considered the best option for beginners because it is inexpensive, holds its shape well, and is available in a vast array of vibrant colors. Wool is another popular choice, as it offers a luxurious, soft texture and creates a fuller, more substantial pom-pom compared to synthetic alternatives.
Avoid using novelty yarns that feature metallic threads, sequins, or extremely thin, delicate fibers, as these can be difficult to manage and may not hold a tight knot. If you are aiming for a specific aesthetic, consider the weight of the yarn; worsted weight is generally ideal. Using a thicker yarn will require fewer wraps to achieve a dense pom-pom, whereas thinner yarns require more patience but can result in a finer, more intricate texture. Always ensure your yarn is not prone to shedding, as this will lead to a messy finished product.
How long does it take to make a pom-pom
The time required to craft a single pom-pom depends largely on the size of the project and your familiarity with the technique. For a standard four-inch pom-pom, a beginner can expect to spend approximately 15 to 20 minutes from start to finish. This includes the time spent preparing the cardboard templates, wrapping the yarn, securing the center, and performing the final trim to achieve a perfect sphere.
Experienced crafters using specialized plastic pom-pom makers can often complete the process in under 10 minutes. The most time-consuming phase is the wrapping stage, as achieving a dense, high-quality pom-pom requires hundreds of passes around the template. To speed up the process, you can use multiple strands of yarn simultaneously, which fills the template much faster than using a single strand. Regardless of the speed, taking the time to trim the pom-pom properly is essential for a professional appearance, so do not rush the final shaping stage.
Common mistakes when making pom-poms
One of the most frequent errors is failing to secure the center knot tightly enough. If the central tie is loose, the yarn strands will slip out, resulting in a lopsided or falling-apart pom-pom. Always use a strong, non-stretchy material like cotton twine or heavy-duty yarn for the center tie to ensure maximum tension. Another common mistake is uneven trimming, which leaves the pom-pom looking ragged rather than spherical.
- Cutting the yarn too short before the pom-pom is fully shaped.
- Using dull scissors, which causes the yarn to fray or chew rather than cut cleanly.
- Overfilling the template to the point where it becomes impossible to insert the scissors.
- Trimming the pom-pom while the yarn is still damp or tangled, which distorts the final shape.
By avoiding these pitfalls, you ensure that your craft remains sturdy and aesthetically pleasing. Always check that your scissors are sharp before beginning the cutting process, as this is the most critical step for achieving a clean, professional finish.
Why pom-poms look uneven
An uneven pom-pom is usually the result of inconsistent yarn distribution during the wrapping phase or improper trimming techniques. If you wrap more yarn on one side of the template than the other, the resulting pom-pom will appear lopsided. To correct this, rotate the template frequently while wrapping to ensure an even buildup of layers. Additionally, failing to "fluff" the pom-pom before trimming can hide uneven sections, leading to an inaccurate cut.
To achieve a perfect sphere, hold the pom-pom in your palm and trim slowly, rotating it constantly as you work. Use the "haircut" method, where you snip away small amounts of yarn at a time, rather than trying to remove large chunks in one go. If you find that your pom-pom has a flat side, it is often because the center knot was not perfectly centered or the yarn was not distributed evenly around the entire circumference. With practice, you will develop the ability to spot these imbalances early and adjust your wrapping technique accordingly to create perfectly uniform pom-poms every time.
Key facts
- Use wool or acrylic yarn for the best volume and fluffiness.
- Wrap yarn around a cardboard template or a dedicated pom-pom maker at least 80 to 100 times for a dense result.
- Always use sharp fabric scissors to cut through the yarn loops, as dull blades will fray the fibers.
- Tie the center bundle with a double knot using a strong, thin cord like embroidery floss to prevent the pom-pom from falling apart.
- Trim the edges of the finished pom-pom into a perfect sphere to ensure a professional, uniform appearance.
- Avoid using cotton yarn, as it lacks the elasticity needed to maintain a round, bouncy shape over time.
The bottom line
Creating a perfect pom-pom is a straightforward craft that relies on consistent wrapping and precise trimming. By using a sturdy template and high-quality yarn, you can produce dense, professional-looking spheres for various accessories. Remember to secure the center tightly and trim slowly to achieve a balanced shape. With practice, you will master the tension and density required to make durable pom-poms that hold their form beautifully.
People also ask
How do I make a pom-pom without a commercial tool?
You can create a simple template by cutting two identical circles out of sturdy cardboard, each with a smaller hole in the center. Stack the circles together and wrap your yarn around the ring until the center hole is nearly filled.
Why does my pom-pom look uneven after I trim it?
An uneven pom-pom usually occurs when the yarn is not wrapped symmetrically or if the center tie is loose. To fix this, hold the pom-pom firmly and slowly rotate it while trimming small amounts of yarn until the shape becomes uniform.
What is the best way to attach a pom-pom to a hat?
Leave the two long ends of your center tie intact when you finish the pom-pom. Thread these ends through a large tapestry needle and sew them securely into the top of the hat from the inside.
Can I use different colors in one pom-pom?
Yes, you can incorporate multiple colors by wrapping different yarns around the template simultaneously or in specific sections. This technique, known as color-blocking, creates unique patterns like stripes or spots within the finished sphere.
How do I make a pom-pom fluffy again after it has been flattened?
Gently steam the pom-pom by holding it over a boiling kettle for a few seconds, being careful not to touch the steam directly. Once the fibers are slightly damp, shake the pom-pom vigorously to restore its original volume.
What is the ideal size for a standard pom-pom?
Most craft projects, such as scarves or beanies, use pom-poms between two and four inches in diameter. You can adjust the size by changing the diameter of your cardboard template or using an adjustable plastic pom-pom maker.
This answer was created with the help of AI research tools and reference sources. Spotted an error? Let us know — we correct mistakes quickly. See our editorial policy.