How do you draw a map of an island step by step?
Short answer
Drawing an island map requires establishing a rough coastline, defining topographical features like mountains and rivers, and adding cartographic elements for context. By layering these details from broad shapes to fine textures, you create a believable geography. This process balances artistic creativity with the logical rules of nature and physical scale.
On this page
How to sketch the initial island shape
The foundation of any map is the coastline, which dictates the island's character. Avoid drawing perfect circles or smooth ovals, as natural coastlines are jagged and irregular due to erosion and tectonic activity. Instead, start with a light, loose outline that incorporates various bays, peninsulas, and inlets. Think about the geological history of your landmass; a jagged, rocky coast suggests high-energy waves, while a smooth, sandy coast implies calmer, shallower waters.
To create a realistic silhouette, follow these steps:
- Sketch a rough, irregular blob shape on your paper to serve as the base.
- Add "noise" to the edges by drawing small, jagged triangles or gentle curves to break up long, straight segments.
- Incorporate at least one major bay or a protruding cape to provide a focal point for the geography.
- Erase the original guideline marks to leave behind a clean, natural-looking perimeter.
How to add mountains and elevation
Elevation is the primary driver of a map's internal logic, as it dictates how water flows across the terrain. Mountains should not be placed randomly; they often form in chains or clusters along tectonic plate boundaries. When drawing them, use a consistent style, such as simple triangles for a stylized look or more detailed, craggy peaks for a realistic aesthetic. Remember that mountains create "rain shadows," where one side of the range is lush and green while the other is arid.
When placing your topographical features, keep these rules in mind:
- Draw mountain ranges in long, curving lines rather than isolated dots to simulate geological pressure.
- Place higher elevations toward the center or along one side of the island to create a natural slope.
- Use shading on one side of your mountain symbols to indicate light direction, which adds depth and a three-dimensional appearance to the flat surface.
How to map rivers and water features
Rivers are the arteries of an island, and they always follow the path of least resistance from high ground to the sea. They originate in mountains or hills and flow downward, often joining together to form larger waterways. A common mistake is drawing rivers that split as they flow toward the coast; in nature, rivers almost always merge rather than divide, except when they reach a delta at the ocean. Ensure your rivers look organic by using winding, serpentine lines.
Follow this progression to build a drainage system:
- Identify the highest point on your island to act as the source for your primary river.
- Draw a thin, squiggly line moving toward the coast, allowing it to curve around obstacles like hills.
- Add smaller tributaries that feed into the main river, creating a branching pattern similar to the veins of a leaf.
- If the river reaches the coast, consider adding a small fan-shaped delta to show where sediment deposits into the sea.
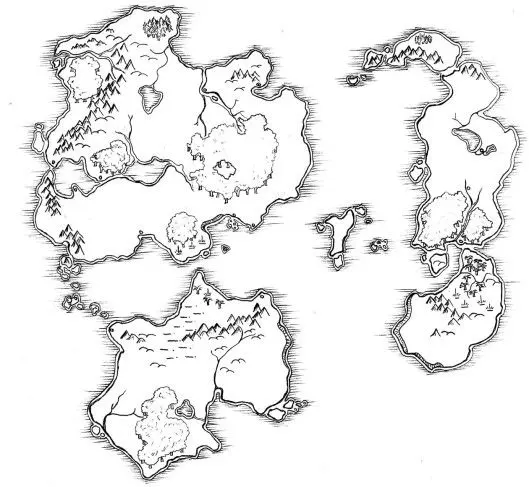
![OC] Hand-drawn map of an island. (names of cties etc. missing so that anybody could use it for their own world](/img/bd/how-do-you-draw-a-map-of-an-island-step-by-step-2.webp)
Best tools for map drawing beginners
You do not need expensive equipment to create a professional-looking map. For beginners, a standard graphite pencil, a fine-liner pen, and a sheet of heavy-weight paper are sufficient. Graphite allows you to lay out the composition and make corrections before committing to ink. Once the layout is finalized, use a waterproof fine-liner to trace the lines, as this ensures the map remains clear if you decide to add color or watercolor washes later.
Consider these essential supplies for your project:
- A set of varying nib sizes (0.1mm to 0.5mm) to differentiate between fine details and bold coastlines.
- A kneaded eraser, which lifts graphite cleanly without damaging the paper fibers.
- A compass or a circular object to help draw accurate scale bars or decorative elements like compass roses.
- High-quality drawing paper with a slight tooth, which helps the ink adhere evenly without bleeding or feathering.
Common mistakes when drawing maps
One of the most frequent errors is failing to establish a sense of scale. Without a scale bar or an understanding of the island's size, the viewer cannot tell if the landmass is a small atoll or a massive continent. Another mistake is overcrowding the map with too many labels or symbols, which obscures the geography. Always prioritize clarity; if a feature is too small to be seen clearly, it is better to omit it or enlarge the scale of the entire map.
To avoid these pitfalls, keep your design clean and intentional:
- Always include a compass rose to orient the viewer, even if it is just a simple "N" arrow.
- Limit your use of decorative flourishes, such as sea monsters or ships, to the corners of the map to avoid cluttering the actual landmass.
- Check your work frequently by holding the map at arm's length to ensure the overall balance and composition remain legible.
Key facts
- Start by sketching a rough, irregular outline to mimic the natural erosion caused by tides and wind.
- Use a consistent scale bar to ensure the proportions of your island remain accurate relative to its size.
- Incorporate topographical features like mountain ranges or valleys to provide a realistic sense of elevation.
- Designate a clear north arrow to establish orientation, which is essential for any functional navigational map.
- Add a legend to explain symbols for vegetation, water sources, and man-made structures like docks or lighthouses.
- Avoid perfectly straight lines for coastlines, as natural islands rarely feature geometric or symmetrical shapes.
The bottom line
Creating an island map requires balancing artistic creativity with geographical accuracy. By starting with an irregular outline, establishing a clear scale, and using standardized symbols for terrain, you transform a blank page into a functional navigational guide. Focus on natural coastal shapes and consistent labeling to ensure your map is both readable and visually compelling. Practice and attention to detail remain the best tools for cartography.
People also ask
What is the most important element to include on a map?
A scale bar is the most critical element because it allows the reader to understand the actual distance between points on the island. Without a scale, the map provides no context for the physical size of the landmass.
Should I use ink or pencil for my initial draft?
Always start with a light graphite pencil to allow for easy corrections as you refine the island's coastal shape. Once the layout is finalized, you can use waterproof ink pens to trace the permanent features and add detail.
How do I represent elevation on a flat piece of paper?
Use contour lines, which are thin lines connecting points of equal elevation, to illustrate hills and mountains. Alternatively, you can use shading or hachures to create a visual sense of depth and terrain height.
Why is a compass rose necessary for a map?
A compass rose provides the cardinal directions, ensuring that the map is properly oriented toward true north. This allows for accurate navigation and helps the viewer understand the spatial relationship between different island landmarks.
What are common mistakes when drawing coastlines?
A common error is drawing coastlines that are too smooth or circular, which looks unnatural. Real islands have jagged edges, inlets, and peninsulas formed by geological processes that require varied, irregular strokes.
How do I make my map look authentic?
Adding texture, such as stippling for sandy beaches or cross-hatching for dense forests, adds visual depth. Including a decorative border or historical-style lettering can also provide a professional aesthetic to your cartographic work.
This answer was created with the help of AI research tools and reference sources. Spotted an error? Let us know — we correct mistakes quickly. See our editorial policy.