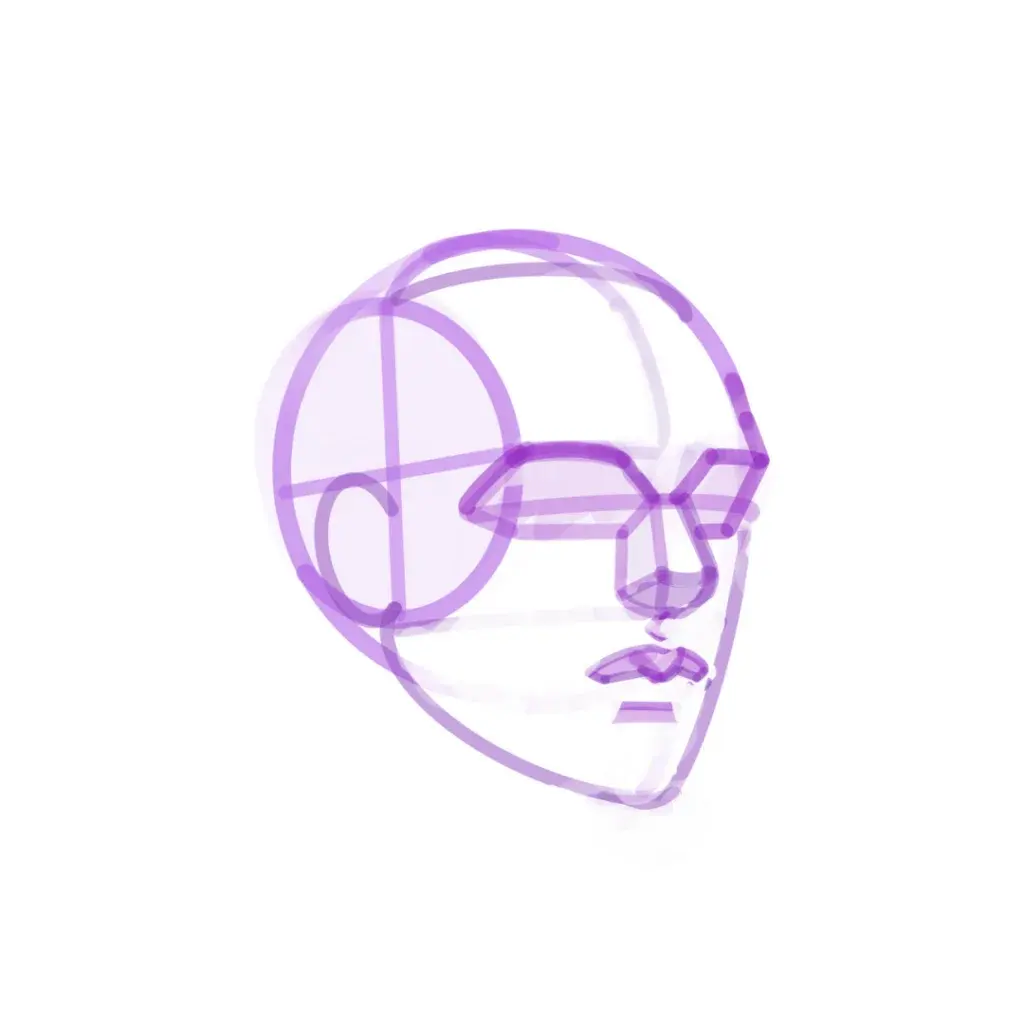
What is the Loomis method?
Short answer
The Loomis method is a system of anatomical construction developed by illustrator Andrew Loomis to draw the human head and figure accurately from any angle. By utilizing geometric primitives like spheres and planes, it provides a reliable framework for artists to maintain correct proportions, perspective, and structural integrity in their drawings.
On this page
What is the Loomis method for head drawing?
The Loomis method is primarily recognized for its systematic approach to constructing the human head. Andrew Loomis, a prominent American illustrator active in the mid-20th century, introduced this technique in his influential 1943 book, Fun with a Pencil. The core concept involves breaking the complex, irregular shape of the human skull into simple, manageable geometric forms. By starting with a sphere and then slicing it to create flat planes, artists can establish the brow line, the nose line, and the chin placement before adding any facial features.
This structural approach ensures that the artist maintains consistent proportions regardless of the head's rotation or tilt. Instead of guessing where the eyes or ears should sit, the practitioner relies on fixed landmarks established by the initial sphere. This method is highly favored in both fine art and commercial illustration because it allows for rapid, accurate sketching from imagination. By mastering this underlying "mannequin" head, artists can eventually simplify the process further, relying on muscle memory to construct faces without needing to draw every geometric guide.
How to use the Loomis method step-by-step
To begin using the Loomis method for a basic front-facing head, follow these essential steps to ensure your proportions remain consistent throughout the drawing process:
- Draw a perfect circle to represent the cranium.
- Bisect the circle with a vertical line for the center of the face and a horizontal line for the brow.
- Slice the sides of the circle to create flat planes, which helps define the width of the head.
- Add a smaller circle or oval below the brow line to designate the nose and jaw area.
- Extend the vertical center line downward to mark the chin, ensuring the distance from the brow to the nose equals the distance from the nose to the chin.
Once these landmarks are established, you can map out the placement of the eyes, ears, and mouth. The top of the ears typically aligns with the brow line, while the bottom of the ears aligns with the base of the nose. By following this rigid order, you eliminate the common issue of features drifting across the face or appearing misaligned in perspective.
Why use the Loomis method for perspective?
Perspective is often the most challenging aspect of figure drawing, particularly when the head is tilted up or down. The Loomis method excels here because the sphere acts as a three-dimensional guide that exists in space. When the head looks upward, the horizontal lines on the sphere curve into ellipses, signaling the change in viewpoint. This geometric logic forces the artist to think in terms of volume rather than flat outlines, which is the key to creating a sense of depth and realism in a two-dimensional image.
By treating the head as a ball with a flat side, the artist can easily rotate this "prop" in their mind. This mental rotation is essential for artists who want to draw characters in dynamic poses or complex action sequences. Because the Loomis method provides a clear, mathematical relationship between the various parts of the skull, it prevents the common mistake of "stretching" the face when attempting to draw a character looking toward the sky or ground.
Common mistakes when using the Loomis method
Many beginners struggle with the Loomis method because they rush the initial construction phase or misunderstand the underlying geometry. One frequent error is drawing an oval instead of a perfect circle for the cranium. An oval lacks the mathematical consistency provided by a circle, which makes it difficult to calculate the correct placement of the jaw and the side planes. Another common mistake is ignoring the "side plane" of the head, which is crucial for defining the temple and the cheekbone area.
- Skipping the construction lines, which leads to asymmetrical facial features.
- Making the chin too narrow or too wide, which distorts the entire jawline.
- Failing to adjust the center line when the head is turned, causing the features to look "pasted on" rather than wrapped around the skull.
- Neglecting to practice the method from multiple angles, which limits the artist to only front-facing portraits.
To avoid these pitfalls, practice drawing the "Loomis head" repeatedly from different angles until the process becomes intuitive. Focus on the relationship between the brow line and the base of the nose, as this is the most critical measurement for establishing the face's length.
How long does it take to master the Loomis method?
Mastering the Loomis method is a journey that varies based on an artist's commitment to daily practice. While you can learn the basic steps in a single afternoon, internalizing the system so that you can draw heads from any angle without guides takes months of consistent effort. Most professional artists spend years refining their understanding of these proportions, eventually moving toward a more stylized or simplified version of the method. The goal is not to draw the construction lines forever, but to use them as a scaffold until you can visualize the underlying structure automatically.
To accelerate your progress, try setting a timer for 10 minutes each day to draw as many "Loomis heads" as possible. Do not worry about adding hair, skin texture, or fine details during these sessions. Instead, focus entirely on the placement of the sphere, the side planes, and the jaw. By isolating the construction process from the rendering process, you will develop the spatial awareness necessary to draw convincing heads from your imagination. Over time, you will find that your sketches become more accurate and your confidence in handling complex angles grows significantly.
Key facts
- The Loomis method is a system for drawing the human head from any angle using a sphere and a set of proportional guidelines.
- It was developed by American illustrator Andrew Loomis and introduced in his 1943 book, Fun with a Pencil.
- The technique relies on dividing a sphere into three equal sections to locate the hairline, brow line, and nose line.
- It is designed to help artists maintain correct anatomical proportions without needing a live model present.
- The method uses a "side plane" of the head, represented by a smaller circle, to establish the depth of the skull.
- A common mistake is drawing the sphere as a perfect circle rather than adjusting for perspective, which flattens the drawing.
The bottom line
The Loomis method remains a cornerstone of figurative art education because it transforms the daunting complexity of the human head into manageable geometric steps. By utilizing a sphere and consistent proportional lines, artists can construct accurate heads from any perspective. While it requires practice to move beyond basic templates, this system provides the essential structural framework needed to achieve professional-level anatomical accuracy in portraiture.
People also ask
Is the Loomis method suitable for beginners?
Yes, it is widely considered the best starting point for beginners because it simplifies complex anatomy into basic geometric shapes. By mastering these proportions, students build a strong foundation before moving on to more advanced anatomical studies.
Can this method be used to draw different face shapes?
Absolutely, the method serves as a structural base that can be modified to fit any facial structure. Once the basic sphere and planes are established, you can adjust the jawline and features to capture unique likenesses.
How long does it take to master the Loomis method?
While the basic steps can be learned in a few hours, true proficiency requires consistent practice over several months. Artists typically spend time drawing the head from various angles to internalize the spatial relationships.
Do I need to know human anatomy to use this system?
You do not need deep medical knowledge, but understanding basic skull landmarks helps significantly. The system acts as a shortcut that mimics the underlying structure of the cranium and jaw.
Why do some artists avoid using the Loomis method?
Some critics argue that the method can lead to stiff or overly stylized results if followed too rigidly. Experienced artists often use it as a starting guide but deviate from the strict measurements to add organic character.
Does the method work for drawing heads in profile?
Yes, the system is highly effective for profile views because the side plane of the head is clearly defined. By rotating the sphere and aligning the features along the established axes, you can maintain perfect proportions from the side.
This answer was created with the help of AI research tools and reference sources. Spotted an error? Let us know — we correct mistakes quickly. See our editorial policy.