How can I draw a scarf easily?
Short answer
Drawing a scarf is best approached by first sketching a simple, flowing ribbon shape that establishes the garment's movement. By adding thickness to the edges and incorporating rhythmic, repeating folds, you create a convincing sense of fabric. Focus on the drape and weight of the material to achieve a realistic, professional look.
On this page
How to draw a scarf step by step
To begin drawing a scarf, start by visualizing the path it takes around the neck or shoulders. Use a light pencil to draw two parallel, wavy lines that represent the length of the fabric. These lines should curve naturally to suggest the weight of the material as it hangs or wraps. Once the basic path is established, you can refine the silhouette to make it look more organic.
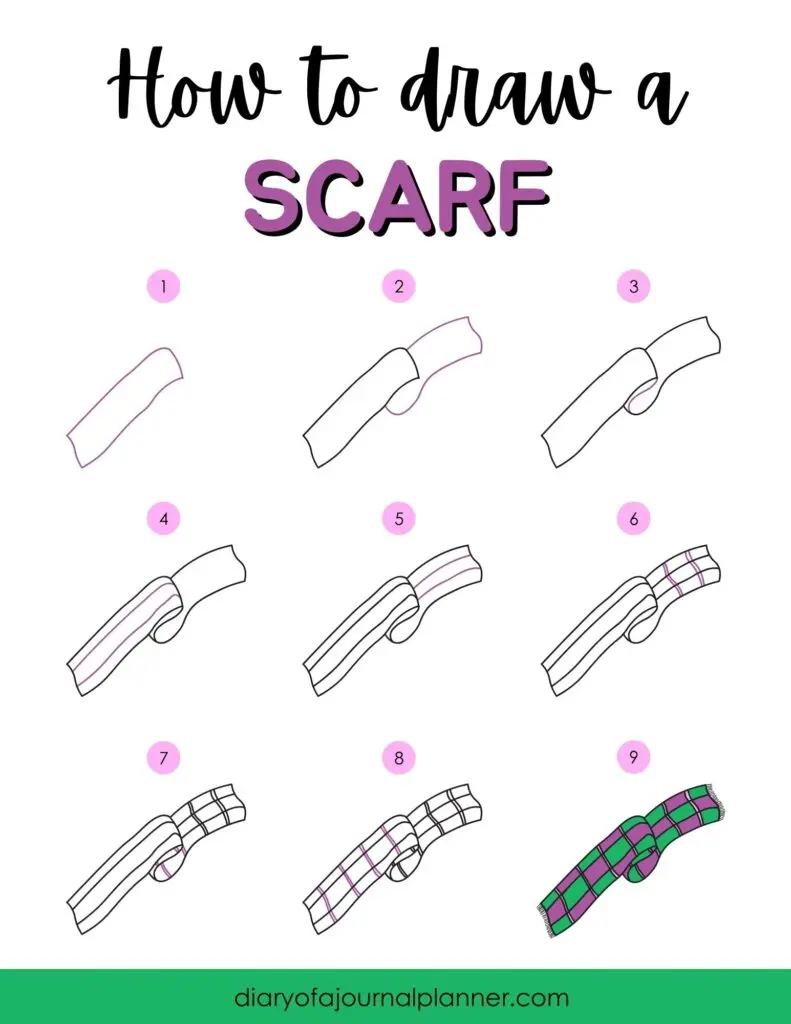
Follow these steps to build the structure:
- Draw a loose, elongated "S" curve to define the main body of the scarf.
- Add a second parallel line to provide thickness, ensuring the distance between lines remains consistent.
- Close the ends of the scarf with slightly curved lines to represent the hems or fringe.
- Add small, V-shaped marks along the edges to indicate folds or creases where the fabric bends.
Best drawing techniques for beginners
When starting out, focus on the concept of "flow." A scarf is a flexible object, so rigid, straight lines will make it look stiff and unnatural. Instead, prioritize long, sweeping strokes that follow the intended motion of the fabric. If you are drawing a scarf draped over a neck, ensure the lines hug the contours of the shoulders to show that the object has physical volume and is interacting with the body.
Practicing with different types of fabric textures can also improve your results. For a thinner, silk-like scarf, use lighter, more delicate lines with tighter, more frequent folds. For a thick, knitted winter scarf, use bolder, heavier lines and simplify the folds to suggest bulk. Always keep your initial sketch lines very light so you can easily erase or adjust them as you refine the final shape.
Why fabric folds look realistic
The secret to realistic fabric lies in understanding how gravity and tension affect material. Folds, or "drapery," occur when fabric is compressed or pulled. When drawing a scarf, look for the points of tension, such as where the fabric loops around the neck or where it hangs over an edge. These areas will naturally have more concentrated folds, while the flatter sections of the scarf will have fewer, softer lines.
To make your drawing appear three-dimensional, use shading to define the depth of the folds. Darken the inner corners of the creases and leave the raised parts of the fabric lighter. This contrast mimics the way light hits a real object, creating highlights and shadows. Remember that the direction of your shading lines should follow the curve of the fabric, which helps the viewer perceive the scarf's volume and orientation in space.
Common mistakes when drawing scarves
One of the most frequent errors is making the scarf look like a flat, paper-thin ribbon. This usually happens when the artist ignores the thickness of the fabric at the ends or edges. Always remember to show the "inside" of the scarf where it folds or turns, as this provides the necessary depth. If the scarf is wrapped around a neck, ensure the lines disappear behind the neck and reappear on the other side to maintain a sense of continuity.
Another common mistake is over-complicating the folds. Adding too many lines can make the fabric look cluttered or messy rather than realistic. Start with the primary, larger folds first, and only add smaller, secondary wrinkles if they are necessary to define the shape. If you find your drawing looks too busy, step back and simplify your lines, focusing only on the most prominent curves that define the scarf’s overall movement.
How to add details and texture
Once the basic structure and shading are complete, you can enhance the drawing with details like fringe, patterns, or knit textures. Fringe is easy to add by drawing short, individual lines at the ends of the scarf, varying their length slightly to make them look natural. If you want to add a pattern, such as stripes or plaid, draw the lines lightly first, following the contours of the folds so the pattern appears to wrap around the fabric correctly.
For a knitted look, use a cross-hatch pattern or small, repeating "V" shapes across the surface of the scarf. This adds a tactile quality that makes the viewer feel the warmth and weight of the garment. Remember to adjust the scale of these patterns based on the folds; they should appear slightly distorted or compressed where the fabric bends. By layering these small details over your solid structural foundation, you transform a simple shape into a convincing, high-quality illustration.
Key facts
- A scarf is essentially a long, thin rectangle that can be draped, knotted, or folded.
- To create a sense of movement, draw the scarf with gentle, flowing "S" curves rather than straight lines.
- Add weight to the fabric by drawing small, V-shaped folds where the scarf bends or knots.
- Use parallel lines to define the edges, ensuring the width remains consistent throughout the length.
- Fringes are best represented by drawing short, slightly irregular vertical lines at the ends of the scarf.
- Shading the underside of the folds creates depth and helps the scarf appear three-dimensional.
The bottom line
Drawing a scarf is an exercise in capturing fluid motion and soft volume. By focusing on gentle curves, consistent width, and strategic shading, you can transform simple lines into a realistic accessory. Remember that fabric is dynamic; it reacts to gravity and movement. Practice by observing how real scarves drape over objects, and focus on adding small details like fringes or textures to complete your illustration.
People also ask
How do I make the scarf look like it is blowing in the wind?
Draw long, sweeping curves that extend away from the body to suggest motion. Ensure the fabric ripples consistently in one direction to maintain a realistic flow.
Should I draw the scarf before or after the person wearing it?
It is easiest to draw the person first to determine the scarf’s placement. Once the neck and shoulders are defined, you can drape the scarf naturally over them.
How can I show the texture of a knitted scarf?
Use a cross-hatch pattern or small repeating "X" marks across the surface of the drawing. This mimics the look of woven yarn without requiring you to draw every individual stitch.
What is the most common mistake when drawing a scarf?
The most frequent error is making the scarf look rigid or flat. Avoid using perfectly straight lines; always introduce slight curves to represent the flexibility of fabric.
How do I draw a scarf tied in a knot?
Draw two overlapping loops to form the center of the knot. Extend the ends of the scarf from underneath these loops to show where the fabric emerges.
How do I add shadows to the scarf?
Identify the light source and darken the areas tucked behind folds or underneath the chin. Use light, soft pencil strokes to create smooth transitions between highlights and shadows.
This answer was created with the help of AI research tools and reference sources. Spotted an error? Let us know — we correct mistakes quickly. See our editorial policy.