What is the easiest way to draw a back?
Short answer
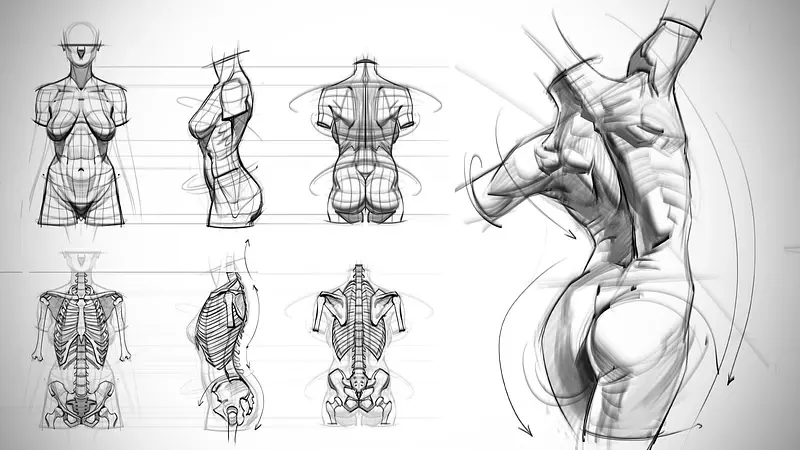
The easiest way to draw a back is to simplify the complex anatomy into a basic "shield" or "hourglass" shape. Focus on the spine as a central line, then block out the trapezoid of the upper back and the V-shape of the lats. This structural approach ensures correct proportions before adding muscle definition.
On this page
How to simplify back anatomy for beginners
Drawing the back is often intimidating because of the numerous overlapping muscle groups. To simplify this, visualize the back as a collection of three primary geometric shapes. The upper section is a broad trapezoid that connects the neck to the shoulders. The mid-section forms a V-shape created by the latissimus dorsi muscles, which taper down toward the waist. Finally, the lower back serves as a rectangular base that connects to the hips. By focusing on these three blocks, you avoid getting lost in the details of individual muscle fibers.
Start by drawing a vertical line representing the spine, which acts as your anchor. This line curves slightly to suggest the natural posture of the subject. Once the spine is established, map out the shoulder blades, or scapulae, as two flattened triangles near the top. Keeping these shapes simple allows you to maintain balance and symmetry across the entire torso. Once the framework is solid, you can refine the curves to represent the specific musculature of your subject.
Best techniques for drawing back muscles
The muscles of the back are defined by their relationship to the skeletal structure. The trapezius is the most prominent muscle, spanning from the base of the skull to the middle of the spine. Below this, the latissimus dorsi muscles wrap around the sides of the torso, creating the characteristic "V-taper" seen in athletic figures. To render these effectively, use light, flowing lines that follow the direction of the muscle fibers rather than harsh, jagged outlines.
- Establish the spine as your central axis.
- Sketch the trapezius as a large, flattened diamond shape.
- Draw the latissimus dorsi as wings extending from the spine to the armpits.
- Add the erector spinae muscles as two vertical columns running parallel to the lower spine.
- Soften the transitions between these shapes with subtle shading to create depth.
By layering these shapes, you create a realistic sense of volume. Remember that muscles are soft tissues that stretch and compress based on the subject's movement, so avoid drawing them as rigid, static blocks.
How to use shading to create depth
Shading is the most effective tool for transforming a flat drawing into a three-dimensional form. Because the back is a curved surface, light will hit it unevenly, creating natural highlights and shadows. Identify your light source first, then apply darker tones to the areas where muscles overlap or tuck into the spine. The deepest shadows usually occur along the central spinal groove and beneath the shoulder blades, where the muscles are most recessed.
Use a soft graphite pencil to build up tones gradually rather than pressing hard immediately. Start with a light wash of gray across the entire back, then darken the areas that are further from the light source. A common technique is to use "cross-hatching" to suggest the texture of skin over muscle. By keeping the highlights crisp and the shadows soft, you emphasize the muscular structure without needing to draw every single anatomical detail. Always check that your shadows follow the rounded contours of the body.
Common mistakes when drawing the back
One of the most frequent errors is making the back too flat or board-like. Beginners often forget that the rib cage and pelvis are curved, which forces the muscles to wrap around the frame. Another common mistake is misplacing the shoulder blades, which should sit flat against the rib cage rather than floating away from it. If the shoulder blades are drawn too far apart, the back will look unnaturally wide and distorted.
- Drawing the spine as a perfectly straight line, which ignores the natural S-curve of the human body.
- Over-defining every muscle group, which makes the subject look like an anatomy textbook rather than a person.
- Failing to account for the thickness of the torso, leading to a drawing that looks like a thin sheet of paper.
- Ignoring the connection between the neck and the shoulders, resulting in a "detached" head appearance.
Avoiding these pitfalls requires constant observation of reference images. Always compare your drawing to a real silhouette to ensure the proportions remain grounded in reality.
How to practice drawing the back effectively
Consistent practice is the only way to master the complexities of human anatomy. Start by sketching from life or high-quality photographs, focusing on one section of the back at a time. Spend a week drawing only the upper back, then move on to the lower back and the waist. This modular approach prevents you from feeling overwhelmed by the entire figure. You can also trace over photographs to understand how the muscles shift during different movements, such as reaching or bending.
- Set a timer for 10-minute "gesture" sketches to capture the pose quickly.
- Spend longer sessions, around 30 minutes, refining the anatomical accuracy of your sketches.
- Use a mirror to study your own back muscles while moving your arms.
- Keep a sketchbook dedicated to torso studies to track your progress over several months.
By analyzing how the back changes when the arms move, you will develop an intuitive understanding of the underlying mechanics. With patience and repetition, the process of drawing the back will become second nature, allowing you to focus on the artistic expression of your subject.
Key facts
- The human back is anchored by the spine, which acts as a gentle "S" curve rather than a straight line.
- Use a "trapezoid" shape to outline the upper torso, narrowing slightly at the waist for a natural silhouette.
- The shoulder blades, or scapulae, sit on the upper back and move outward when the arms are raised.
- The latissimus dorsi muscles create a V-shape that tapers from the armpits down toward the lower back.
- Always mark the center line of the spine to ensure symmetry between the left and right sides.
- Keep the lower back narrower than the shoulders to establish a balanced and realistic anatomical structure.
The bottom line
Drawing a back effectively requires prioritizing the underlying skeletal structure before adding muscle mass. By establishing the spine’s natural curve and the taper of the torso, you create a believable foundation. Focus on the relationship between the shoulder blades and the latissimus dorsi to define movement. With consistent practice and careful observation of anatomical references, you will master the balance between structural accuracy and fluid artistic expression.
People also ask
How do I draw the spine correctly?
Draw a soft, flowing line that curves slightly inward at the neck and lower back. This "S" shape provides the necessary structural foundation for the rest of the back muscles.
Should I draw the muscles as individual shapes?
Avoid drawing every muscle as a distinct bubble. Instead, focus on the overall silhouette and use subtle shading to suggest the depth of the spinal groove.
How do shoulder blades move?
Shoulder blades are triangular bones that shift position based on arm movement. When the arms are at the sides, they lie flat; when reaching forward, they rotate outward.
What is the biggest mistake beginners make?
Beginners often draw the back too wide or perfectly rectangular. Remember that the human torso is organic and tapers significantly toward the hips.
How do I show muscle definition?
Use light, directional hatching to indicate the curve of the latissimus dorsi and the trapezius. Keep your lines soft to avoid making the muscles look like rigid armor.
Is it better to use a reference photo?
Using a reference is essential for understanding complex anatomy. Even experienced artists use photos to capture the subtle tension and weight distribution of the human body.
This answer was created with the help of AI research tools and reference sources. Spotted an error? Let us know — we correct mistakes quickly. See our editorial policy.