How do you draw a wrench?
Short answer
Drawing a wrench requires breaking the tool into simple geometric shapes: a long, rectangular handle and two distinct heads. Start by sketching a central axis line for symmetry. Add a U-shaped open end at one side and a circular or hexagonal box end at the other, then refine the contours for realism.
On this page
How to sketch the basic shape of a wrench
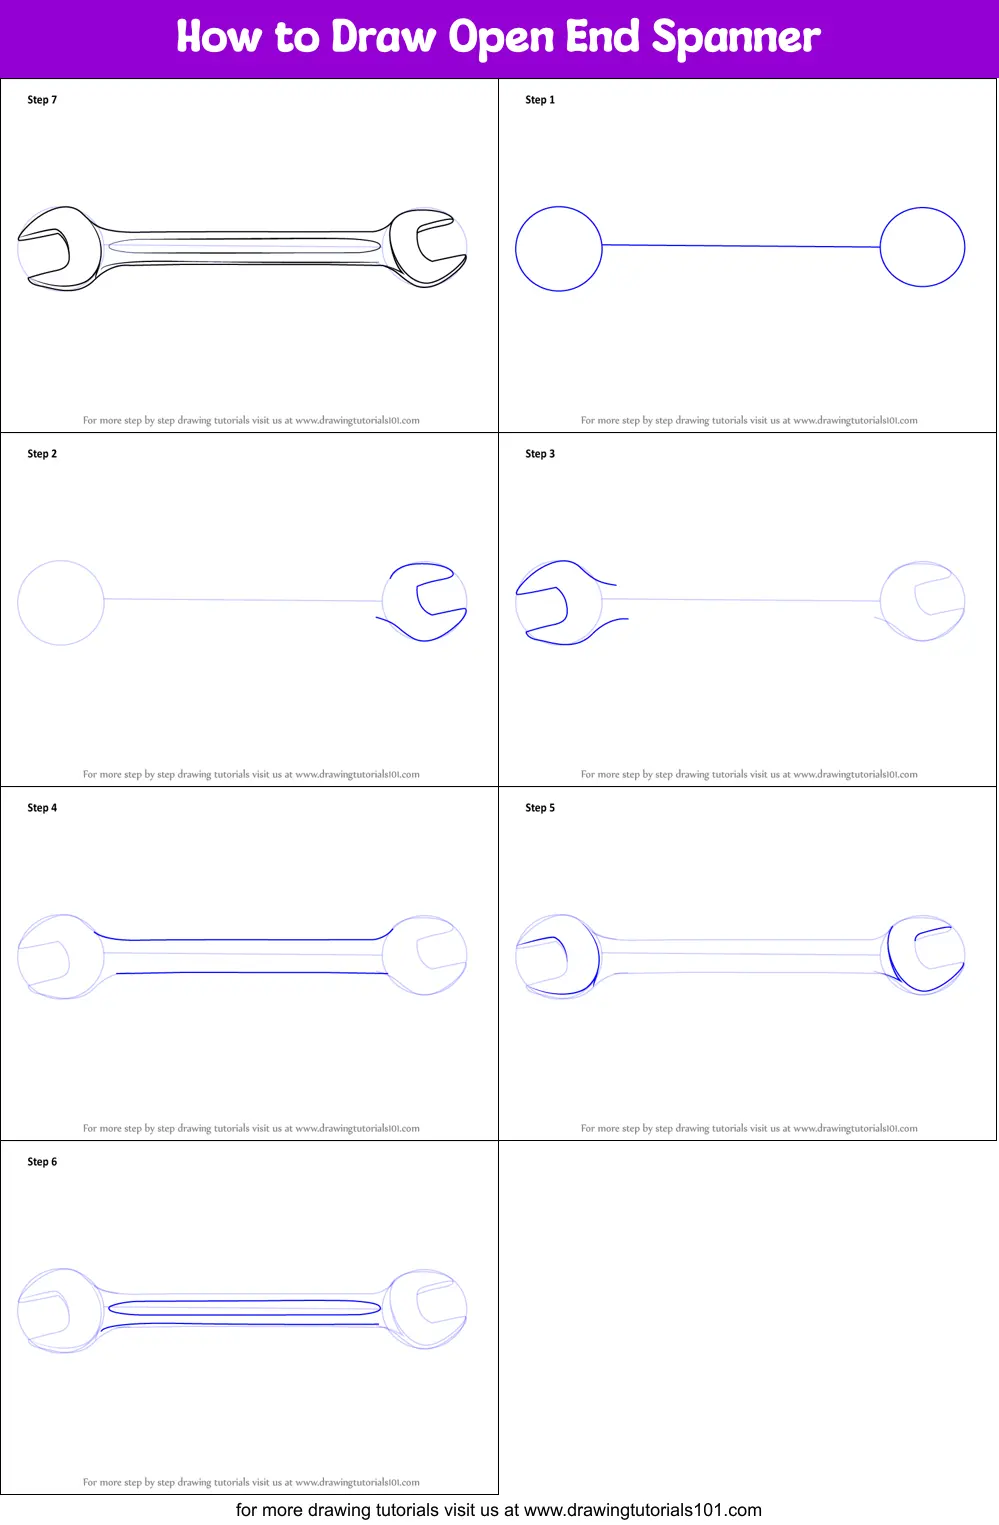
To begin your drawing, focus on the structural anatomy of a standard combination wrench. Every wrench consists of a central beam, an open-ended jaw, and a box-end ring. Start by drawing a light horizontal construction line to serve as the spine of the tool. This ensures your final drawing remains straight and proportional.
Next, sketch two parallel lines along your axis to define the handle. Most wrenches feature a slight taper, becoming thicker near the heads to provide structural integrity. Use these steps to establish your foundation:
- Draw a long, thin rectangle centered on your axis line.
- Sketch a small circle at one end to represent the box-end opening.
- Draw a U-shape at the opposite end to represent the open-ended jaw.
- Connect these shapes to the handle using smooth, gentle curves.
How to add detail to the wrench head
The heads are the most recognizable parts of a wrench, so precision here is vital. For the open-ended side, the U-shape must have two parallel inner faces that grip a bolt. Ensure the outer edges of the jaw are rounded to give the tool a forged, metallic appearance. Adding a slight bevel to the inner edges suggests the thickness of the steel.
For the box end, draw a smaller concentric circle inside the main ring to represent the internal wall. To make it look like a professional tool, divide the interior of this circle into a hexagon or a twelve-point star pattern. This detail indicates where the fastener sits. Remember that the head is typically wider than the handle, so make sure the transition point is clearly defined with a smooth, curved shoulder.
Best techniques for shading a metal wrench
Shading is essential to convey the reflective, metallic quality of steel. Since wrenches are made of polished or chrome-plated metal, they feature high-contrast highlights and deep shadows. Identify a consistent light source before you begin. Place your darkest shadows along the bottom edges of the handle and the undersides of the wrench heads.
Use a smooth gradient to transition from dark shadows to bright, white highlights on the top surfaces. A common technique is to leave thin, unshaded strips along the edges of the handle to simulate the reflection of light on curved metal. Apply these shading principles:
- Use a hard-edged pencil for the outlines and a softer lead for the shadows.
- Keep your highlights sharp to mimic the look of polished chrome.
- Use a blending stump or a piece of tissue to create smooth transitions between tones.
- Add small, bright white spots using an eraser to emphasize the metallic glint.
Common mistakes when drawing a wrench
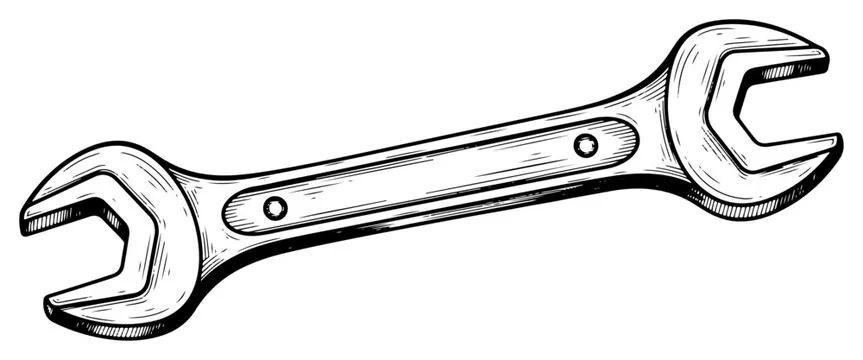
One of the most frequent errors is making the wrench handle perfectly uniform. In reality, wrenches are designed with ergonomic curves; a handle that is too stiff or flat will look like a plastic toy rather than a heavy-duty tool. Avoid drawing the handle as a simple, flat strip. Instead, incorporate a slight curve or a subtle "I-beam" profile to give it depth and weight.
Another mistake involves the proportions of the jaws. If the open end is too wide or the box end is too small, the tool will appear non-functional. Always check that the opening of the jaw aligns with the central axis of the handle. If the jaw is tilted at an odd angle, the wrench will lose its realistic appearance. Take a moment to look at a real wrench or a photograph to ensure your angles match the mechanical reality of the tool.
Why perspective matters in technical drawing
Even a simple object like a wrench benefits from basic perspective. If you draw the wrench from a slight angle, it gains a three-dimensional quality that a flat, side-view drawing lacks. Consider the "foreshortening" effect, where the end of the wrench closer to the viewer appears slightly larger than the end further away. This subtle adjustment makes your drawing look professional and grounded in space.
To master this, practice drawing the wrench in a diagonal orientation rather than perfectly horizontal. This forces you to account for the thickness of the metal and the way light wraps around the cylindrical handle. By focusing on the interplay between the handle’s length and the heads’ volume, you transition from a simple sketch to a sophisticated technical illustration. Keep your lines clean and your proportions consistent to ensure the final result looks like a functional, high-quality piece of equipment ready for use in any workshop.
Key facts
- Start by drawing two overlapping circles to establish the size and spacing of the wrench jaws.
- Use a straight-edge ruler to ensure the handle maintains a consistent width and parallel sides.
- Connect the jaws to the handle using gentle, sweeping curves to represent the tapered neck of the tool.
- Add a small, rectangular cutout at the end of the handle to depict the common hanging hole.
- Apply shading on one side of the handle and the inner curve of the jaws to create a three-dimensional metallic effect.
- Use a white gel pen or eraser to add a thin highlight line along the center of the handle to simulate polished steel.
The bottom line
Drawing a realistic wrench relies on mastering basic geometry and light reflection. By starting with simple circles and straight lines, you can build a stable foundation before refining the curves and adding metallic shading. Focus on maintaining parallel handle edges and consistent shadows to ensure the final image appears solid and professional. With practice, these structural techniques allow you to illustrate any hand tool with precision.
People also ask
What is the most common type of wrench to draw?
The open-ended wrench is the standard choice because its iconic U-shaped jaw is easily recognizable and simple to construct using basic geometric shapes.
Should I use ink or pencil for the initial sketch?
Always start with a light graphite pencil to lay out your proportions, as you will need to erase the overlapping construction lines once the final outline is complete.
How do I make the wrench look like metal?
Use a gradient shading technique where you transition from dark grey at the edges to bright white in the center, which mimics the way light reflects off curved steel surfaces.
Why does my wrench drawing look flat?
A drawing often looks flat because it lacks a consistent light source; ensure all your shadows are placed on the same side of the object to create depth.
What is the standard length-to-width ratio for a wrench handle?
While it varies by size, a professional-looking wrench handle is typically about eight to ten times longer than its width, depending on the intended torque capacity.
Can I draw a wrench without using a ruler?
While you can draw freehand, a ruler is highly recommended for the handle to ensure the edges are perfectly straight, which is a defining characteristic of manufactured metal tools.
This answer was created with the help of AI research tools and reference sources. Spotted an error? Let us know — we correct mistakes quickly. See our editorial policy.