How do you draw a chipmunk?
Short answer
Drawing a chipmunk involves capturing its compact, rounded shape and signature facial stripes. Start by sketching basic geometric forms to establish the body proportions. Focus on the large, expressive eyes and the bushy, flicked tail. By layering simple shapes and adding distinct fur textures, you can create a lifelike, recognizable chipmunk illustration.
On this page
How to sketch basic chipmunk proportions
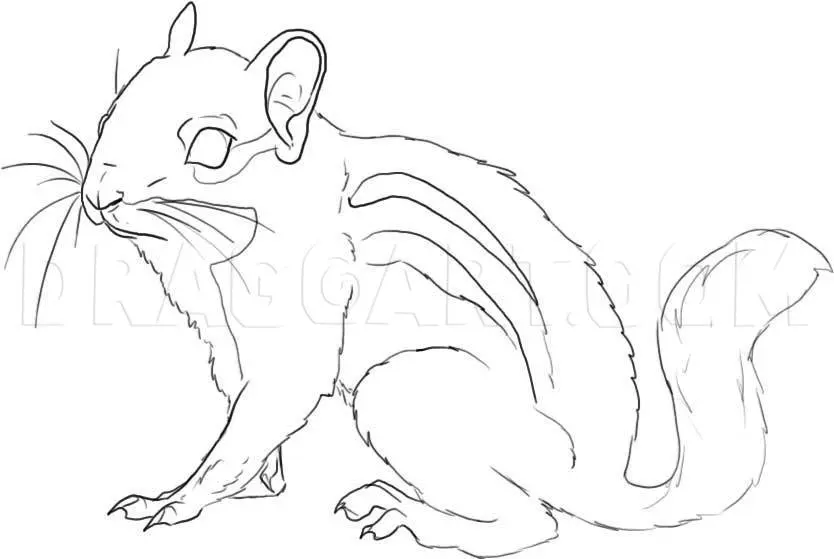
The key to a realistic chipmunk is capturing its small, stout physique. Begin by drawing a horizontal oval for the main body and a smaller, slightly flattened circle for the head. Place the head overlapping the upper third of the body oval. A chipmunk’s neck is barely visible, so keep these two shapes close together to maintain that characteristic "chunky" silhouette.
Once your foundation is set, add guidelines for the limbs and tail. Draw two small ovals near the bottom of the body for the hind legs and two thin, angled lines for the front paws. Add a long, curved shape extending from the rear to represent the tail. Keep your lines light during this stage, as you will refine the anatomy later.
- Draw a large oval for the torso.
- Add a smaller circle for the head.
- Sketch a curved, bushy shape for the tail.
- Position small circles for the hind haunches.
Best drawing tools for beginners
For those new to wildlife sketching, graphite pencils are the most forgiving medium. Start with an HB pencil for your initial structural outlines, as it is easy to erase if you make a mistake. Once the proportions are correct, switch to a 2B or 4B pencil to add depth, shadows, and the darker fur textures that define the chipmunk’s appearance.
High-quality drawing paper with a slight tooth, or texture, is ideal for capturing fur details. Avoid smooth printer paper, as it can make shading look muddy and uneven. If you want to add color, colored pencils allow for precise layering of the chipmunk’s earthy tones, such as reddish-browns, creams, and deep blacks. Using a kneaded eraser is also essential for lifting graphite to create highlights in the eyes.
- HB pencil for light construction lines.
- 2B or 4B pencils for shading and detail.
- Kneaded eraser for precision highlights.
- Textured drawing paper for better graphite adherence.
How to draw chipmunk facial features
The face is the most recognizable part of a chipmunk. Start by drawing two horizontal lines across the face to map out the placement of the dark stripes. These stripes should run from the nose, through the eye, and toward the back of the head. Ensure the eyes are large, round, and positioned on the sides of the head to reflect their natural anatomy.
The nose should be small and triangular, positioned at the very tip of the snout. Below the nose, add a tiny, curved mouth line. The ears are relatively large and rounded, sitting high on the head. When shading the face, use short, quick pencil strokes to mimic the direction of fur growth, moving outward from the nose and eyes to create a natural, soft appearance.
- Sketch the horizontal stripes running from the nose.
- Place large, dark, circular eyes within the stripes.
- Add rounded ears at the top of the head.
- Detail the small, triangular nose and subtle mouth.
Common mistakes when drawing chipmunks
A frequent error is making the body too elongated, which makes the chipmunk look more like a squirrel or a weasel. Remember that chipmunks are compact; their legs should appear tucked close to the body rather than stretched out. Another mistake is forgetting the white or cream-colored underbelly, which provides a necessary contrast to the darker, striped back.
Beginners often draw the tail too thin or straight. A chipmunk’s tail is naturally bushy and often held in a slight curve or flicked upward. If the tail looks like a simple line, the drawing will lose its sense of volume. Additionally, avoid drawing the stripes as perfectly straight lines; they should follow the natural contour of the animal’s back, curving slightly with the shape of the body.
- Avoid elongated bodies; keep the frame stout and round.
- Do not forget the contrast between the dark back and light belly.
- Ensure the tail has volume and a natural, bushy curve.
- Curve stripes to match the animal’s anatomy rather than drawing straight lines.
How to add realistic fur texture
To give your chipmunk a lifelike quality, focus on the direction of the fur. Fur never grows in a uniform direction; it radiates from the face and flows toward the tail. Use short, flicking motions with your pencil to create individual hairs. Start by shading the darker areas first, then use your eraser to pull out lighter strands of fur, which creates a realistic, layered effect.
Pay special attention to the transition between the dark stripes and the lighter fur on the sides. Use a blending stump or a soft cloth to gently smudge the edges of the stripes so they do not look like harsh, disconnected lines. Finally, add a small, bright white dot in the pupil of the eye to provide a "sparkle," which instantly brings the portrait to life and makes the chipmunk appear alert and curious.
Key facts
- Chipmunks are characterized by five distinct dark stripes running down their backs and faces.
- Their bodies are small and compact, typically measuring 8 to 10 inches in length including the tail.
- Always sketch a large oval for the body and a smaller circle for the head to establish proportions first.
- Use quick, short pencil strokes to mimic the texture of fur rather than drawing solid, smooth outlines.
- A chipmunk’s tail is bushy and flattened, distinct from the rounder, plume-like tail of a tree squirrel.
- Focus on the large, dark, round eye, which is a focal point that gives the creature its expressive appearance.
The bottom line
Drawing a chipmunk successfully relies on capturing its compact, energetic posture and its signature facial markings. By establishing basic geometric shapes first and layering texture with short, directional pencil strokes, you can create a lifelike representation. Remember to prioritize the distinct striped pattern and the expressive, large eyes. With practice, these small details will bring your illustration to life while maintaining the animal's recognizable, charming character.
People also ask
What is the most common mistake when drawing a chipmunk?
Beginners often draw the ears too small or too far apart on the head. Chipmunk ears are relatively large, rounded, and sit high on the skull to help them detect predators.
Should I use ink or pencil for drawing a chipmunk?
Pencil is recommended for beginners because it allows for soft shading and easy corrections. Once the form is set, you can use fine-liner pens to add detail to the stripes and fur texture.
How do I make the chipmunk look like it is holding food?
Draw a small, rounded shape between the front paws to represent a nut or seed. Ensure the cheeks look slightly distended, as chipmunks store food in their large cheek pouches.
How do I draw the stripes accurately?
Start by drawing light guidelines along the back to ensure the stripes follow the curve of the body. Use a darker pencil to fill in the stripes, making them slightly thicker in the middle and tapering at the ends.
What is the best way to draw the feet?
Chipmunks have four toes on their front feet and five on their back feet. Keep the feet compact and tucked close to the body to maintain the animal's natural, huddled posture.
How do I create the illusion of fur?
Avoid drawing long, continuous lines. Instead, use short, overlapping dashes that follow the direction of the fur growth from the head toward the tail.
This answer was created with the help of AI research tools and reference sources. Spotted an error? Let us know — we correct mistakes quickly. See our editorial policy.